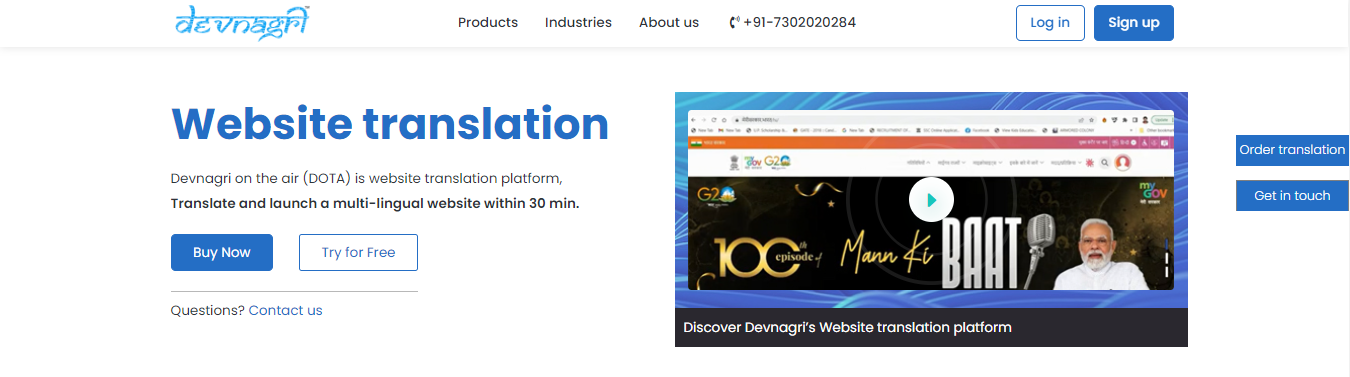
# DOTA Web
Devnagri On the Air is a platform that translates your website on the fly.
The platform enables your website to go multilingual in minutes with minimal effort. You don't need to change anything at the code or infrastructure level. Its just a plug and play solution to go multilingual.
Devnagri On The Air makes your multilingual journey quick and easy.
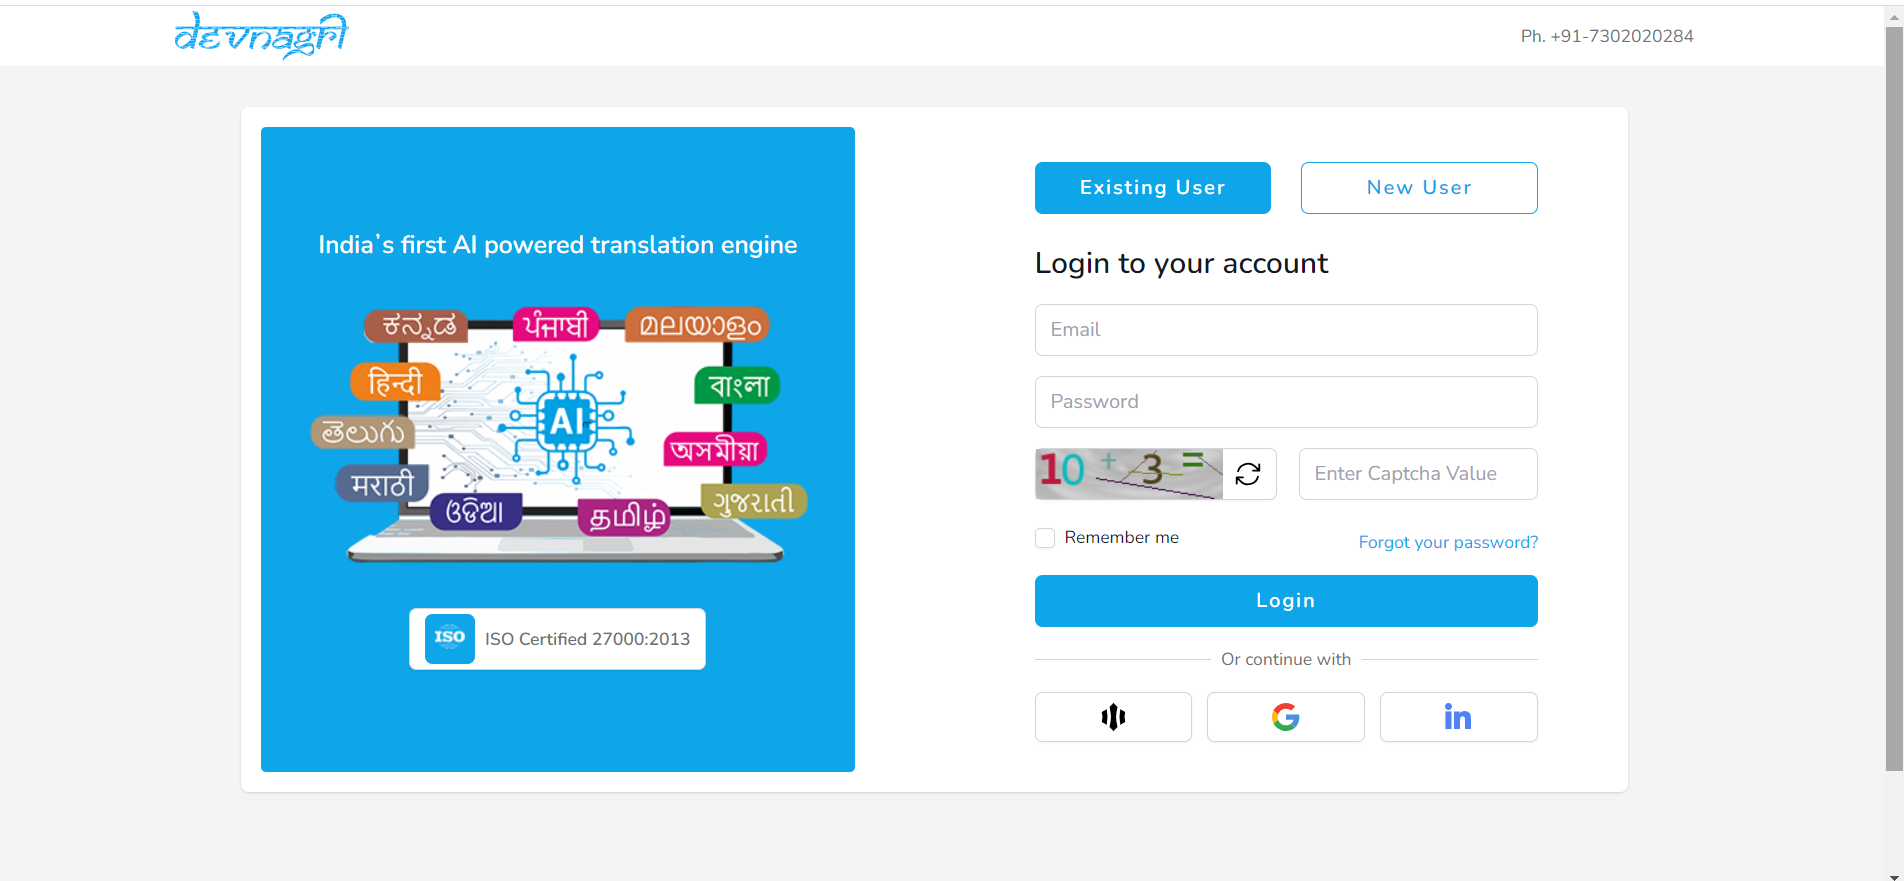
# Login Page
The user must input the login credentials, then click on the "Log In" button.
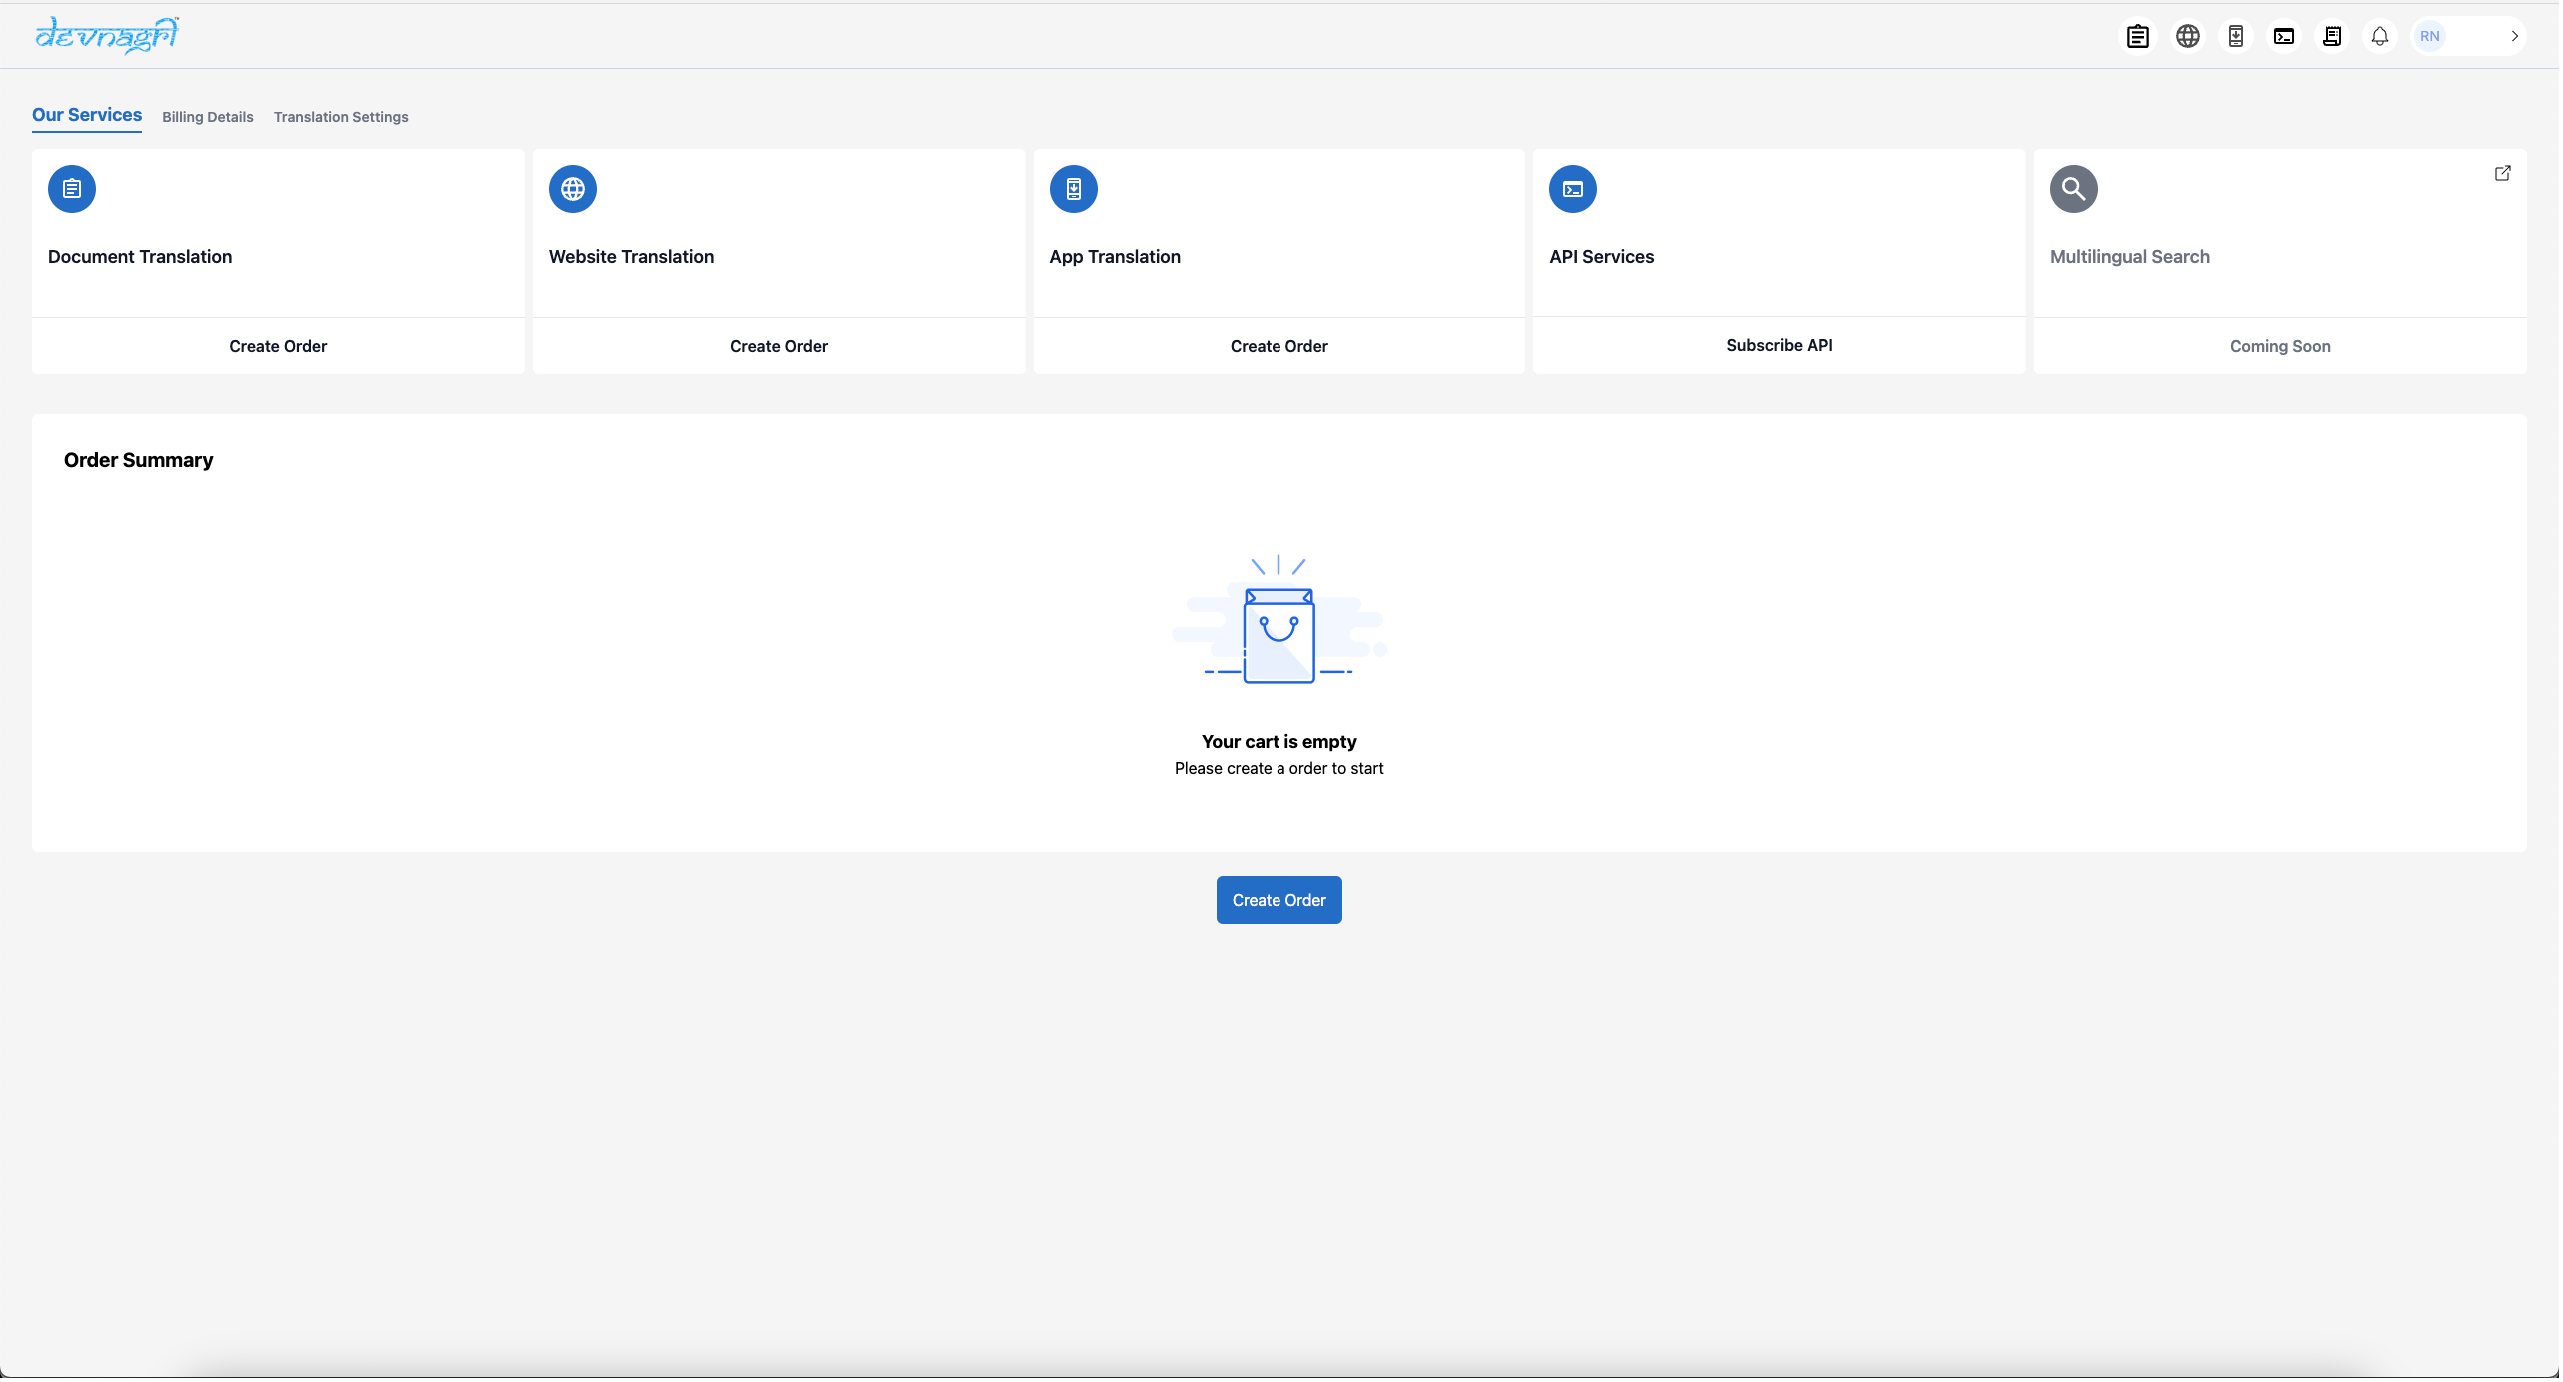
# User Dashboard
Once logged in, the user will be directed to their dashboard, where they can opt to initiate a new Website Translation order.
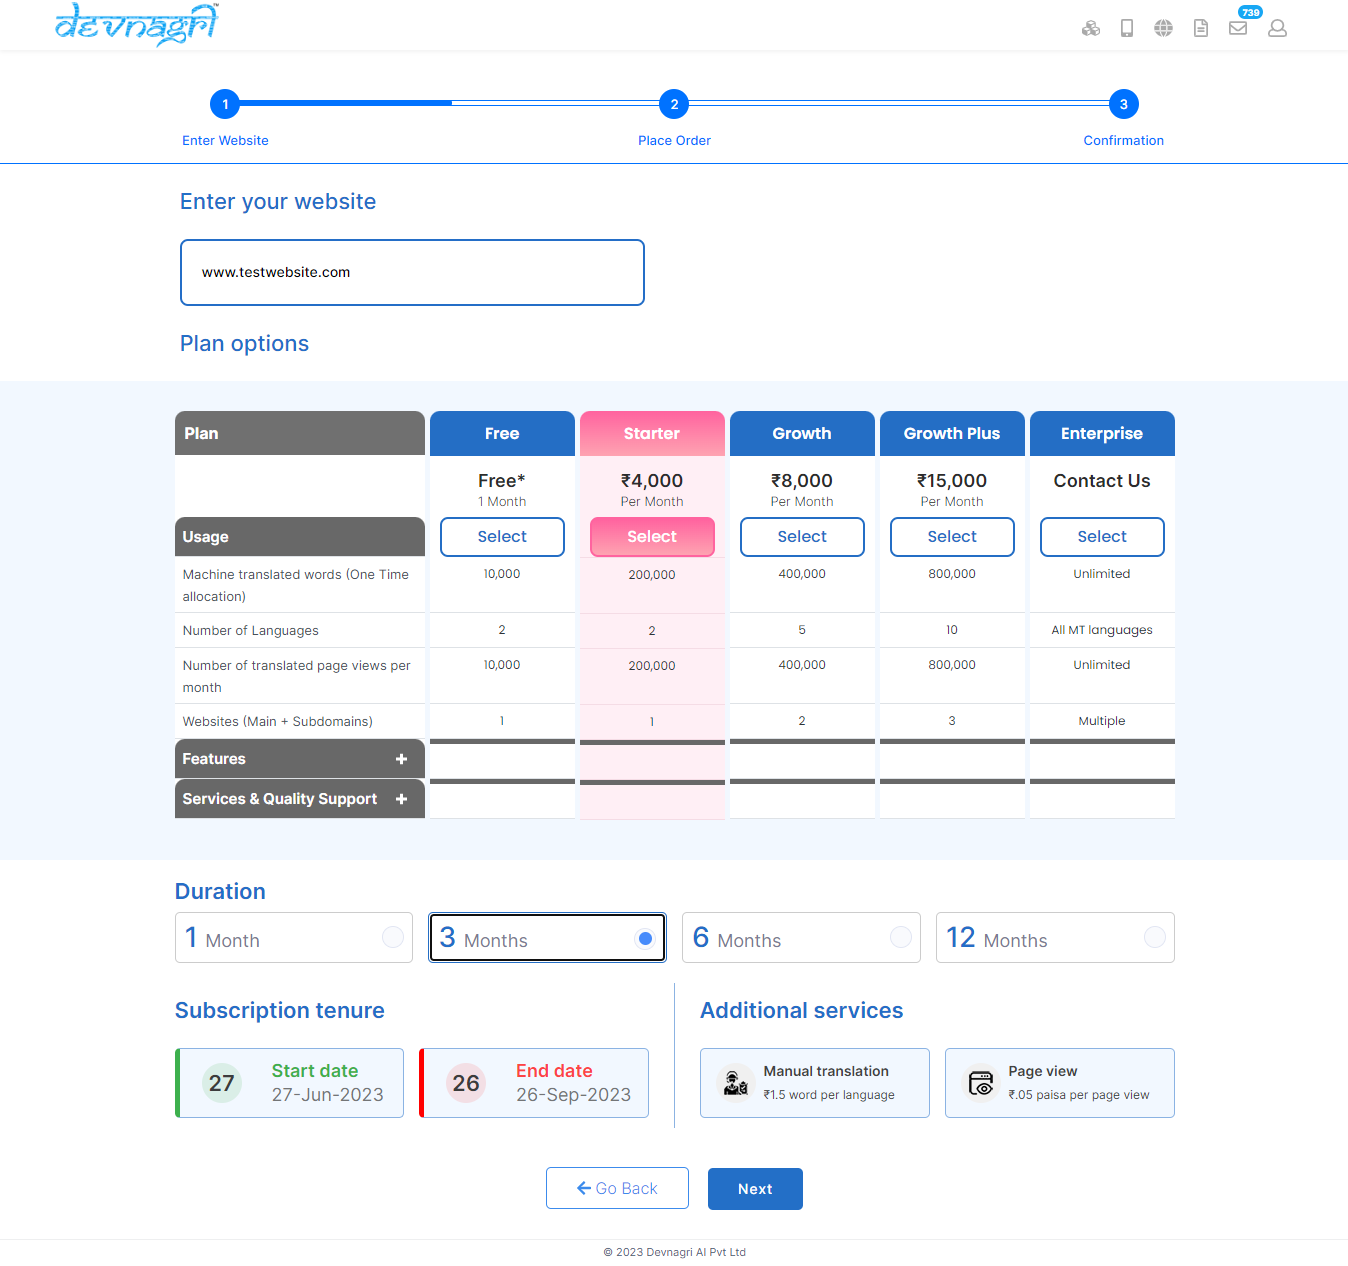
# New Order on DOTA
- Enter the URL of the website which needs to be localised.
- Select the pricing plan.
- Select the duration.
# Order Summary
On the Order Summary page, a user can select the languages for website localization and specify the industry to tailor translations for industry-specific terms. Please do note that you can add languages later on as well.
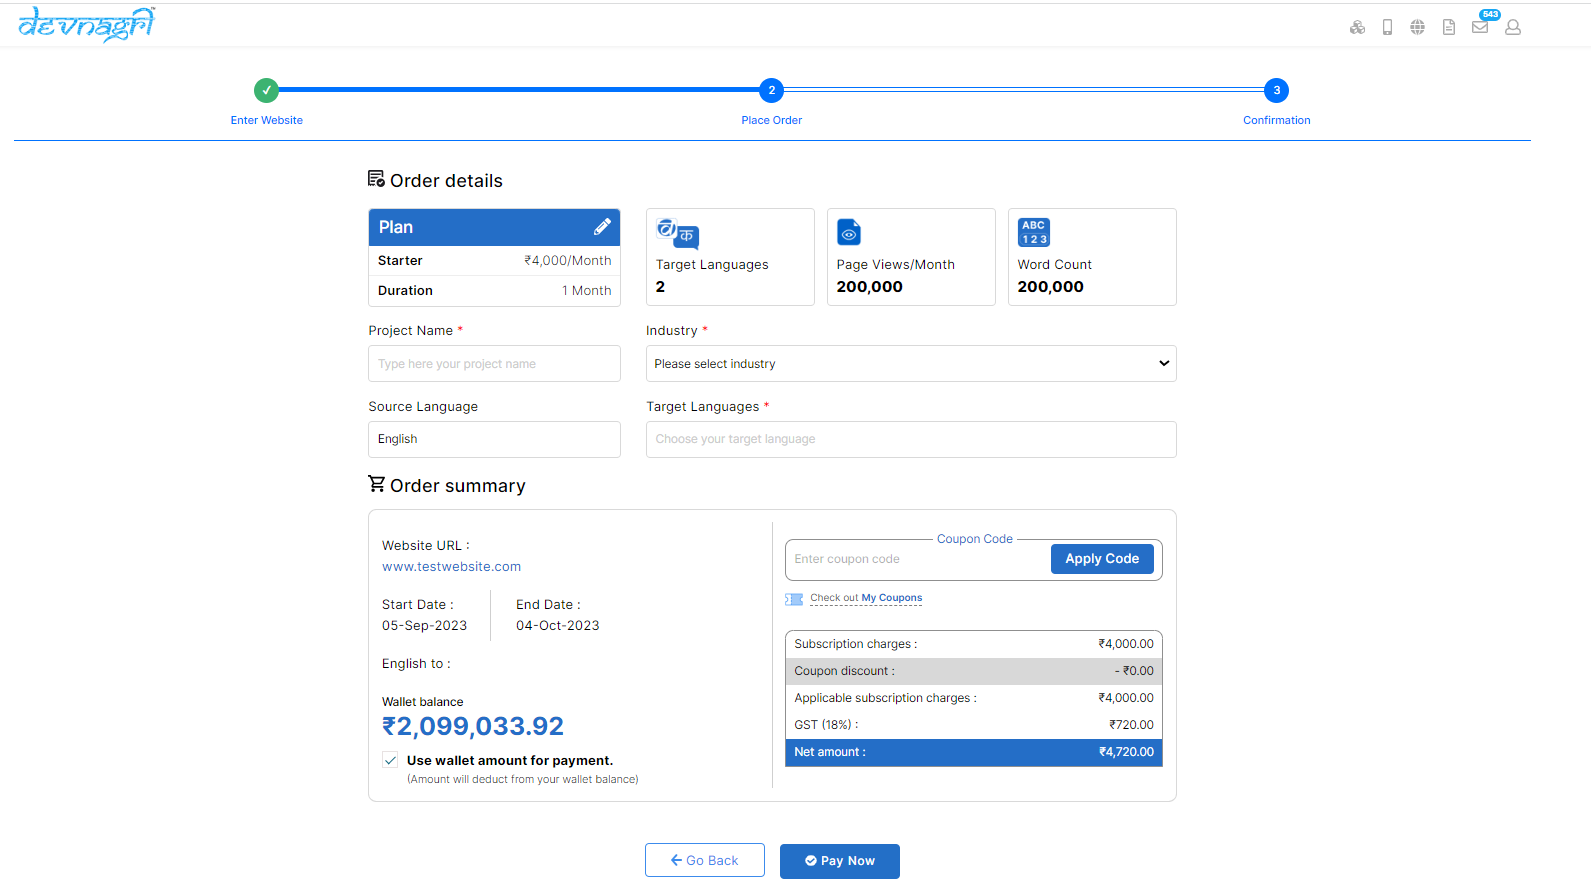
# Payment
If user has existing balance in their wallet, the order will be confirmed, and they will be redirected to the "Verify Website Ownership" page. Alternatively, if the user does not have balance in their wallet, they will be redirected to the payment gateway, where they can select a preferred payment method to complete the transaction and confirm the order.
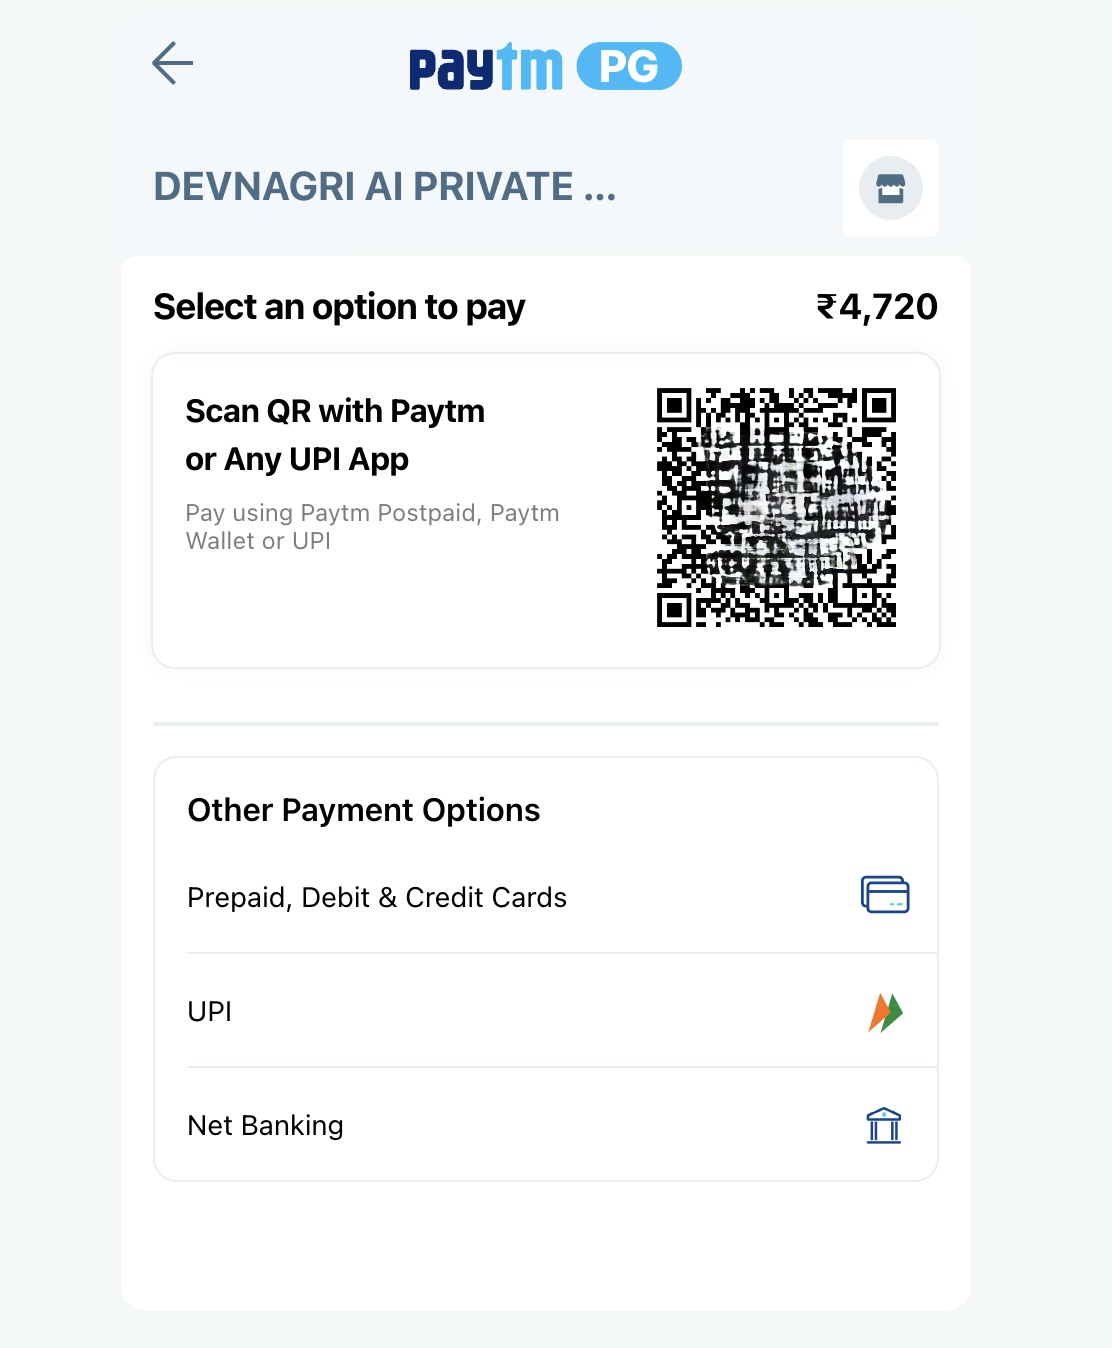
After the order is confirmed, the user will be redirected to the "Verify Website Ownership" page.
# Verify Website Ownership
Sign in to your domain name service provider and add the generated TXT record generated for your domain into your DNS Configuration (opens new window).
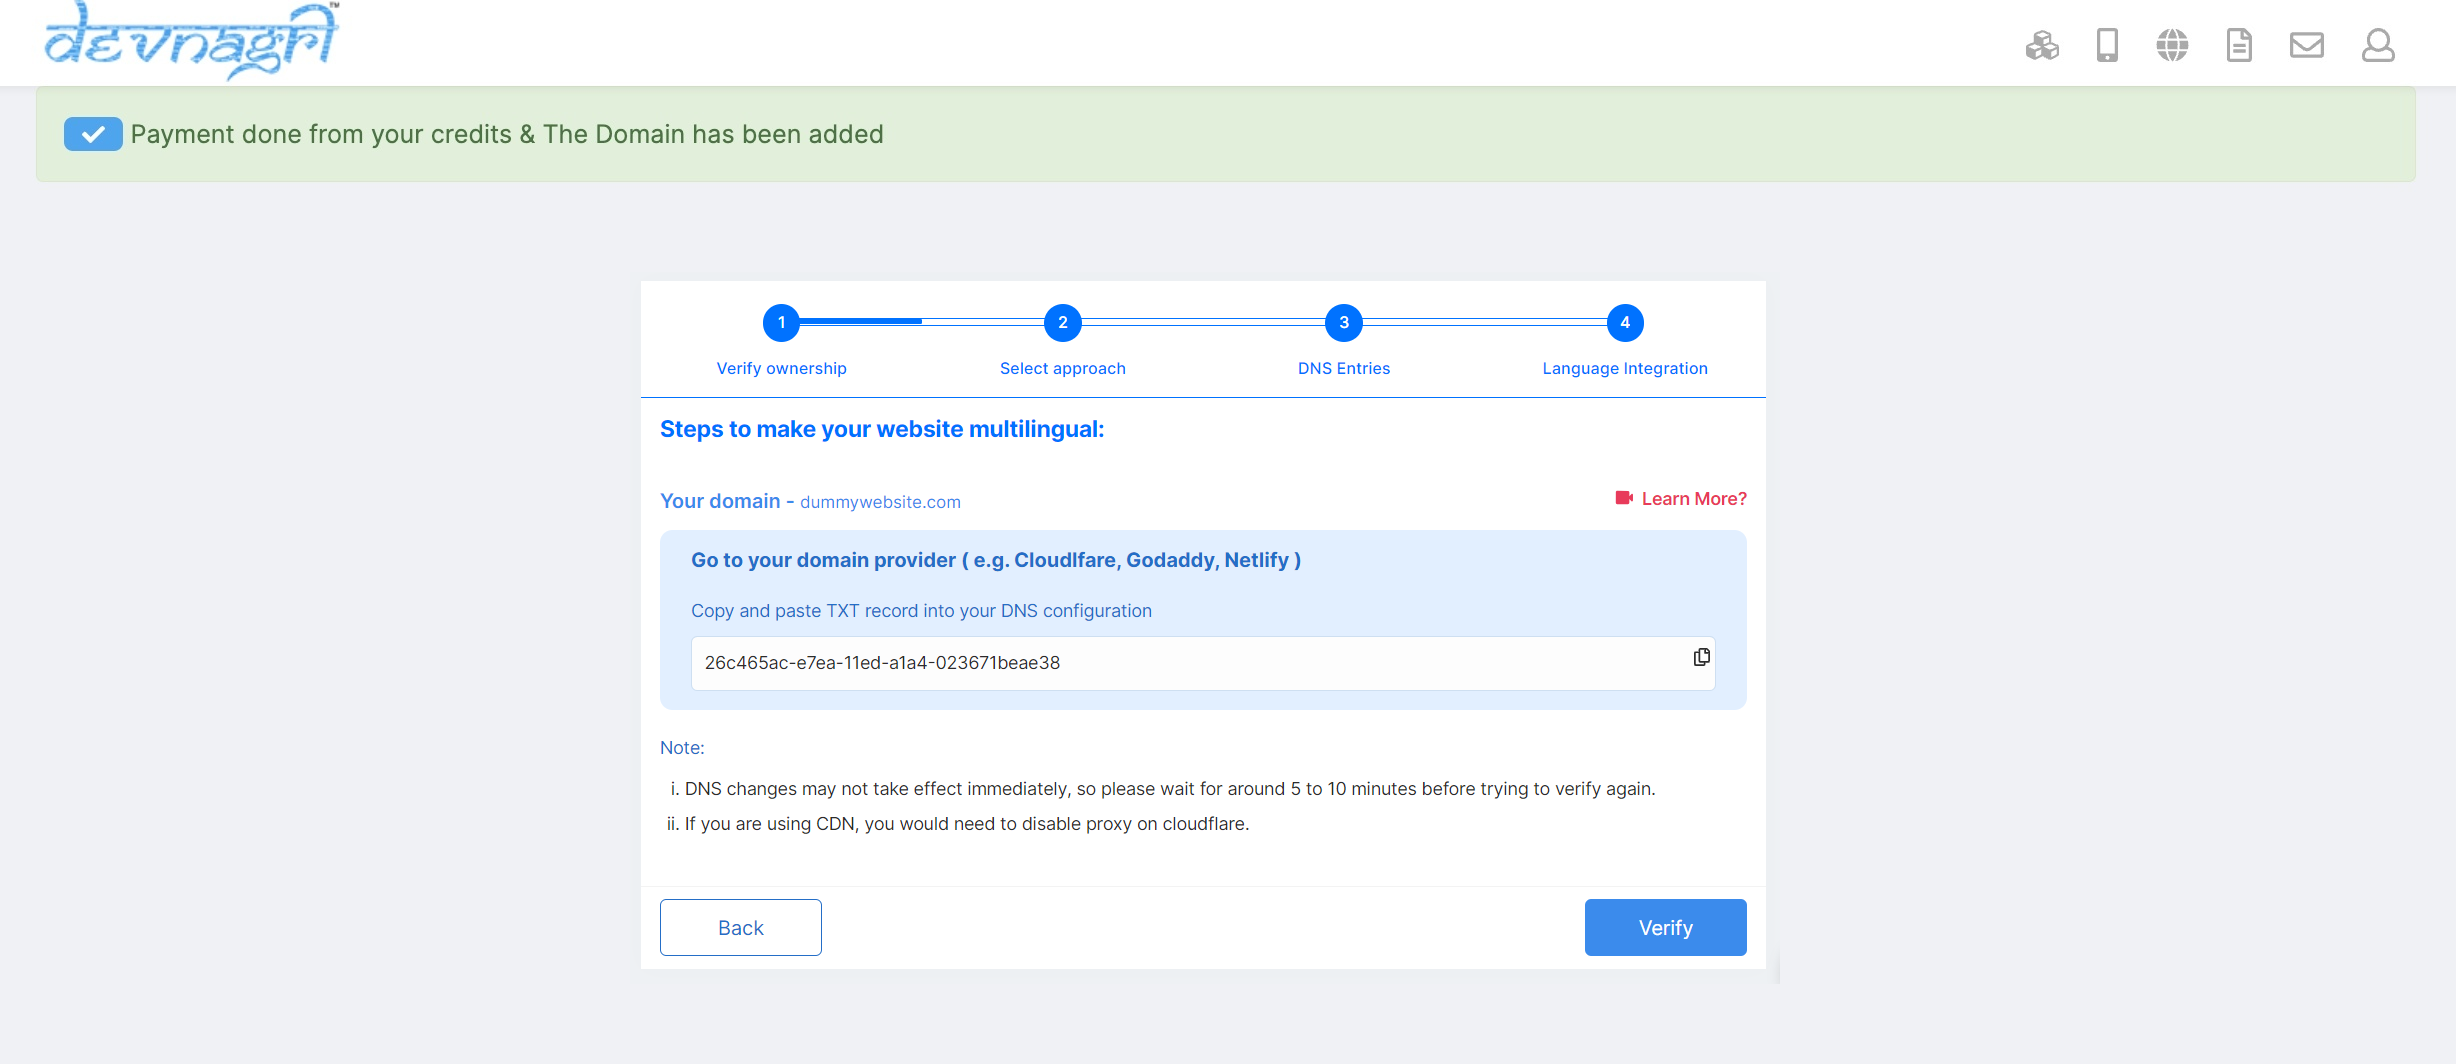
Click on verify and then it will take up sometime to verify the txt record.
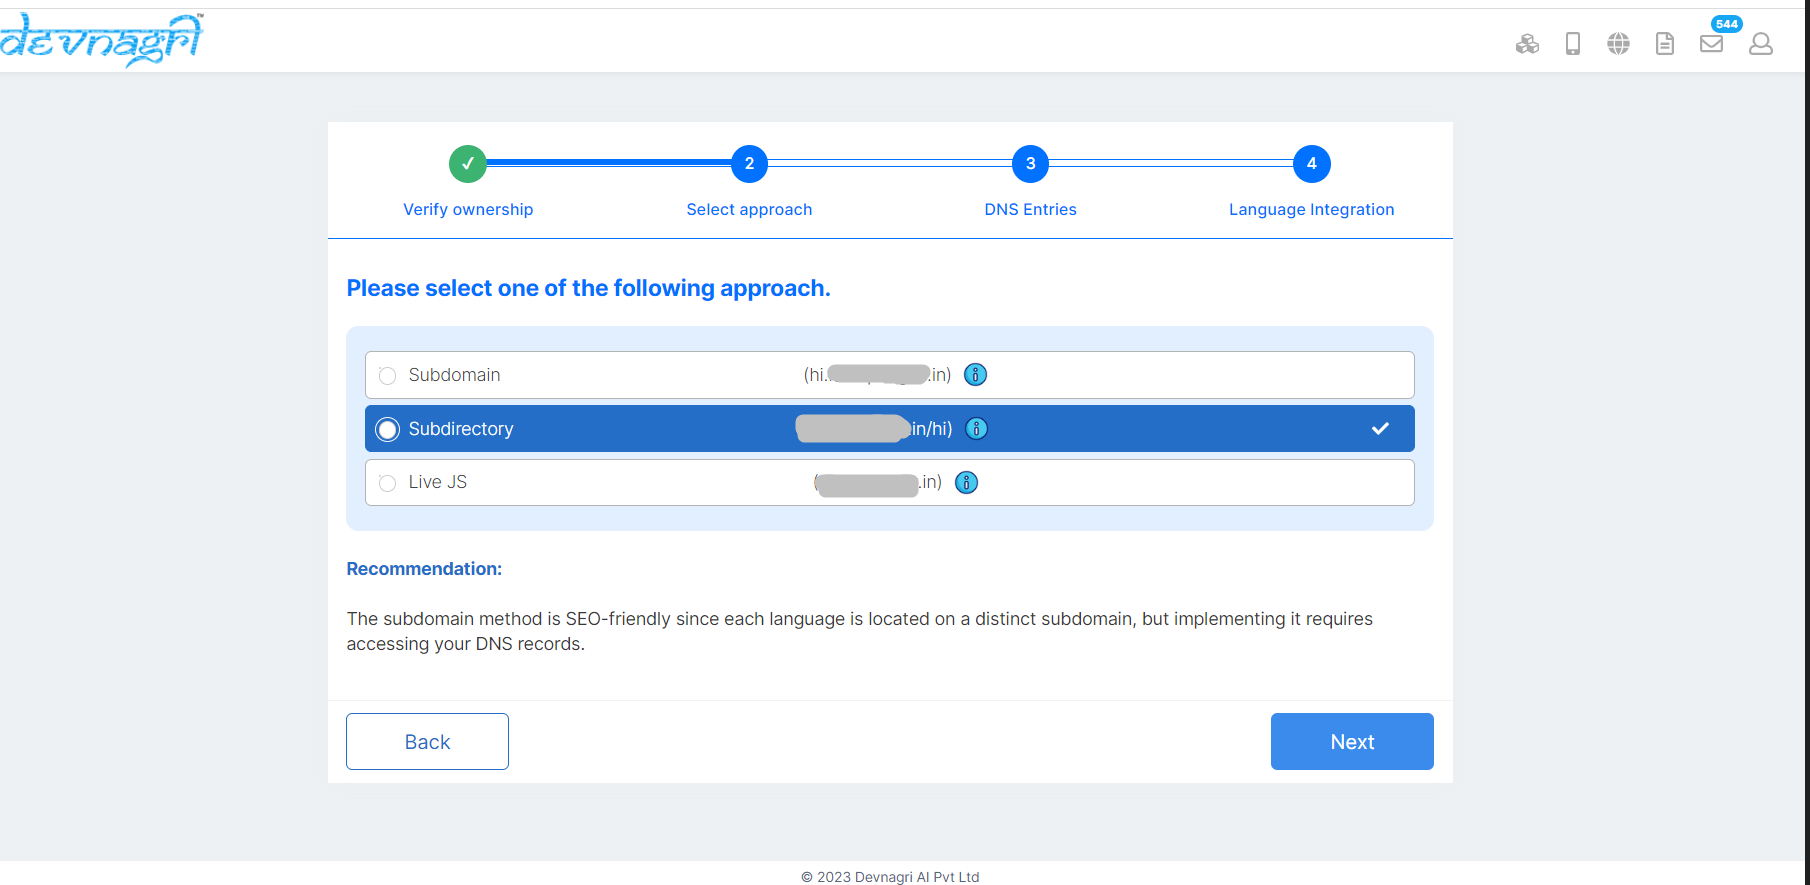
# Select approach
- Subdomain (hi.example.com)
- Subdirectory (example.com/hi)
- Live JS (example.com)
# 1. Subdomain
Step 1.
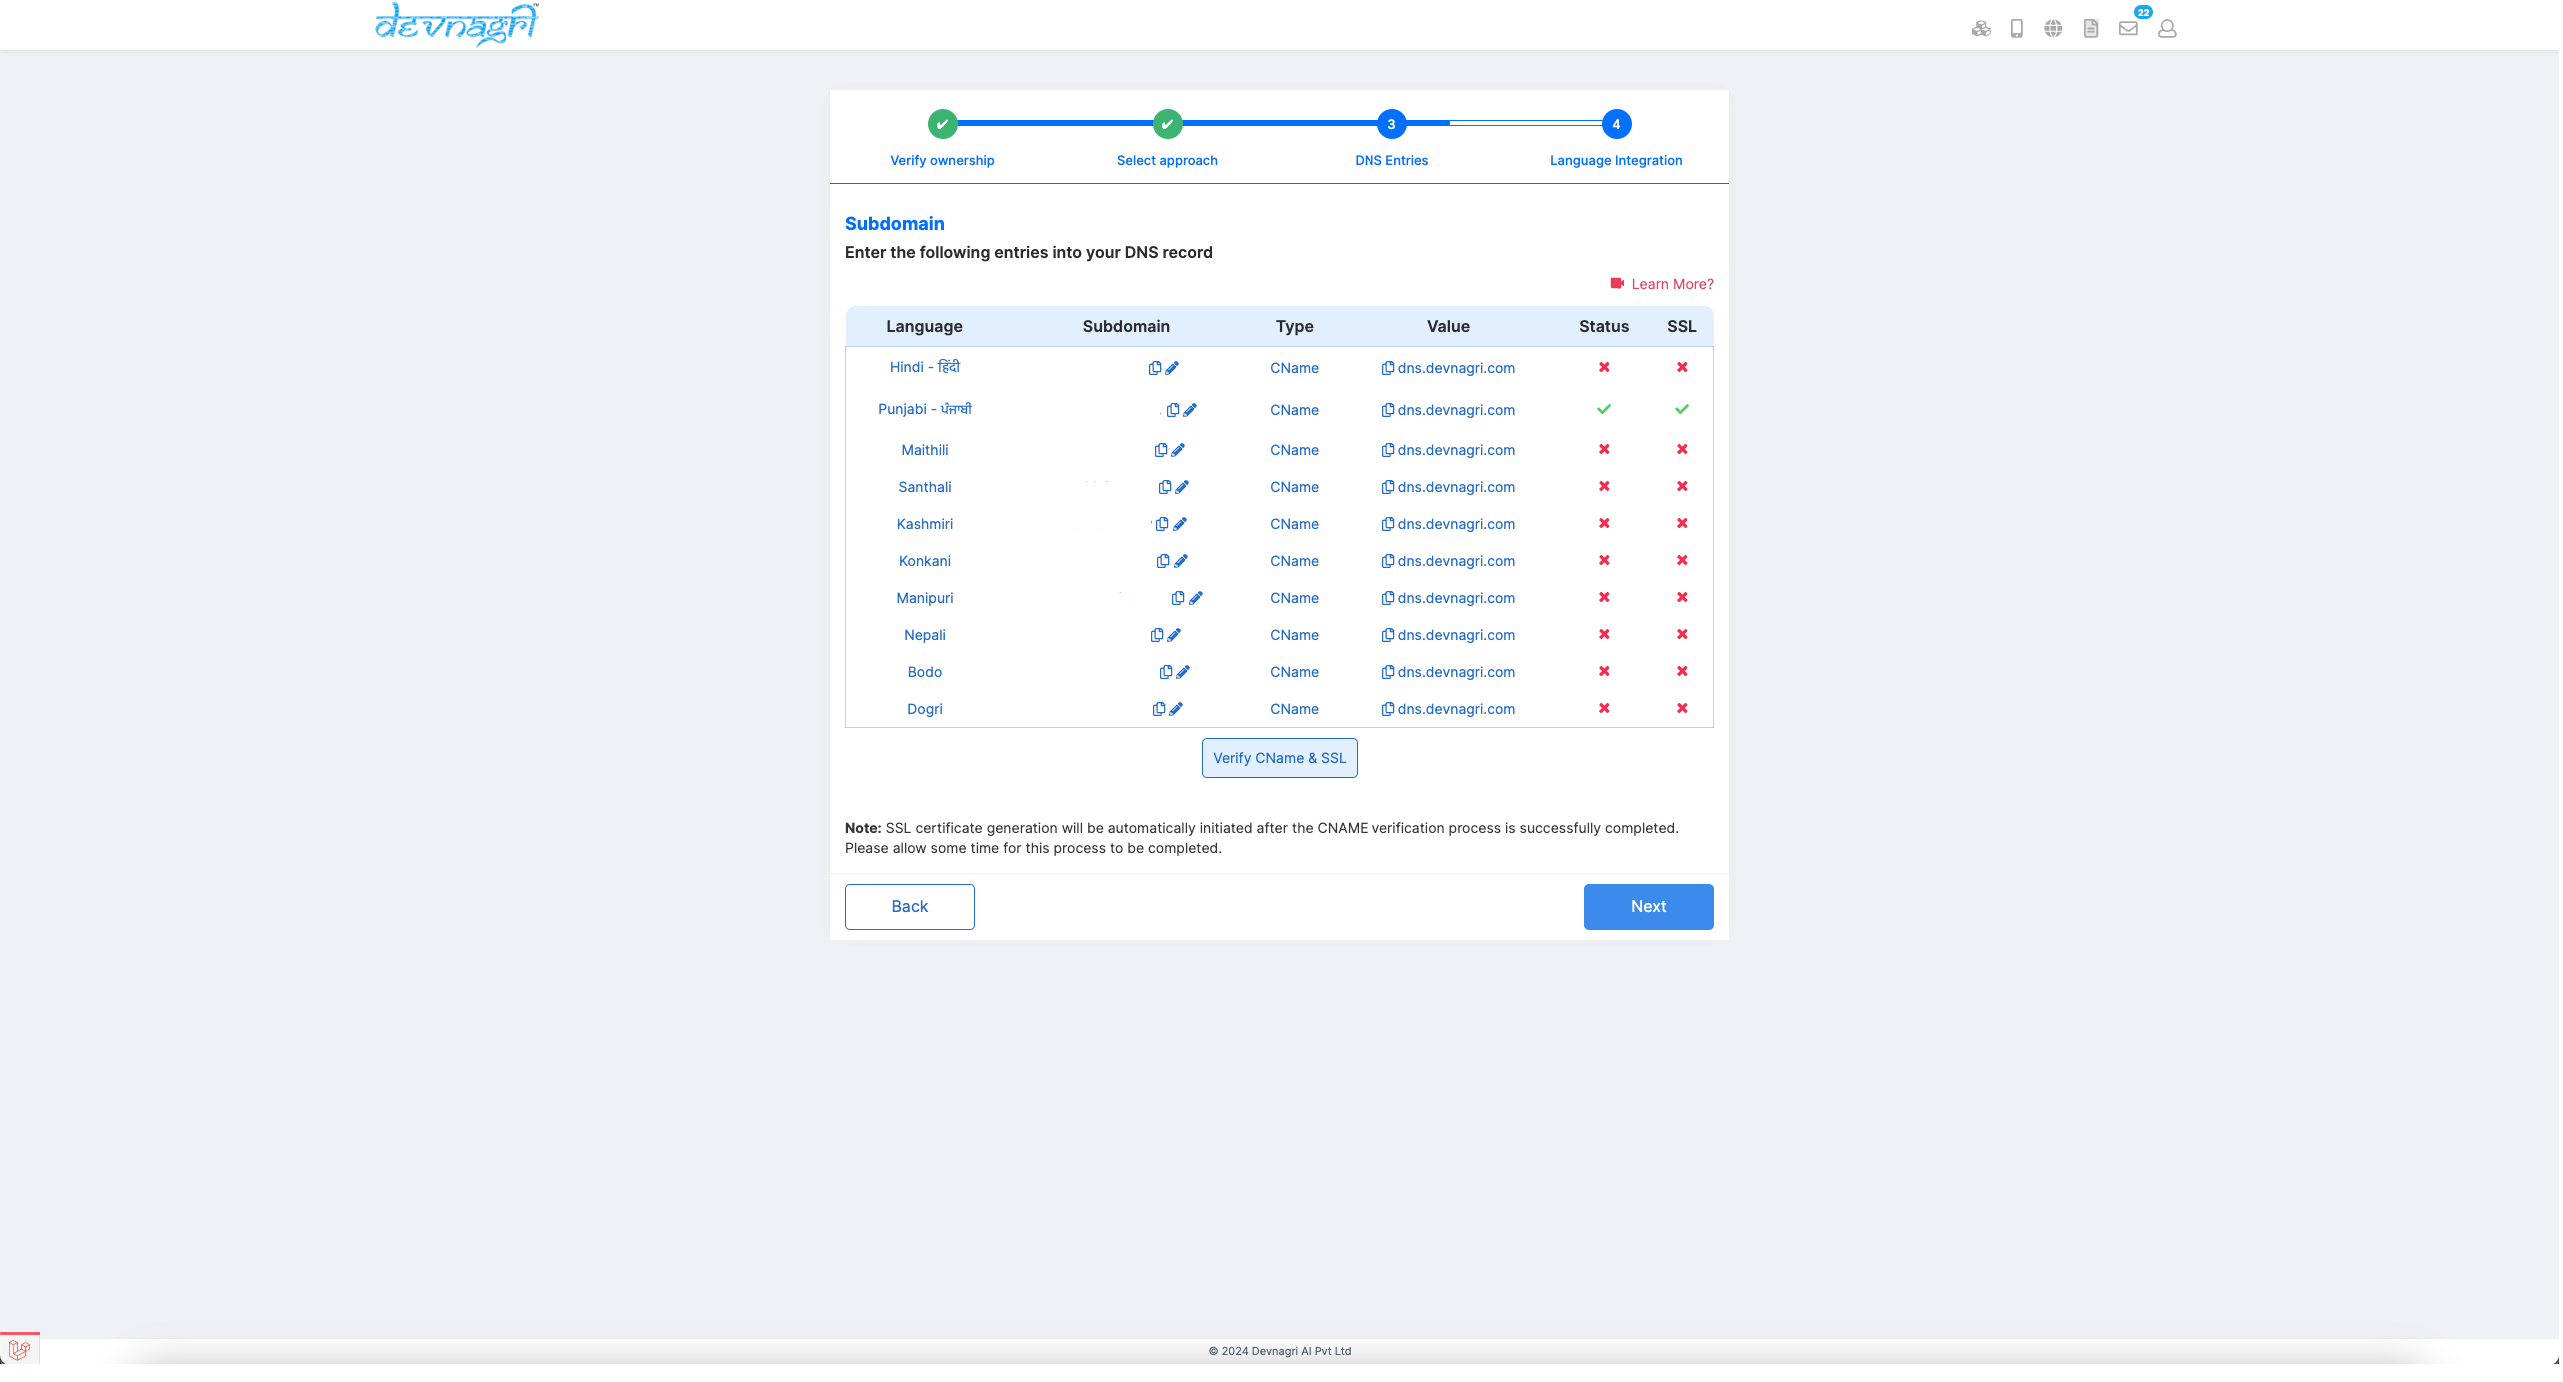
a. Please enter the CNAME record generated for the website URL in your DNS.
Note: If you are using CDN, you need to disable proxy setting on Cloudflare.
If you are using GoDaddy or Cloudflare you can see how to do it in the videos below:
GoDaddy (opens new window)
Cloudflare (opens new window)
Click on Verify CNAME and post verification both the red crosses will turn into green ticks after a few minutes.
Devnagri is currently initializing your subdomains and generating SSL certificates for the subdomains. Please be patient while the process completes.
Step 2.
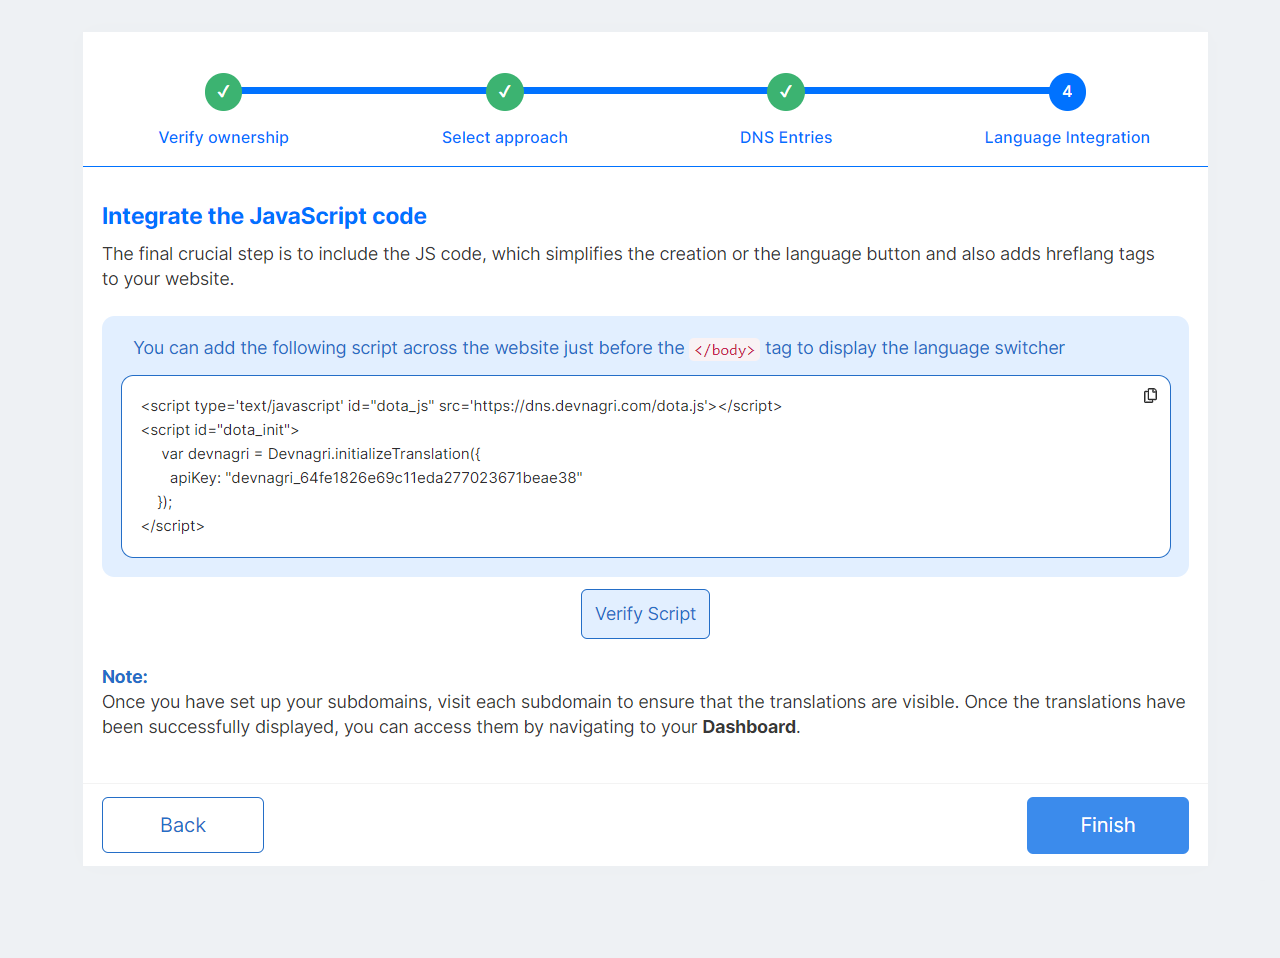
It is recommended that you include the Javascript code snippet immediately before your closing body tag. This will enable the language switcher to appear on your source website, as well as add hreflang tags to notify Google of the different variations of the same page and prioritize indexing of these pages. This is particularly beneficial for your SEO efforts.
Once its done, you can click on Finish and you're done!
Step 3.
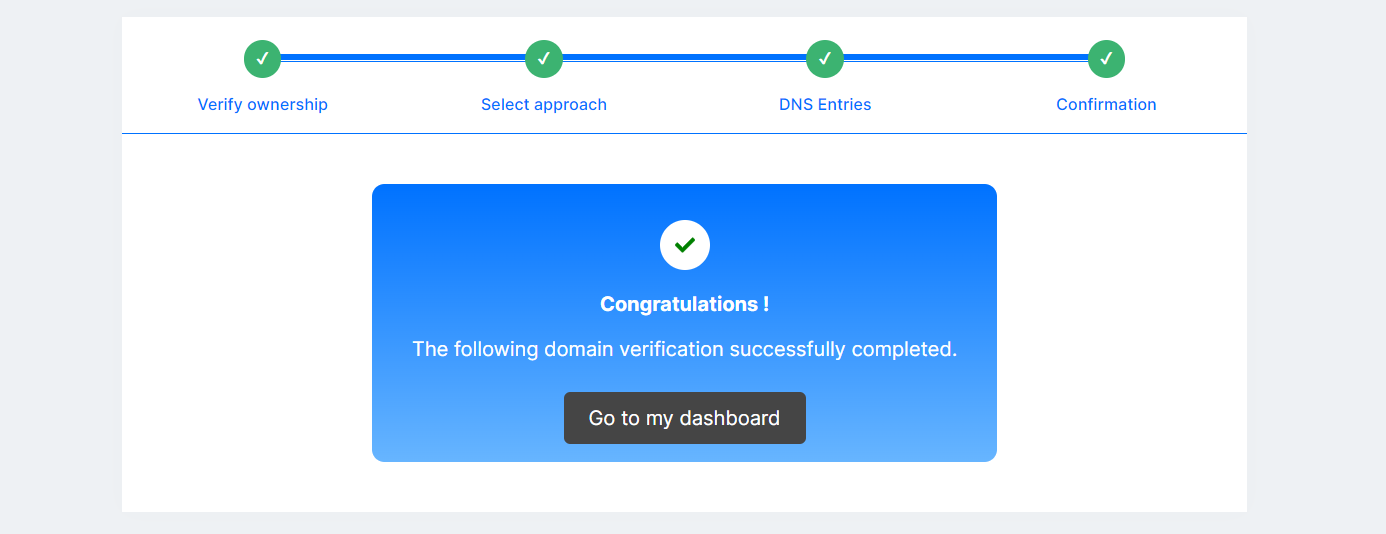
Your project has been created. Now, you can go to DOTA dashboard by clicking on Go to my dashboard.
# 2. Subdirectory
This approach involves creating a new subdirectory for each language version of your website. For example, if your main website is www.example.com, the Hindi version could be www.example.com/hi or www.example.com/hindi.
Step 1.

It is recommended to include Apache/Ngnix code snippet to your website server configuration.
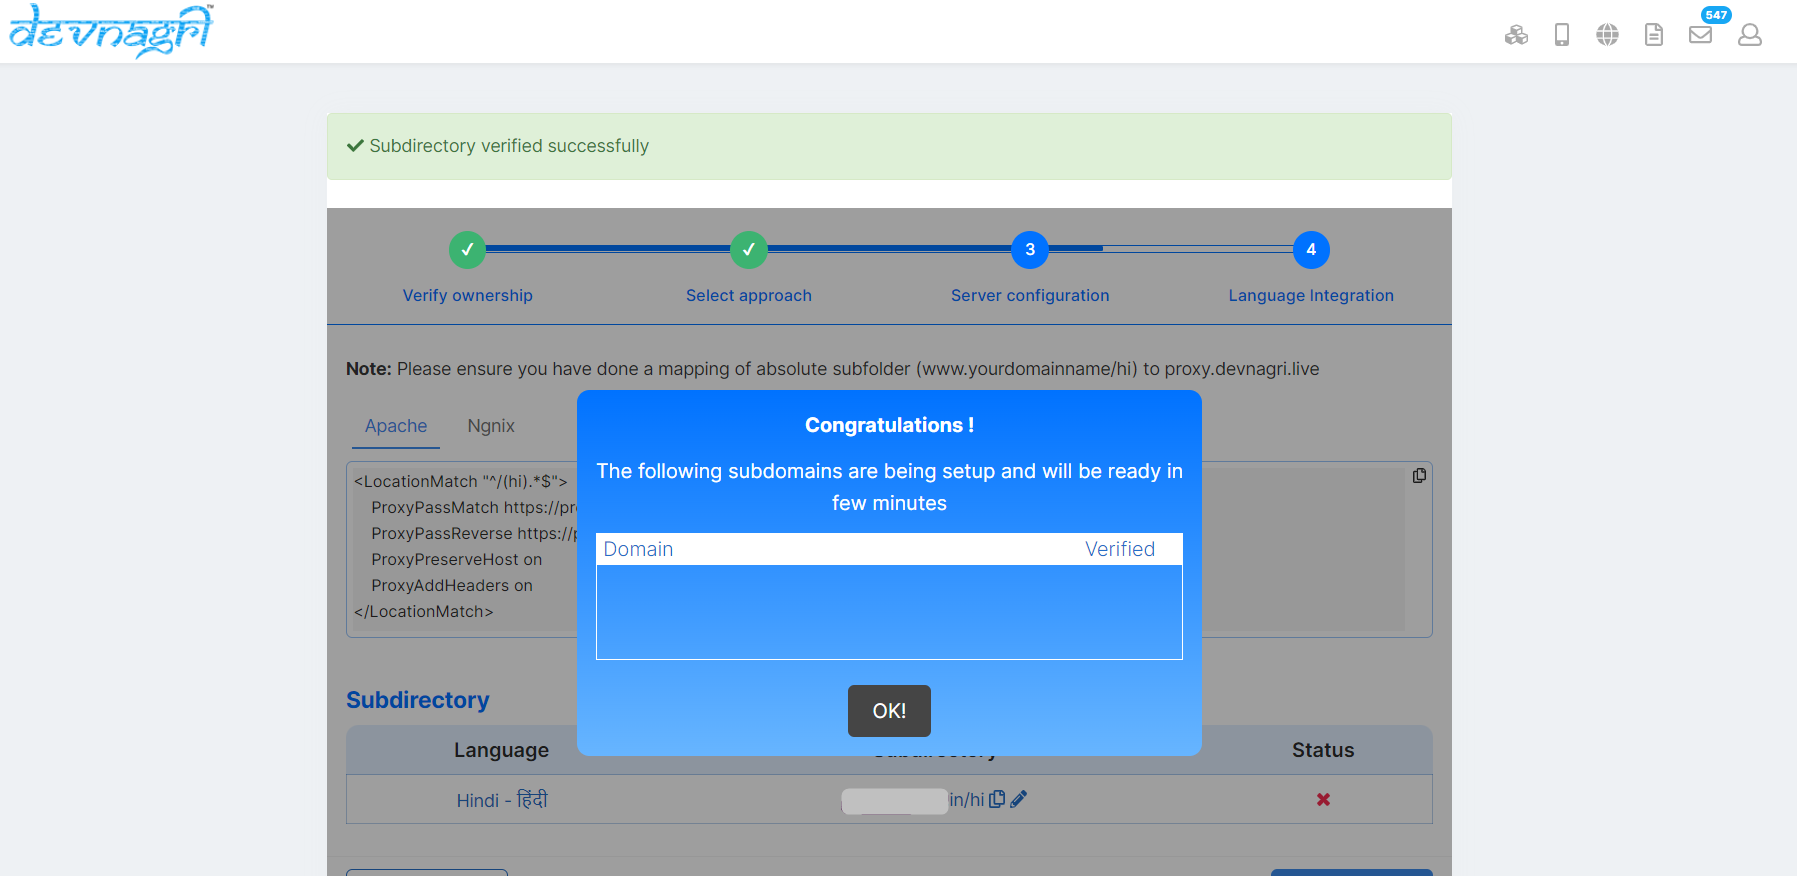
Once the mapping has been done click on Verify & Next. In order to verify server configuration for subdirectory approach.
Step 2.
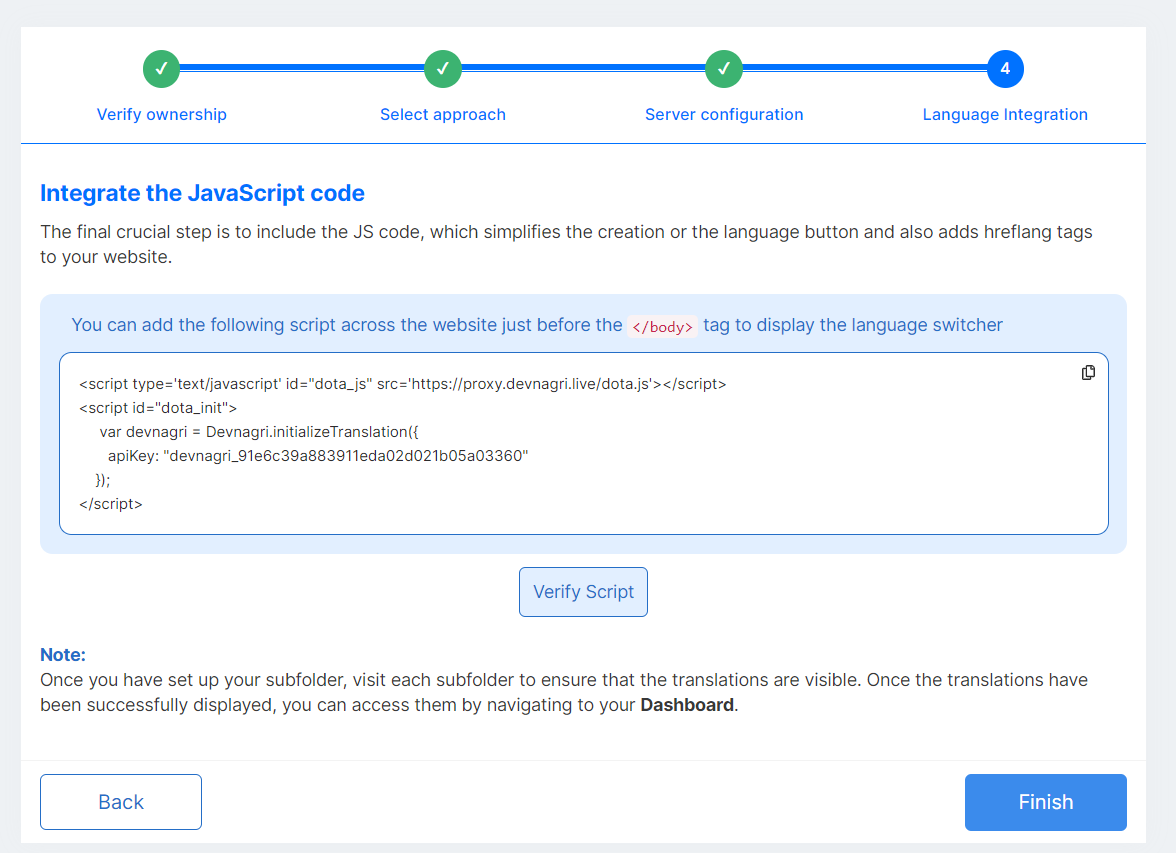
The final step is to include the JS code, which simplifies the creation of the language button and also adds hreflang tags to your website.
It is recommended that you include the Javascript code snippet immediately before your closing body tag.This will enable the language switcher to appear on your website.
Once its done, you can click on Finish and you're done!
# 3. Live JS
Step 1.
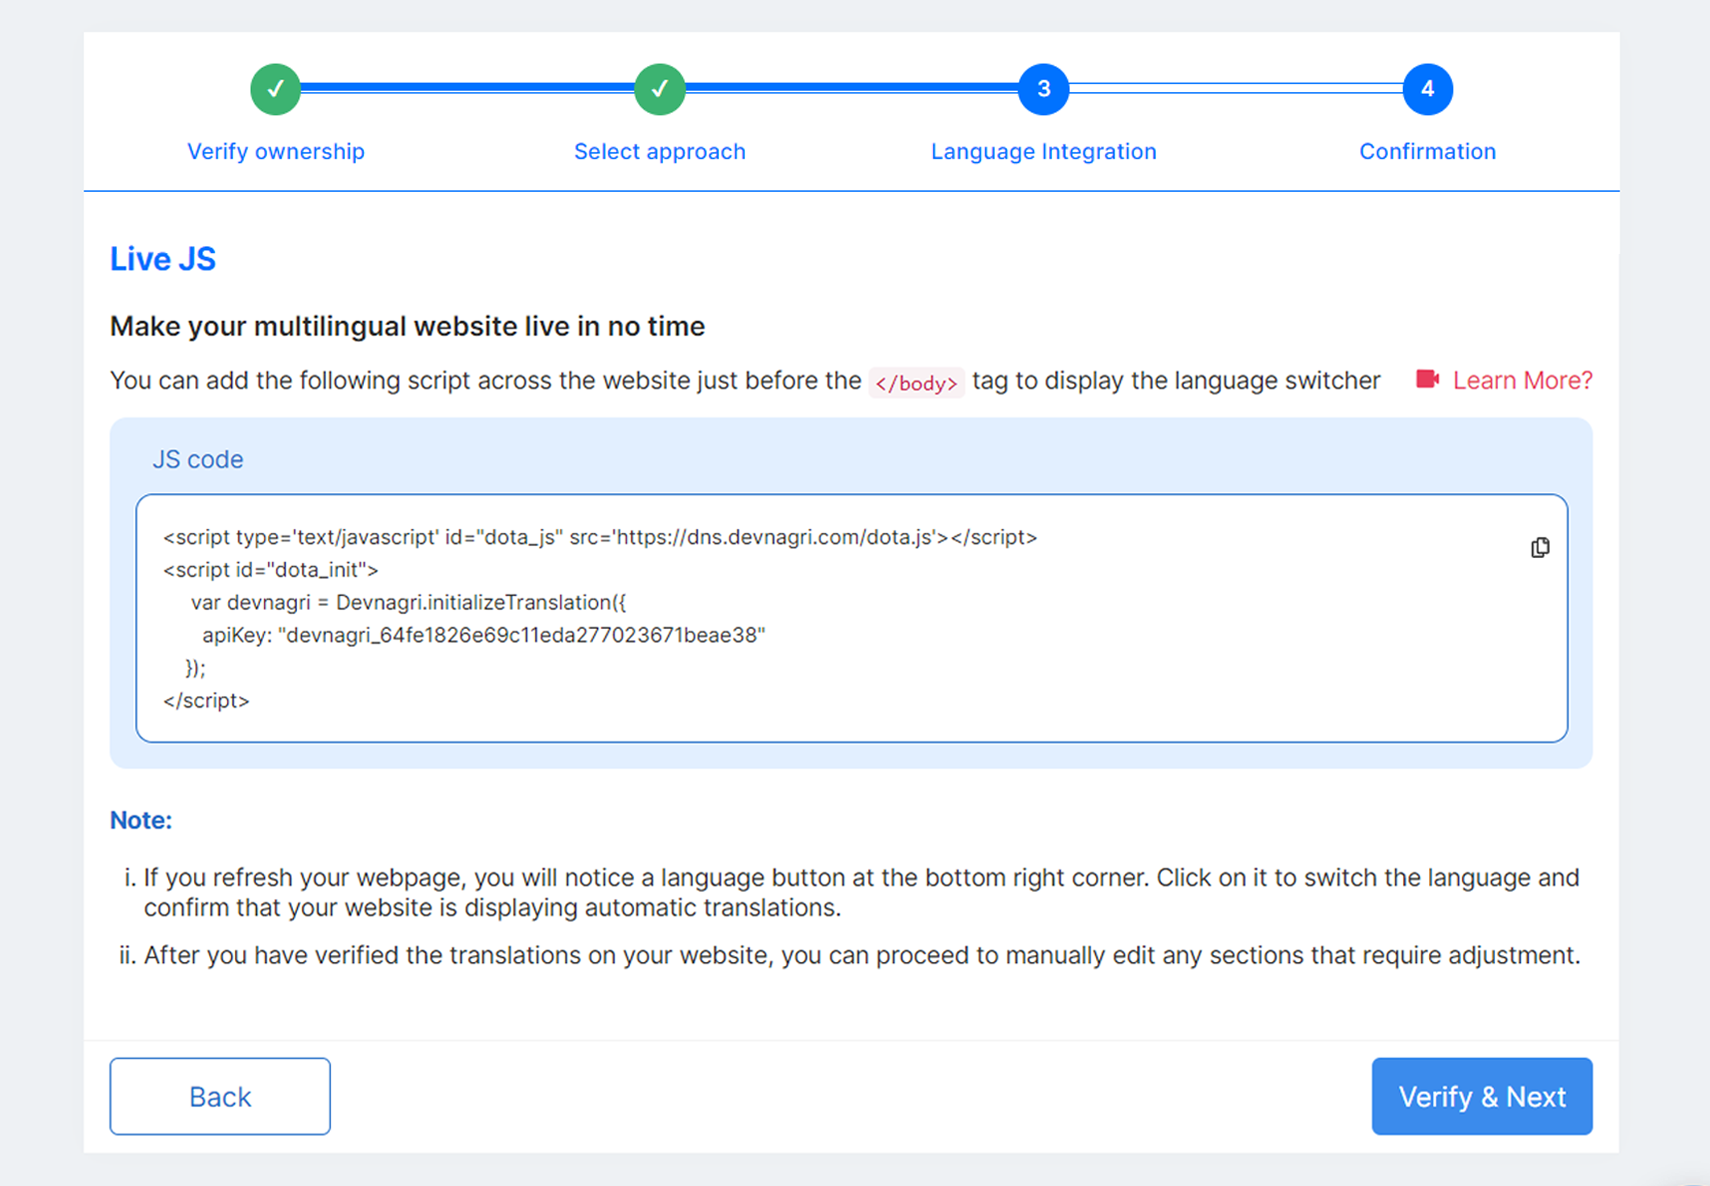
You're welcome to adhere to the guidelines and include the Javascript code snippet immediately before your closing body tag. This will enable the language switcher to appear on your website.
Step 2.
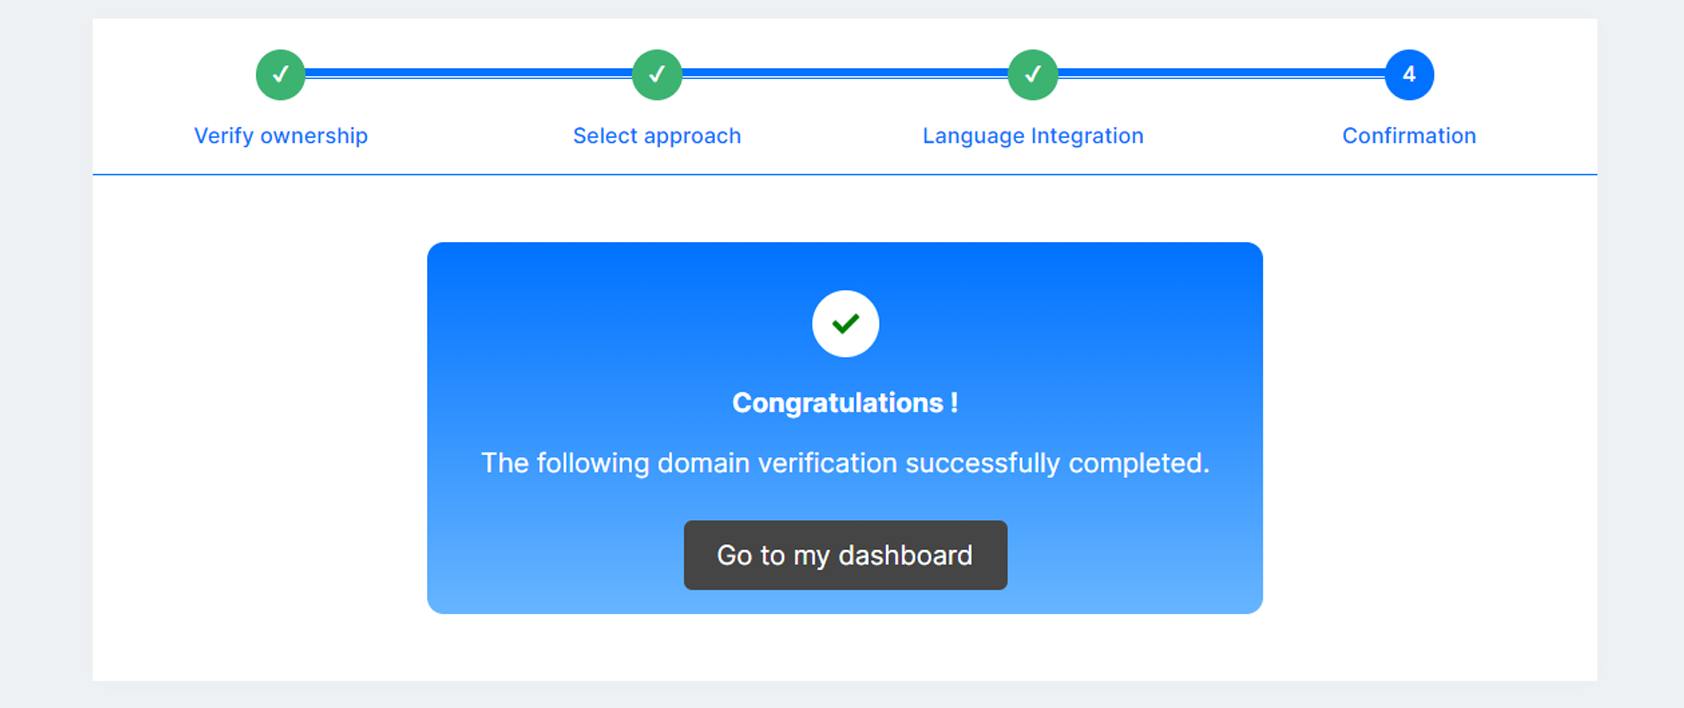
Your project has been created. Now, you can go to DOTA dashboard by clicking on Go to my dashboard.
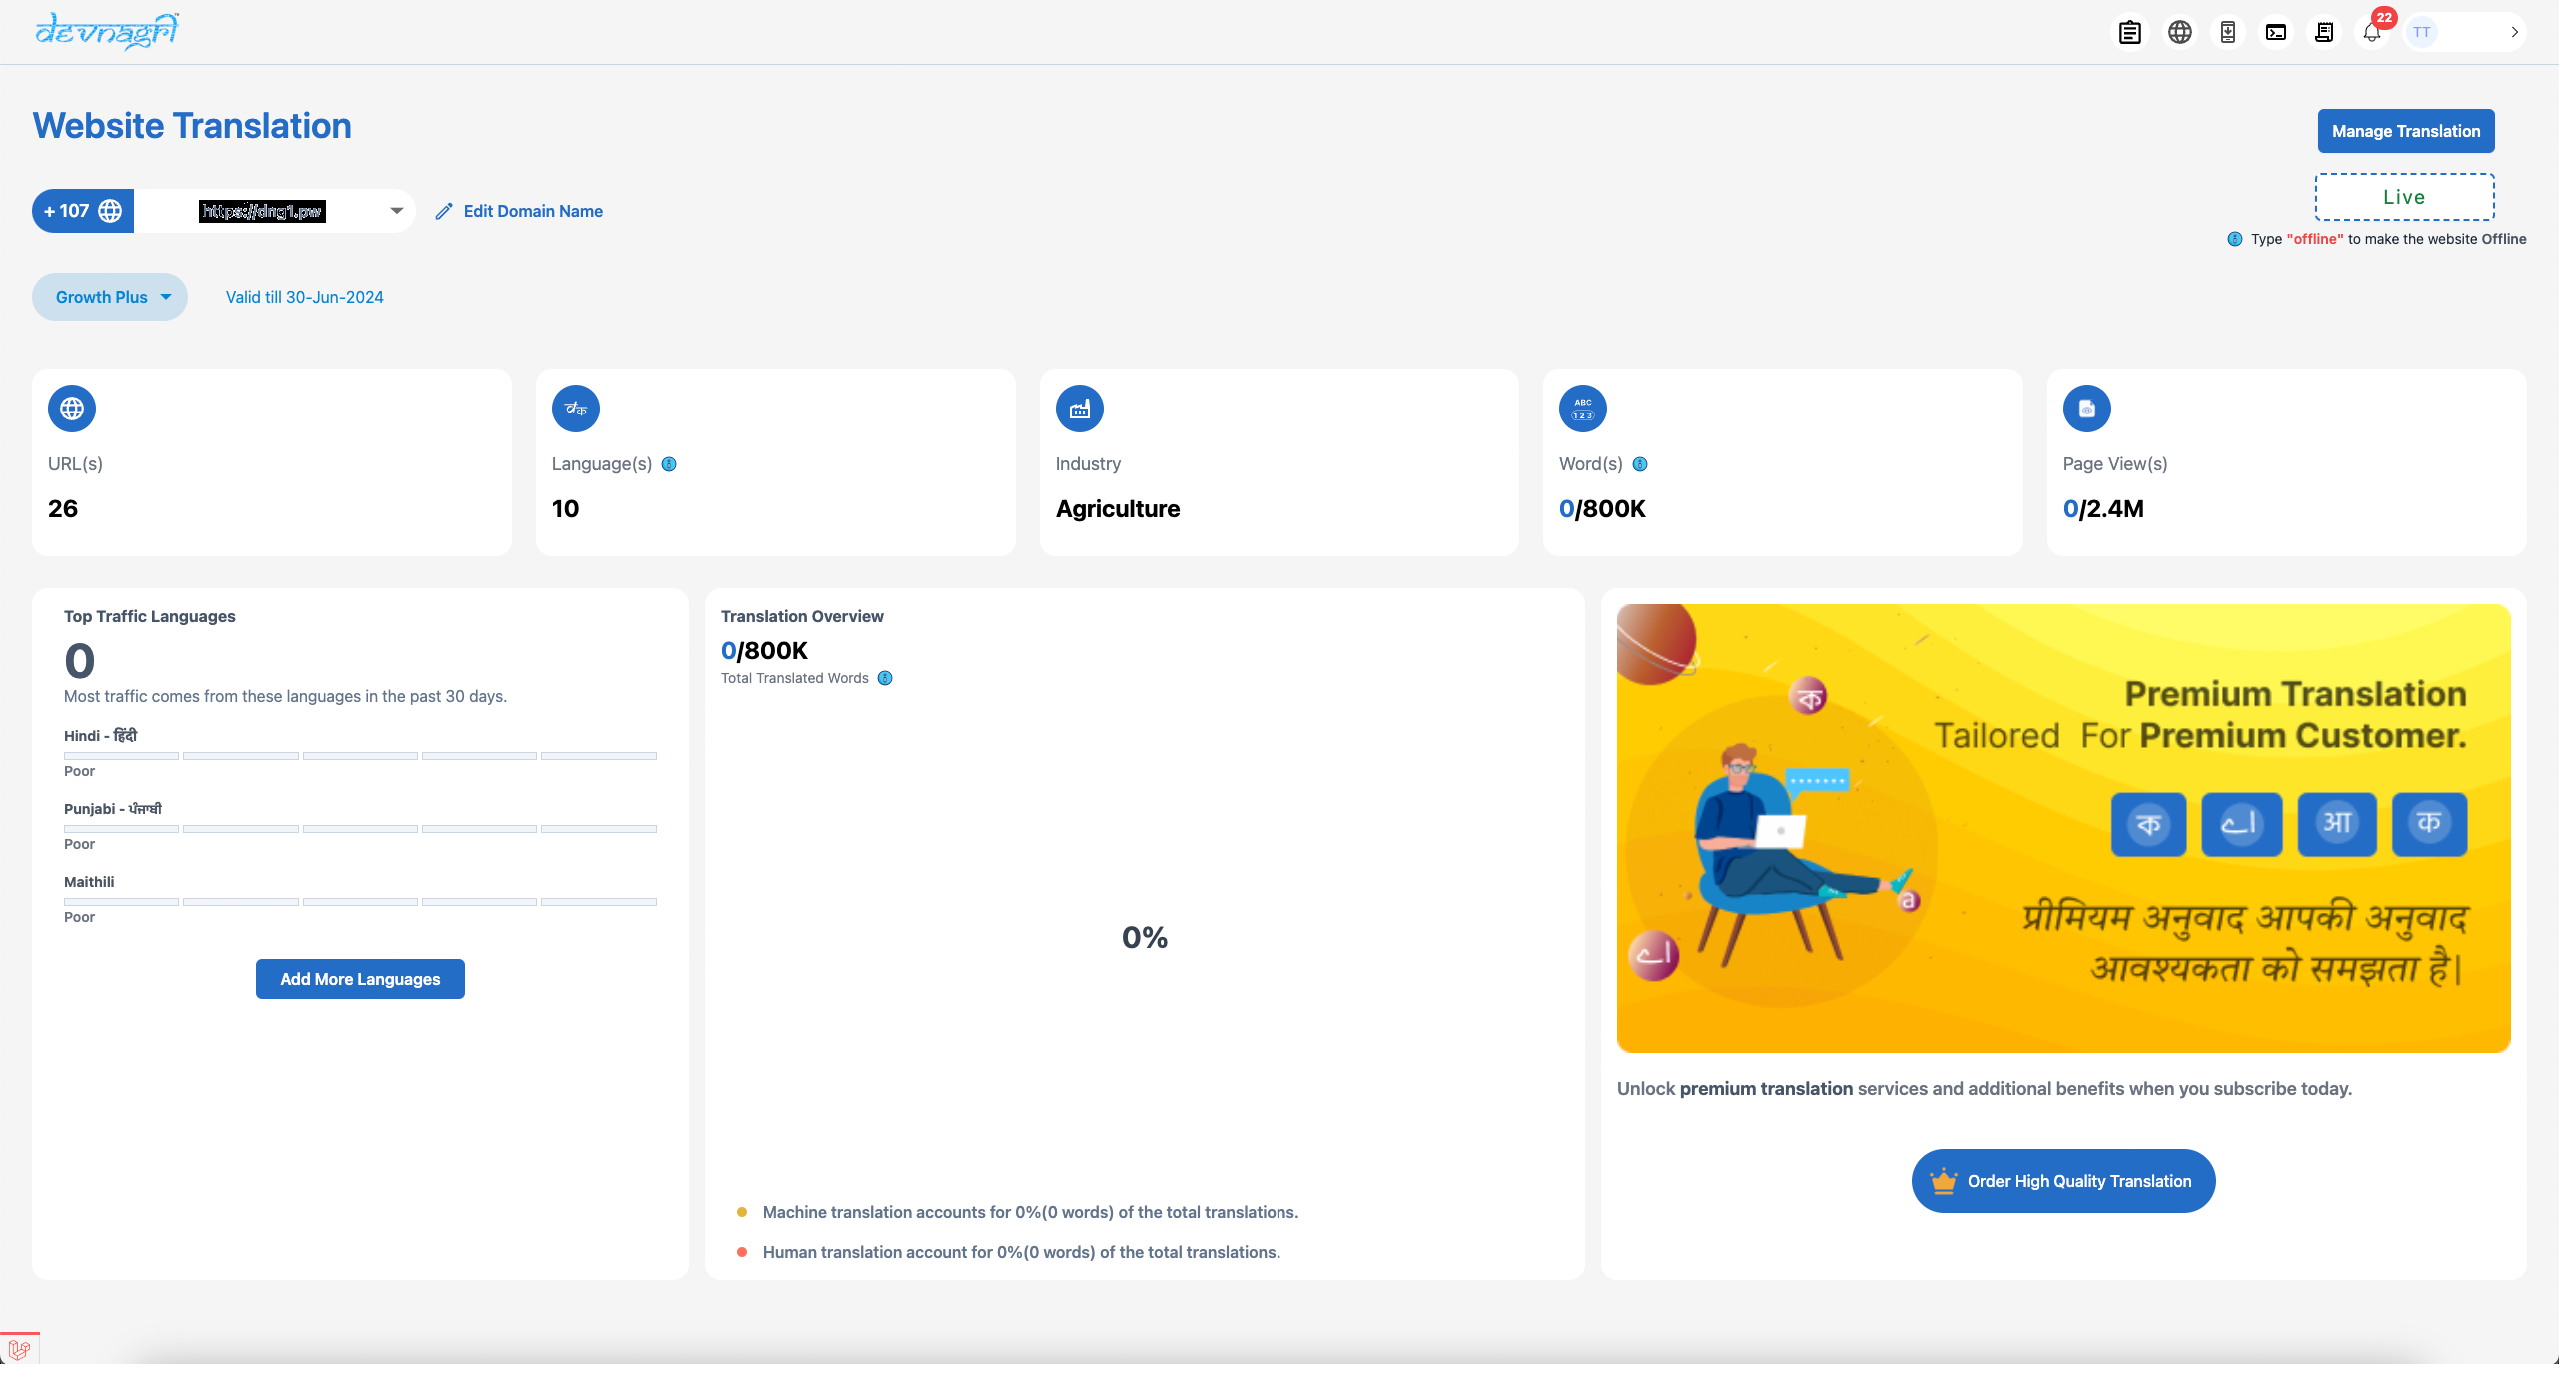
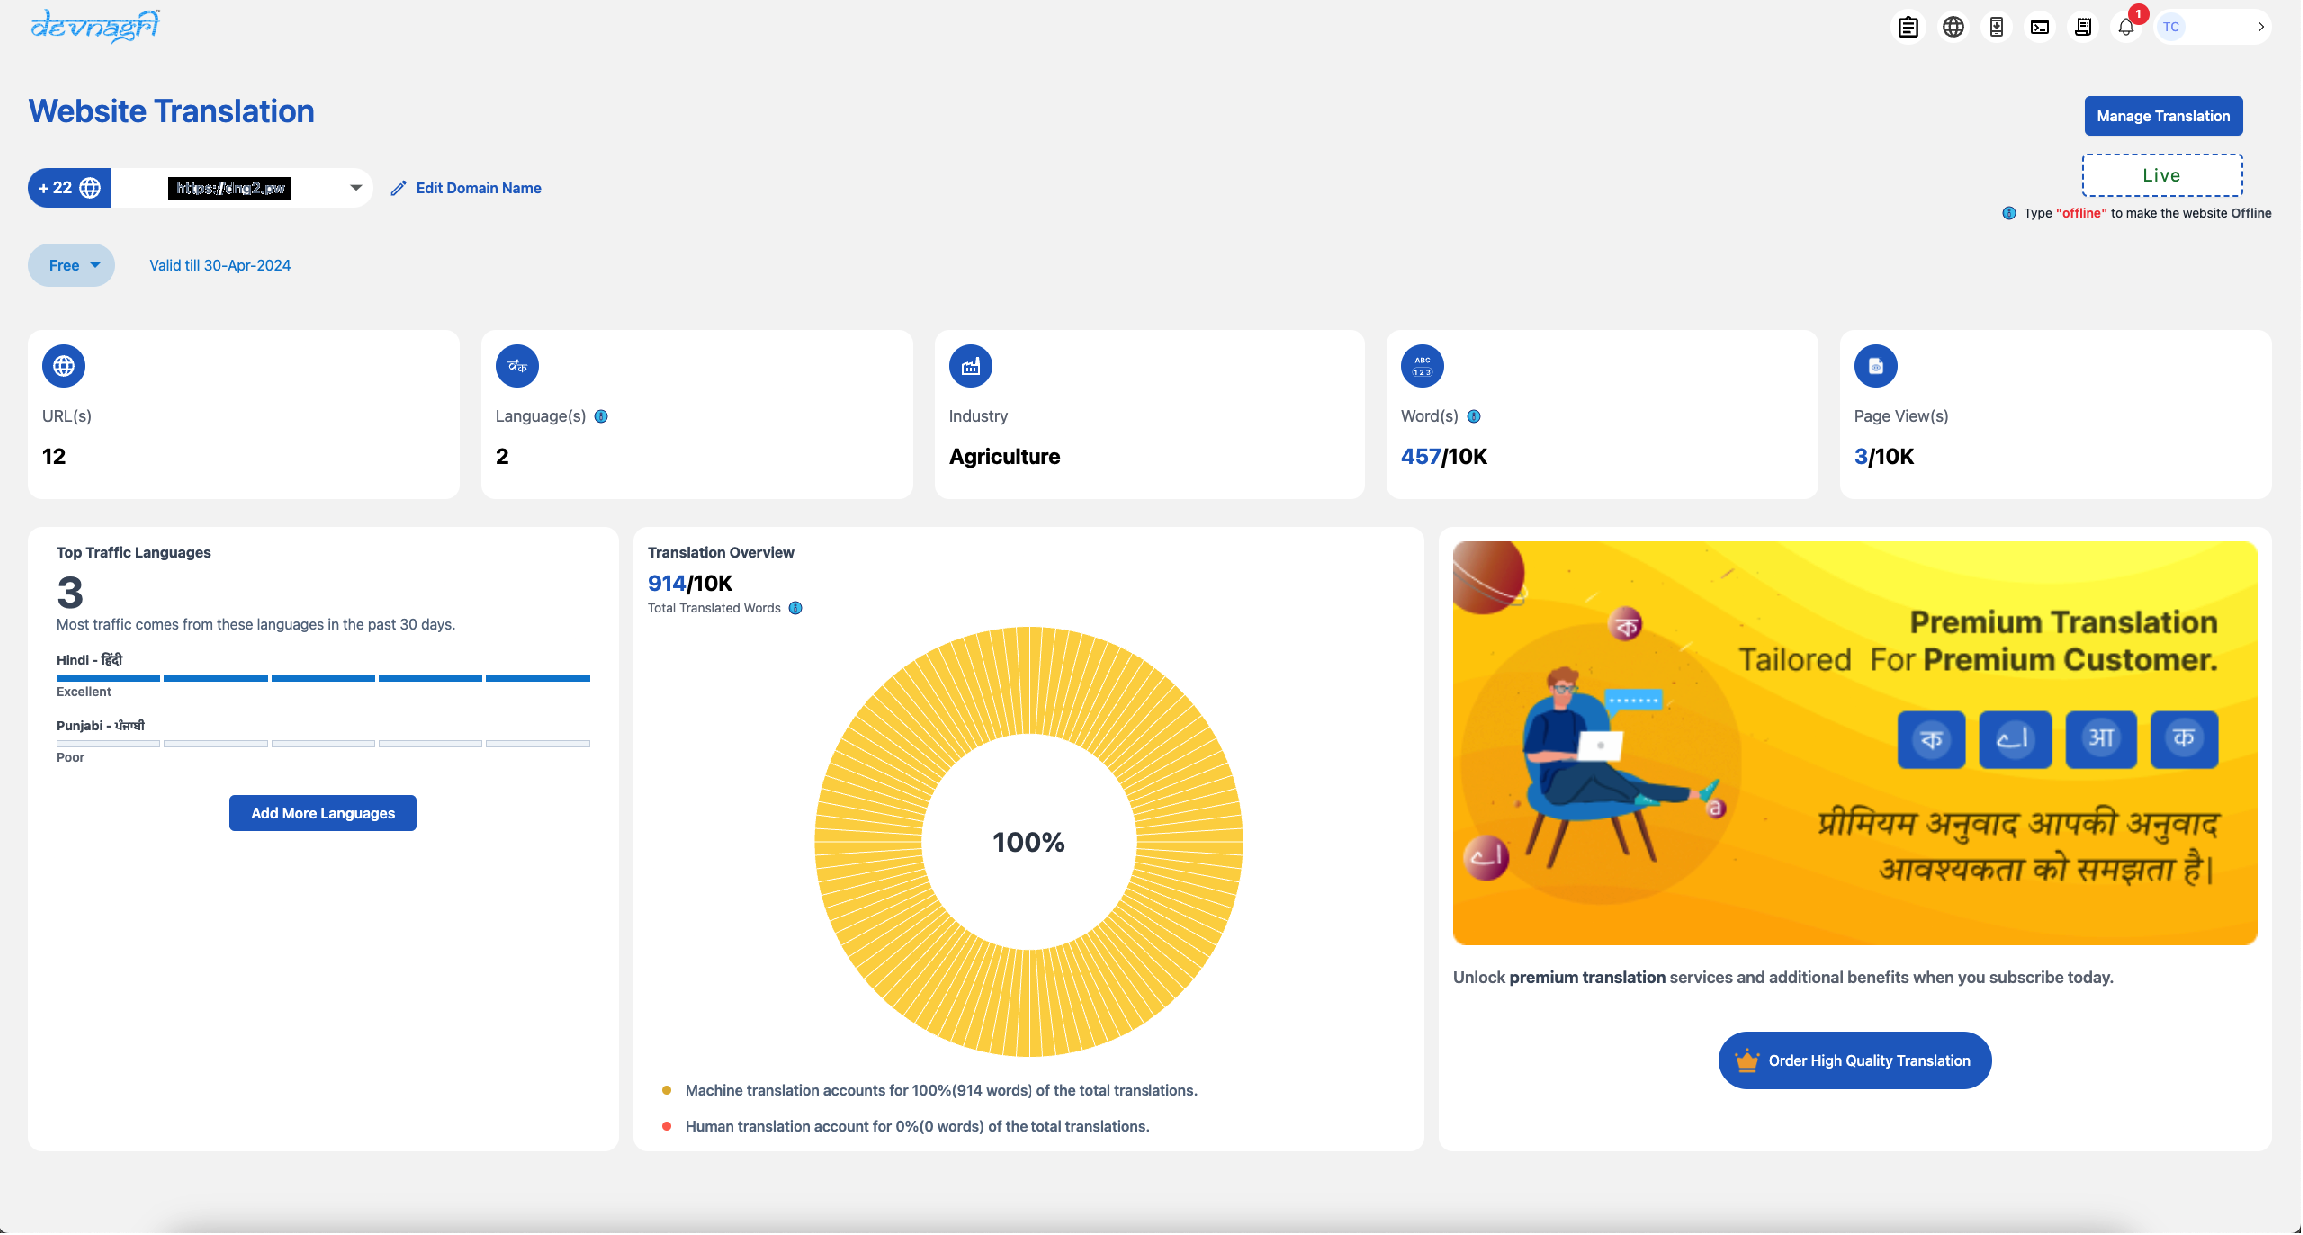
# DOTA dashboard
User dashboard shows all the details of order placed for a domain.
- Website name
- Languages
- Industry
- Count of URLs
- Status of the Domain
- Plan
- Progress
- Plan Validity
- Page Views
- Word Count
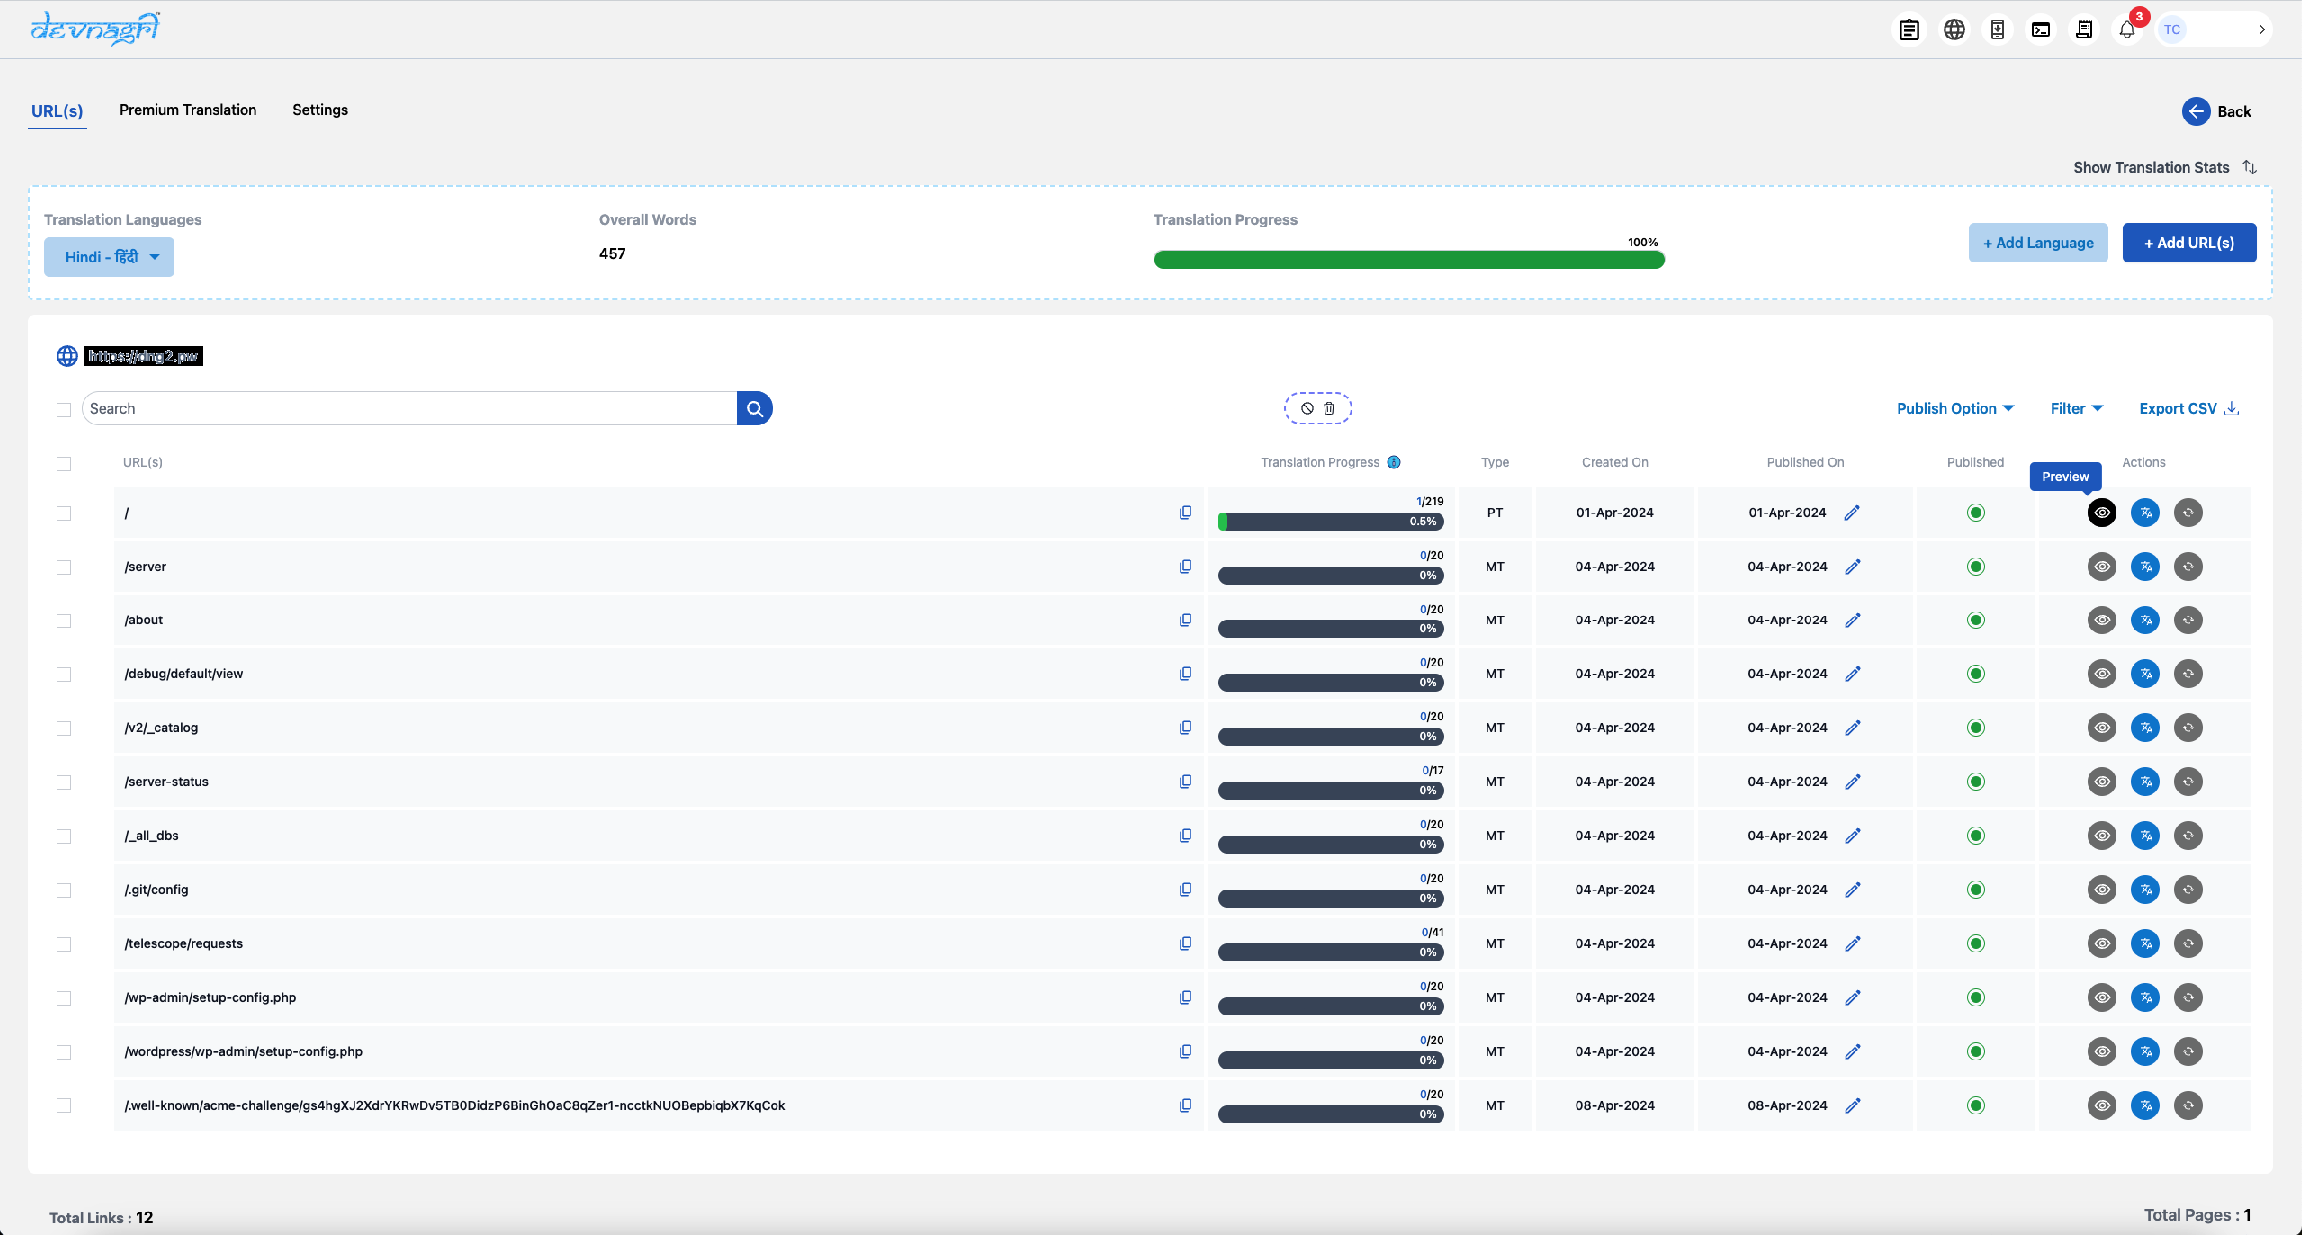
# URLs
When the user clicks on the "URLs" tile, they will be directed to a list of URLs. The domain name is listed separately and hence the homepage would show up as just a / .

# Translation Progress
Percentage of segments accepted by the user.
# Words
Word count present in the URL.
# Translation Type
Translation type of the URL - MT (Machine Translation), PT (Premium Translation) or HT (Human Translation).
# Machine Translation
Translation is to be done by the Machine Engine only.
# Human Translation
Translation is to be done by the customer himself.
# Premium Translation
Translation is to be done by utilsing the Devnagri's premium services.
# Created On
Date on which the URL was created in the Devnagri System.
# Published On
Date on which the URL was first published in the Devnagri System.
# Published On History
Displays the history of publishing/unpublishing of the URL.
# Updated On
Displays the date when the URL was last updated with new content.
# Action
# Preview
User can view the translated URL in the selected language.
# Proof Read/Translate
Click on proof read Tab.

Proof read shows all the sentences of the URL along with the translation. User can edit the translations as well.

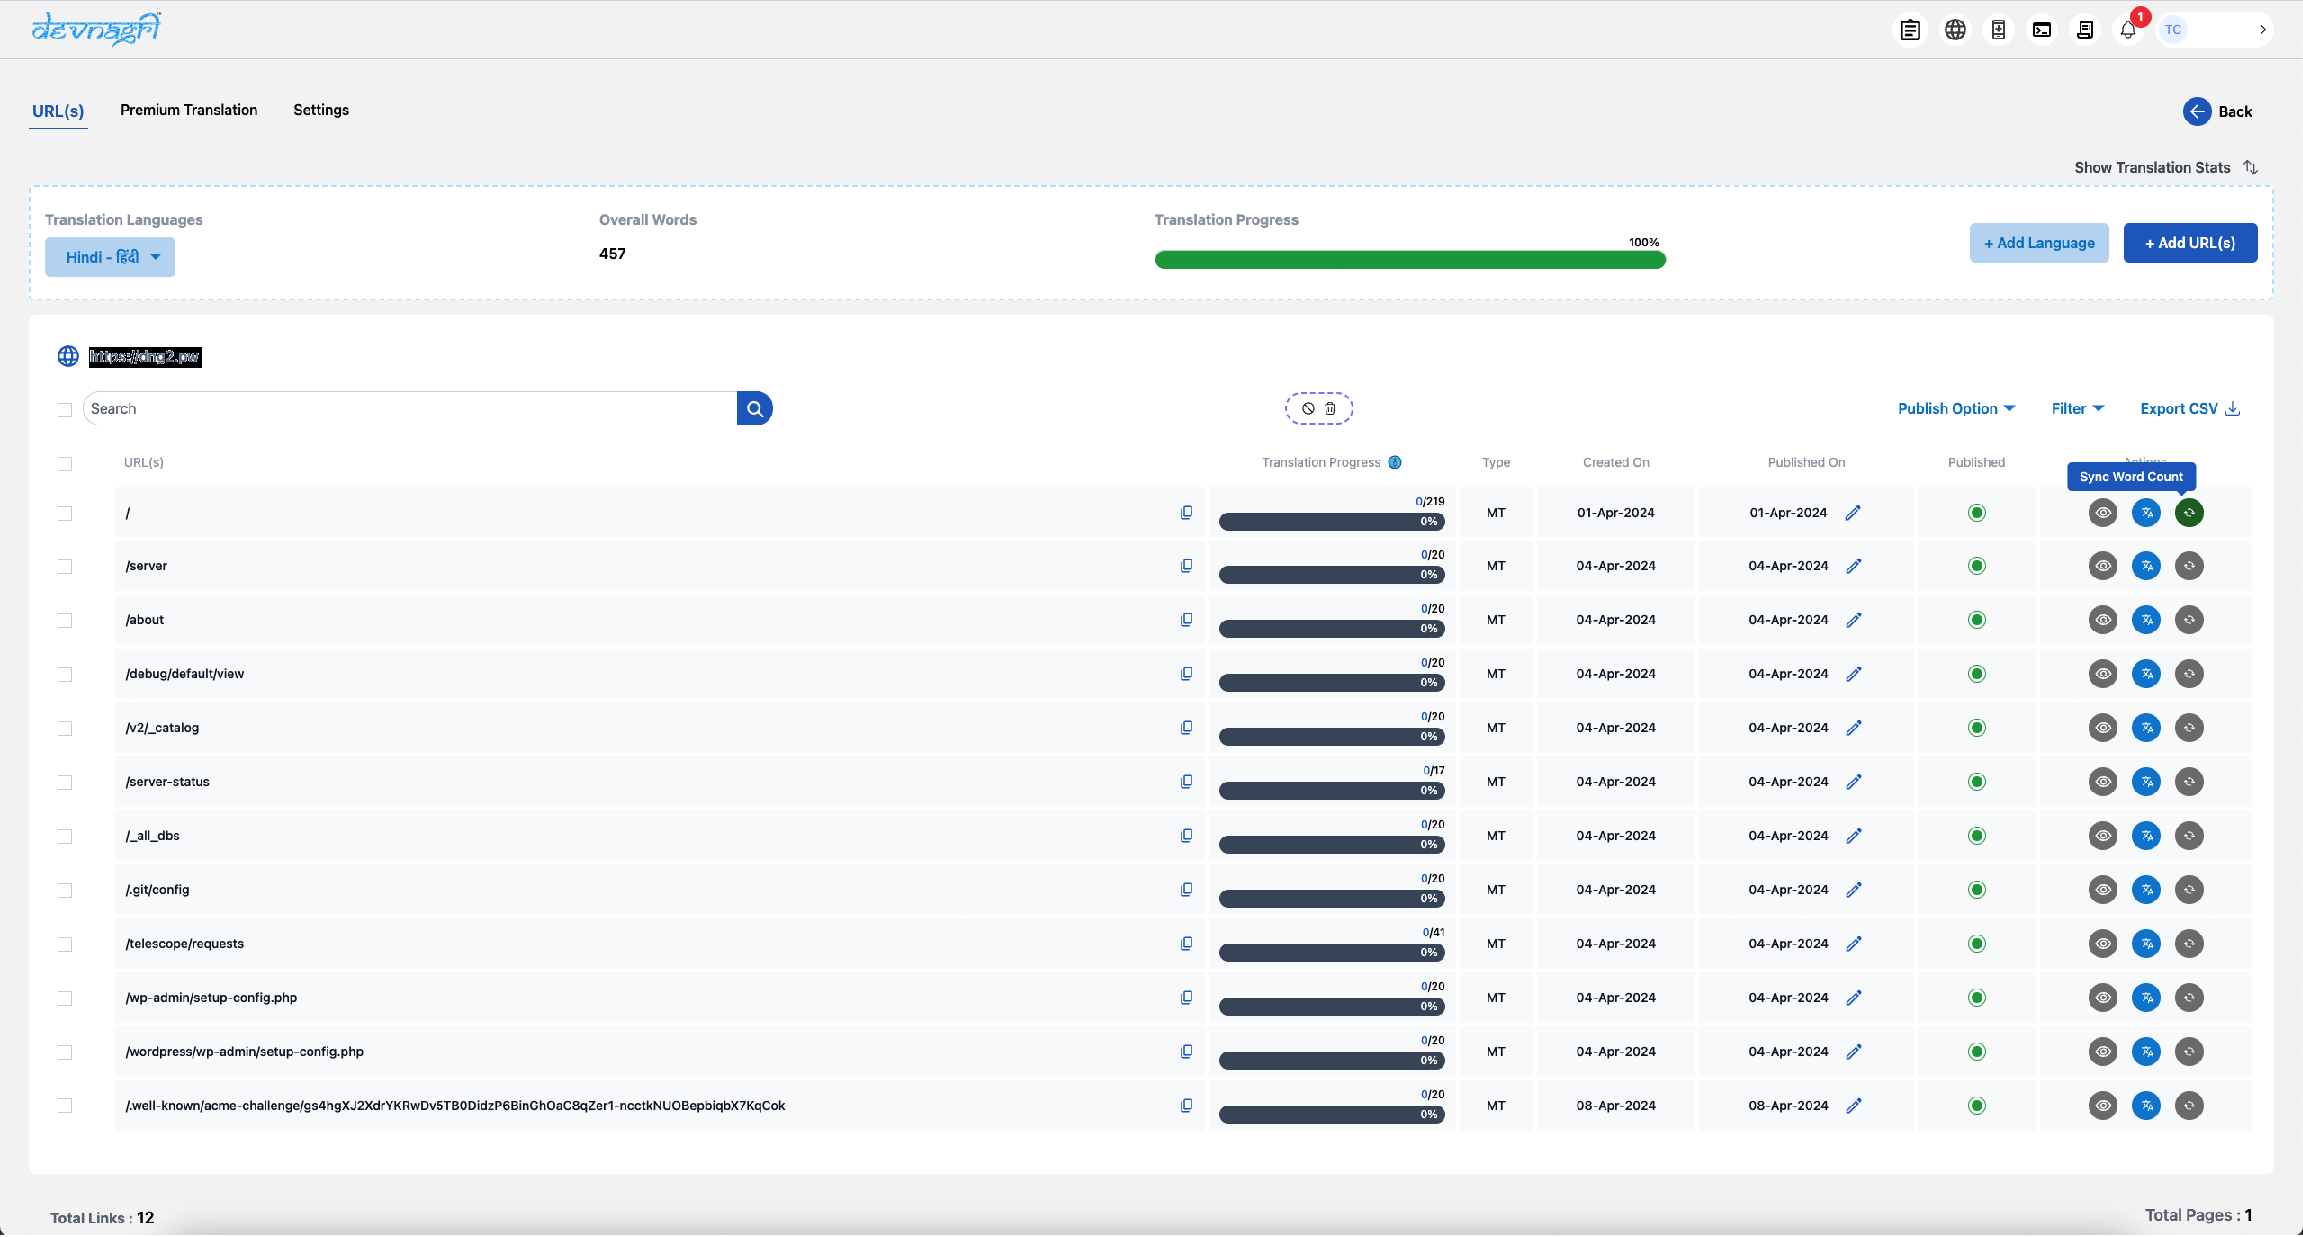
# Sync Word Count
User can sync word count for each url. This will update the word count for the specific URL.
# Published
Only published links are shown as translated.

# Search Tab
Users can utilize the search functionality to look up any specific URL. There is an option to perform exact search corresponding to the entered URL.

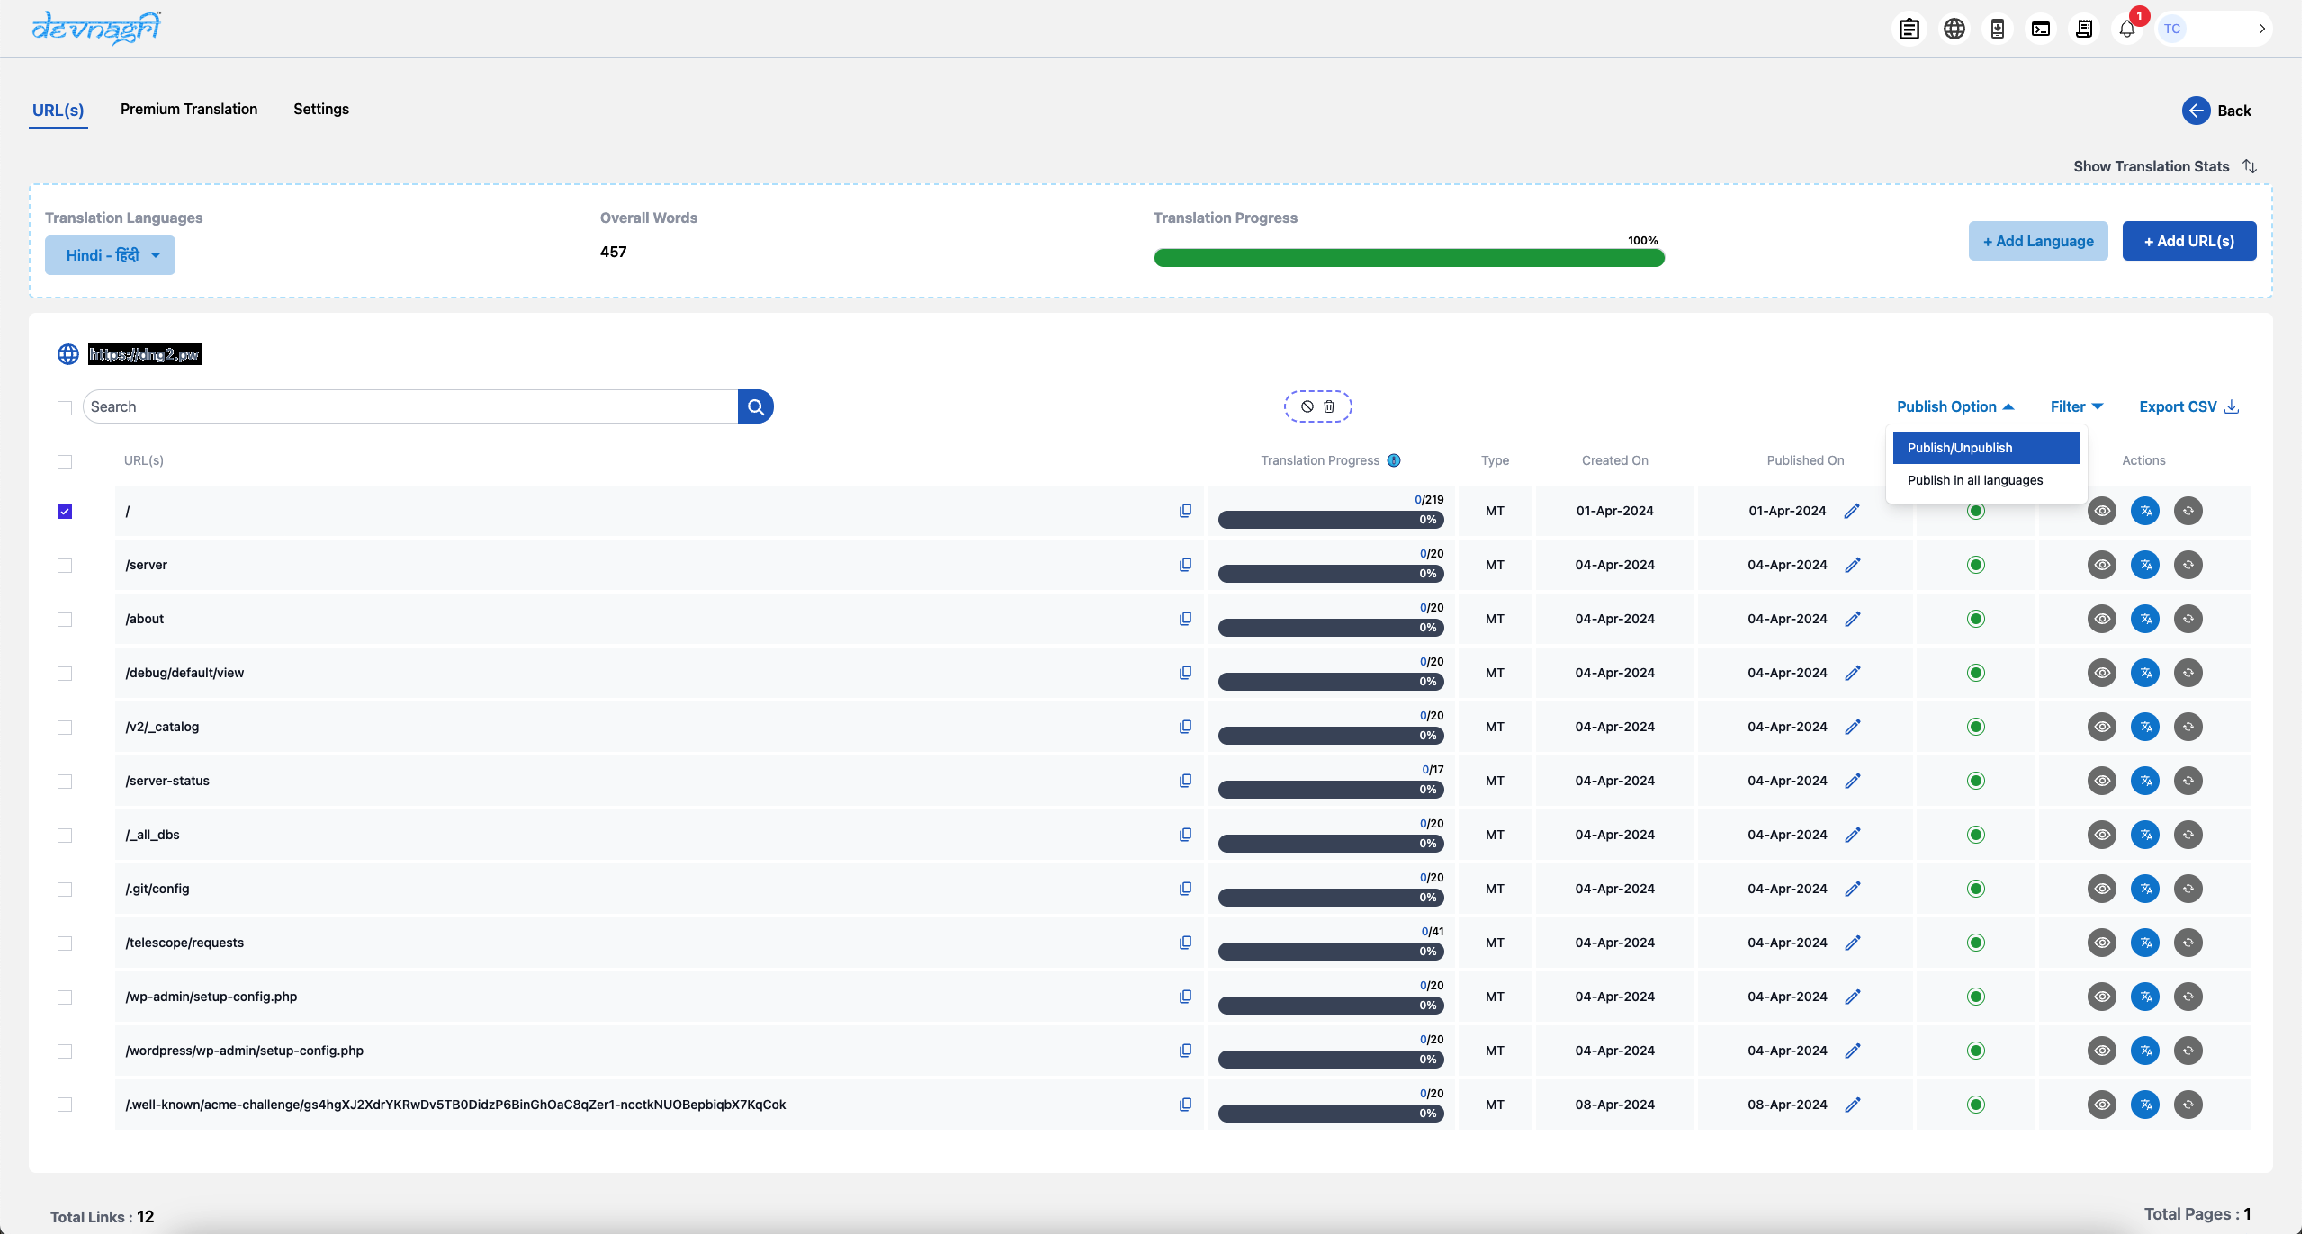
# Change URL Status
Users have the ability to publish or unpublish URLs using the options from the dropdown menu. Do note that selecting "publish in all languages" will publish the URL for all available languages in the order, while unpublishing can only be done on a language-by-language basis.
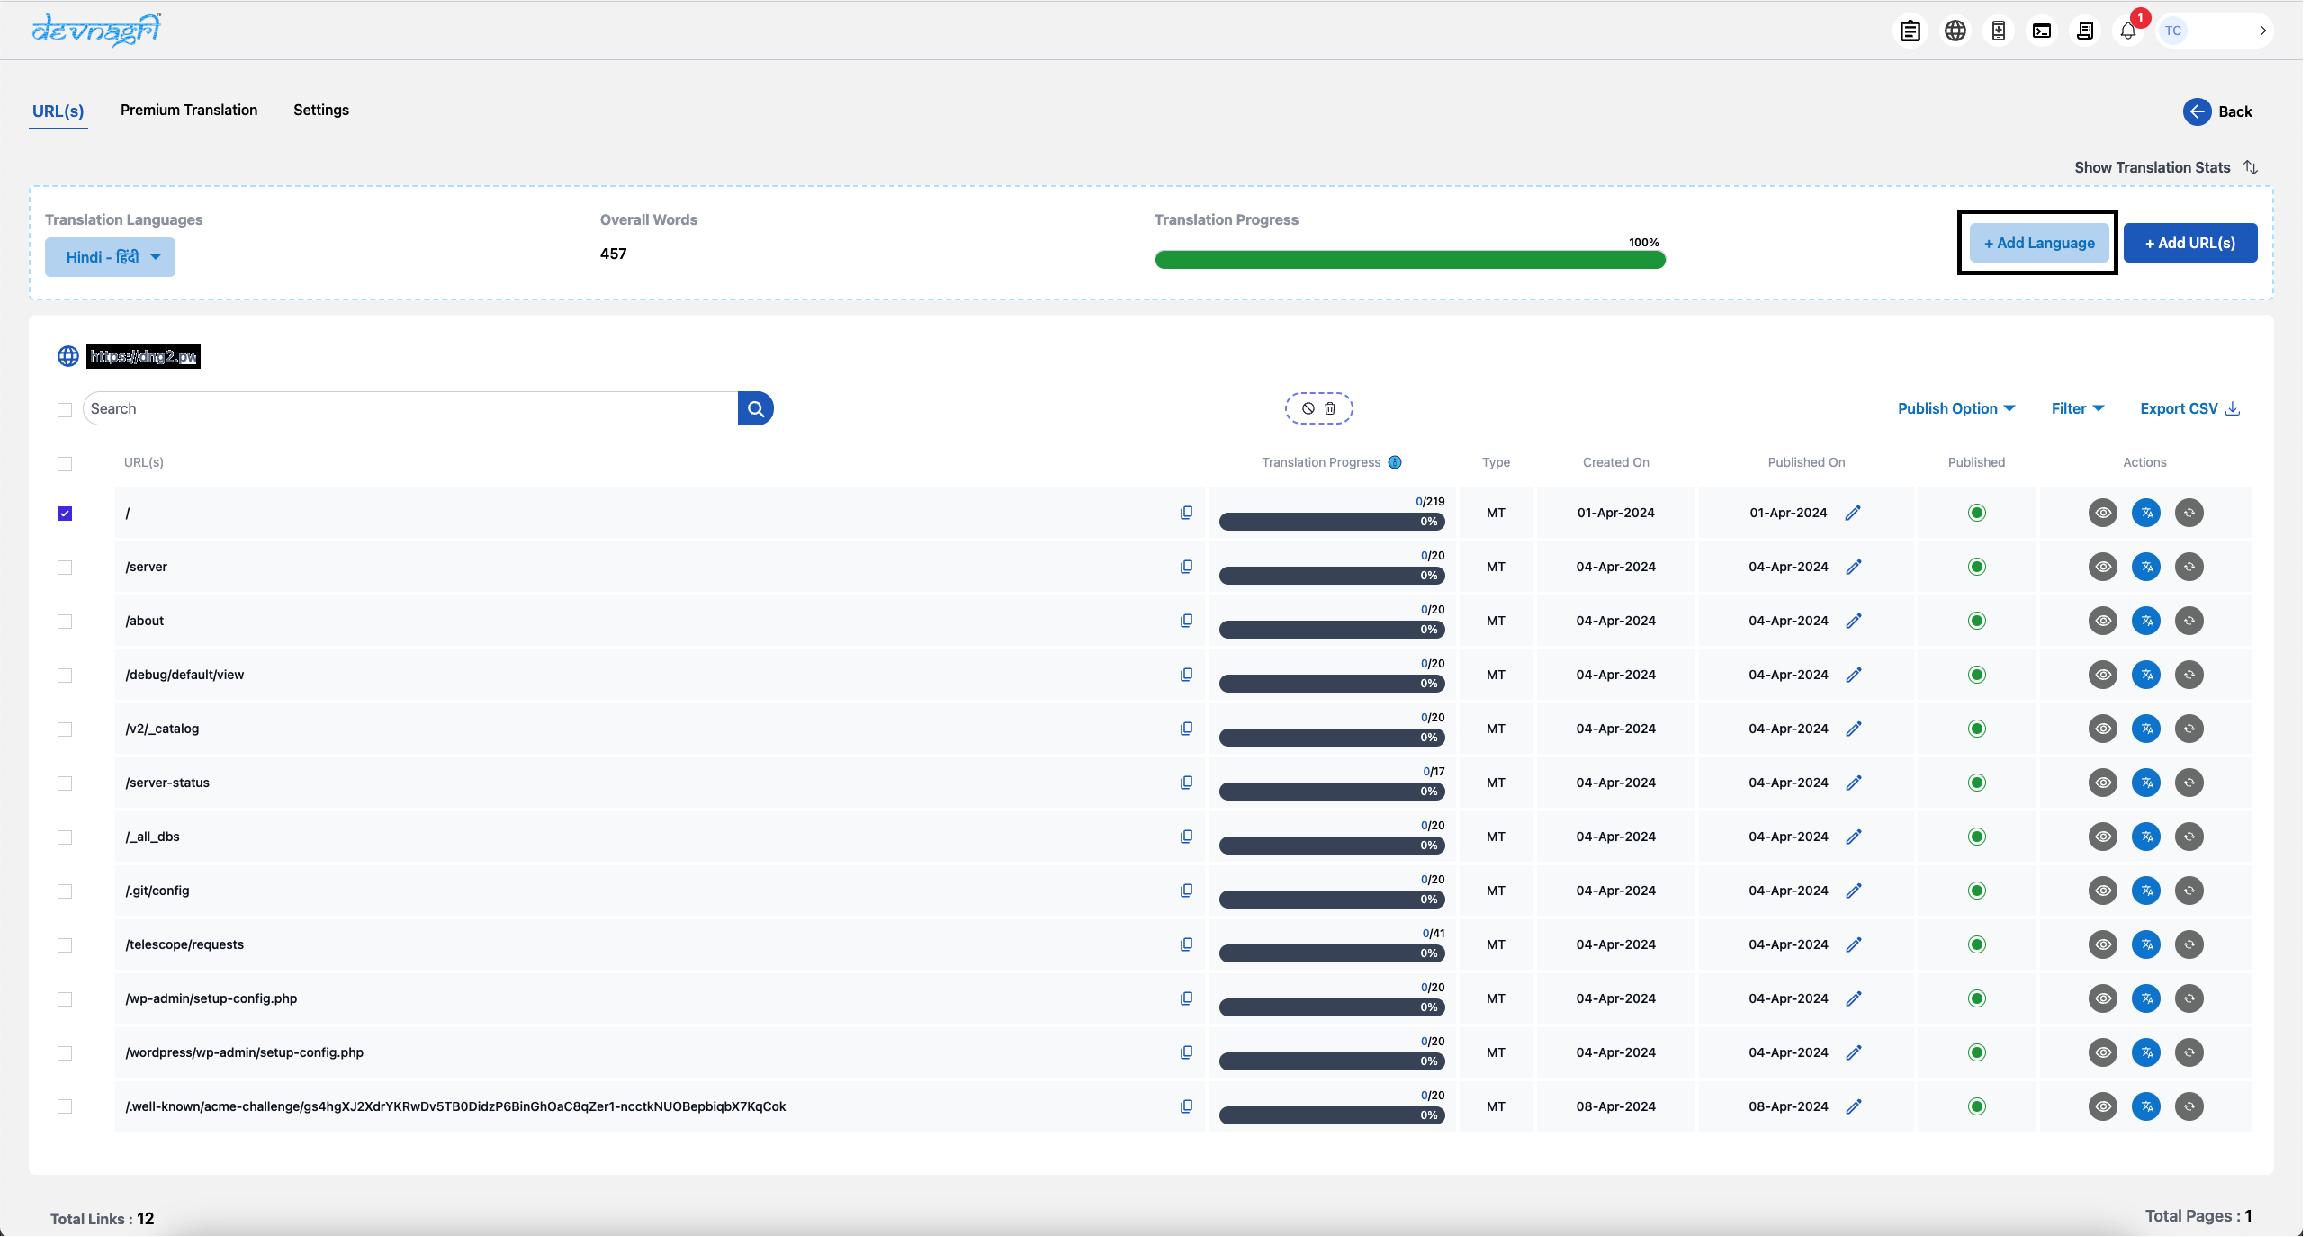
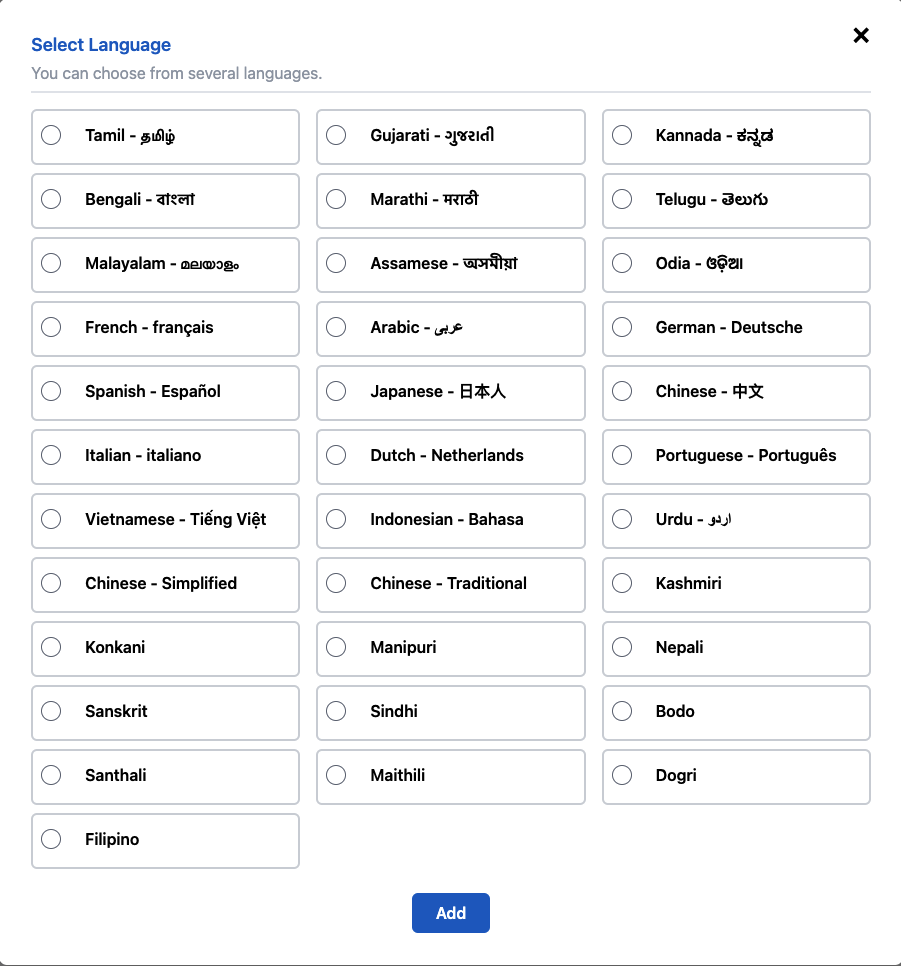
# Add more language
User can add a new languages from this option.
# Delete URL
User can delete a URL from this option.

# Change Block/Unblock URL Status
User can change Block/Unblock status of a URL. This is used to block/unblock any URL for display and localisation purposes.
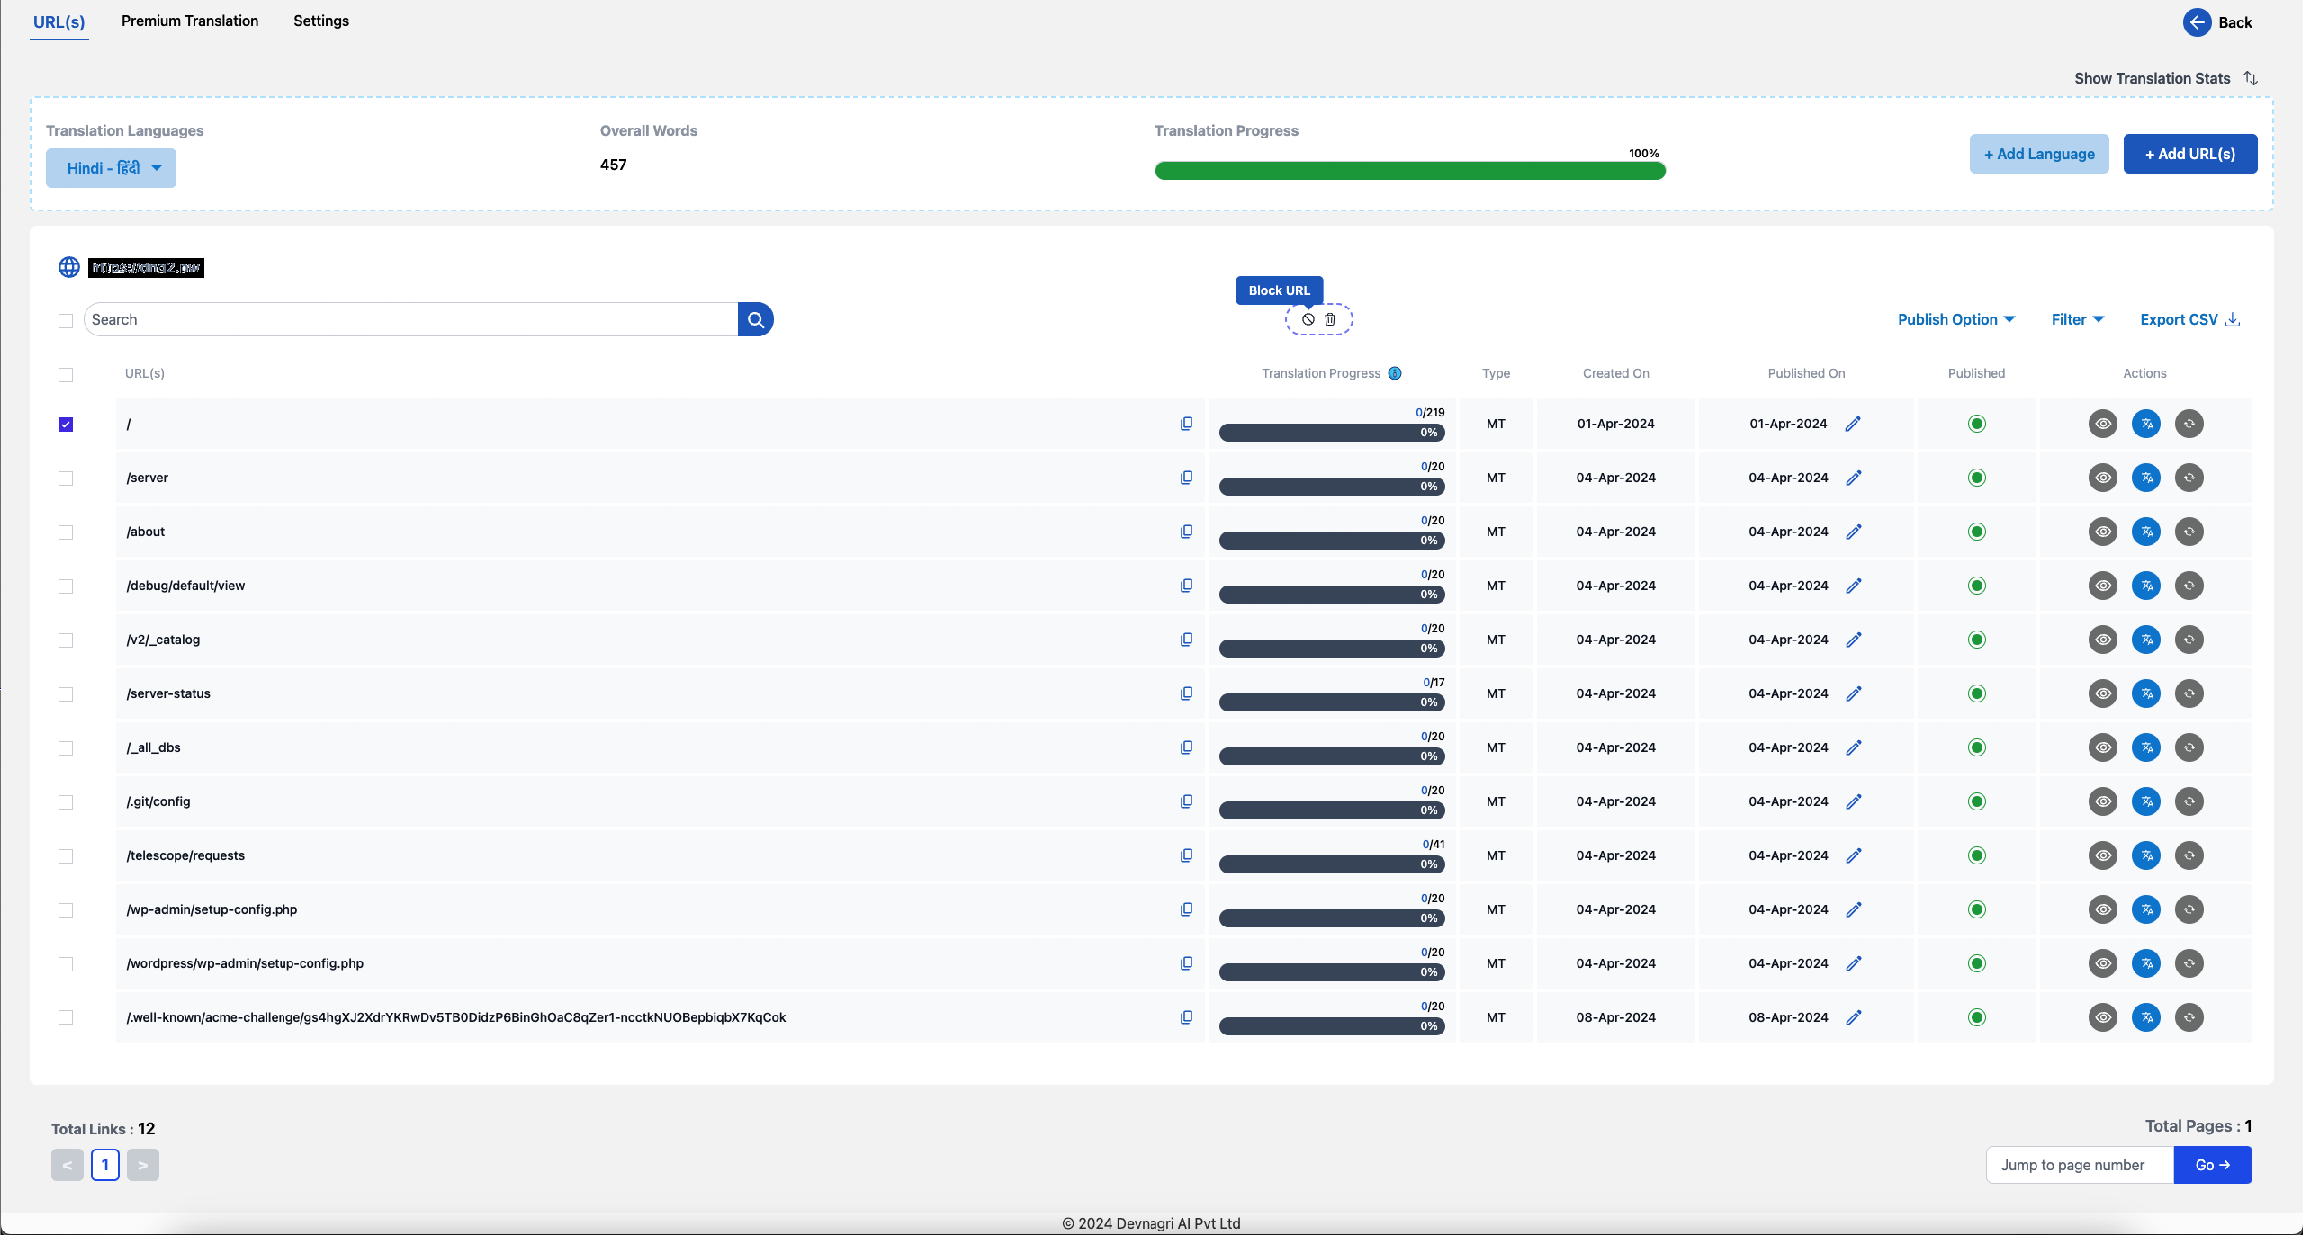
# Change language Dropdown
User can see the progress of the translated URLs in the selected language.

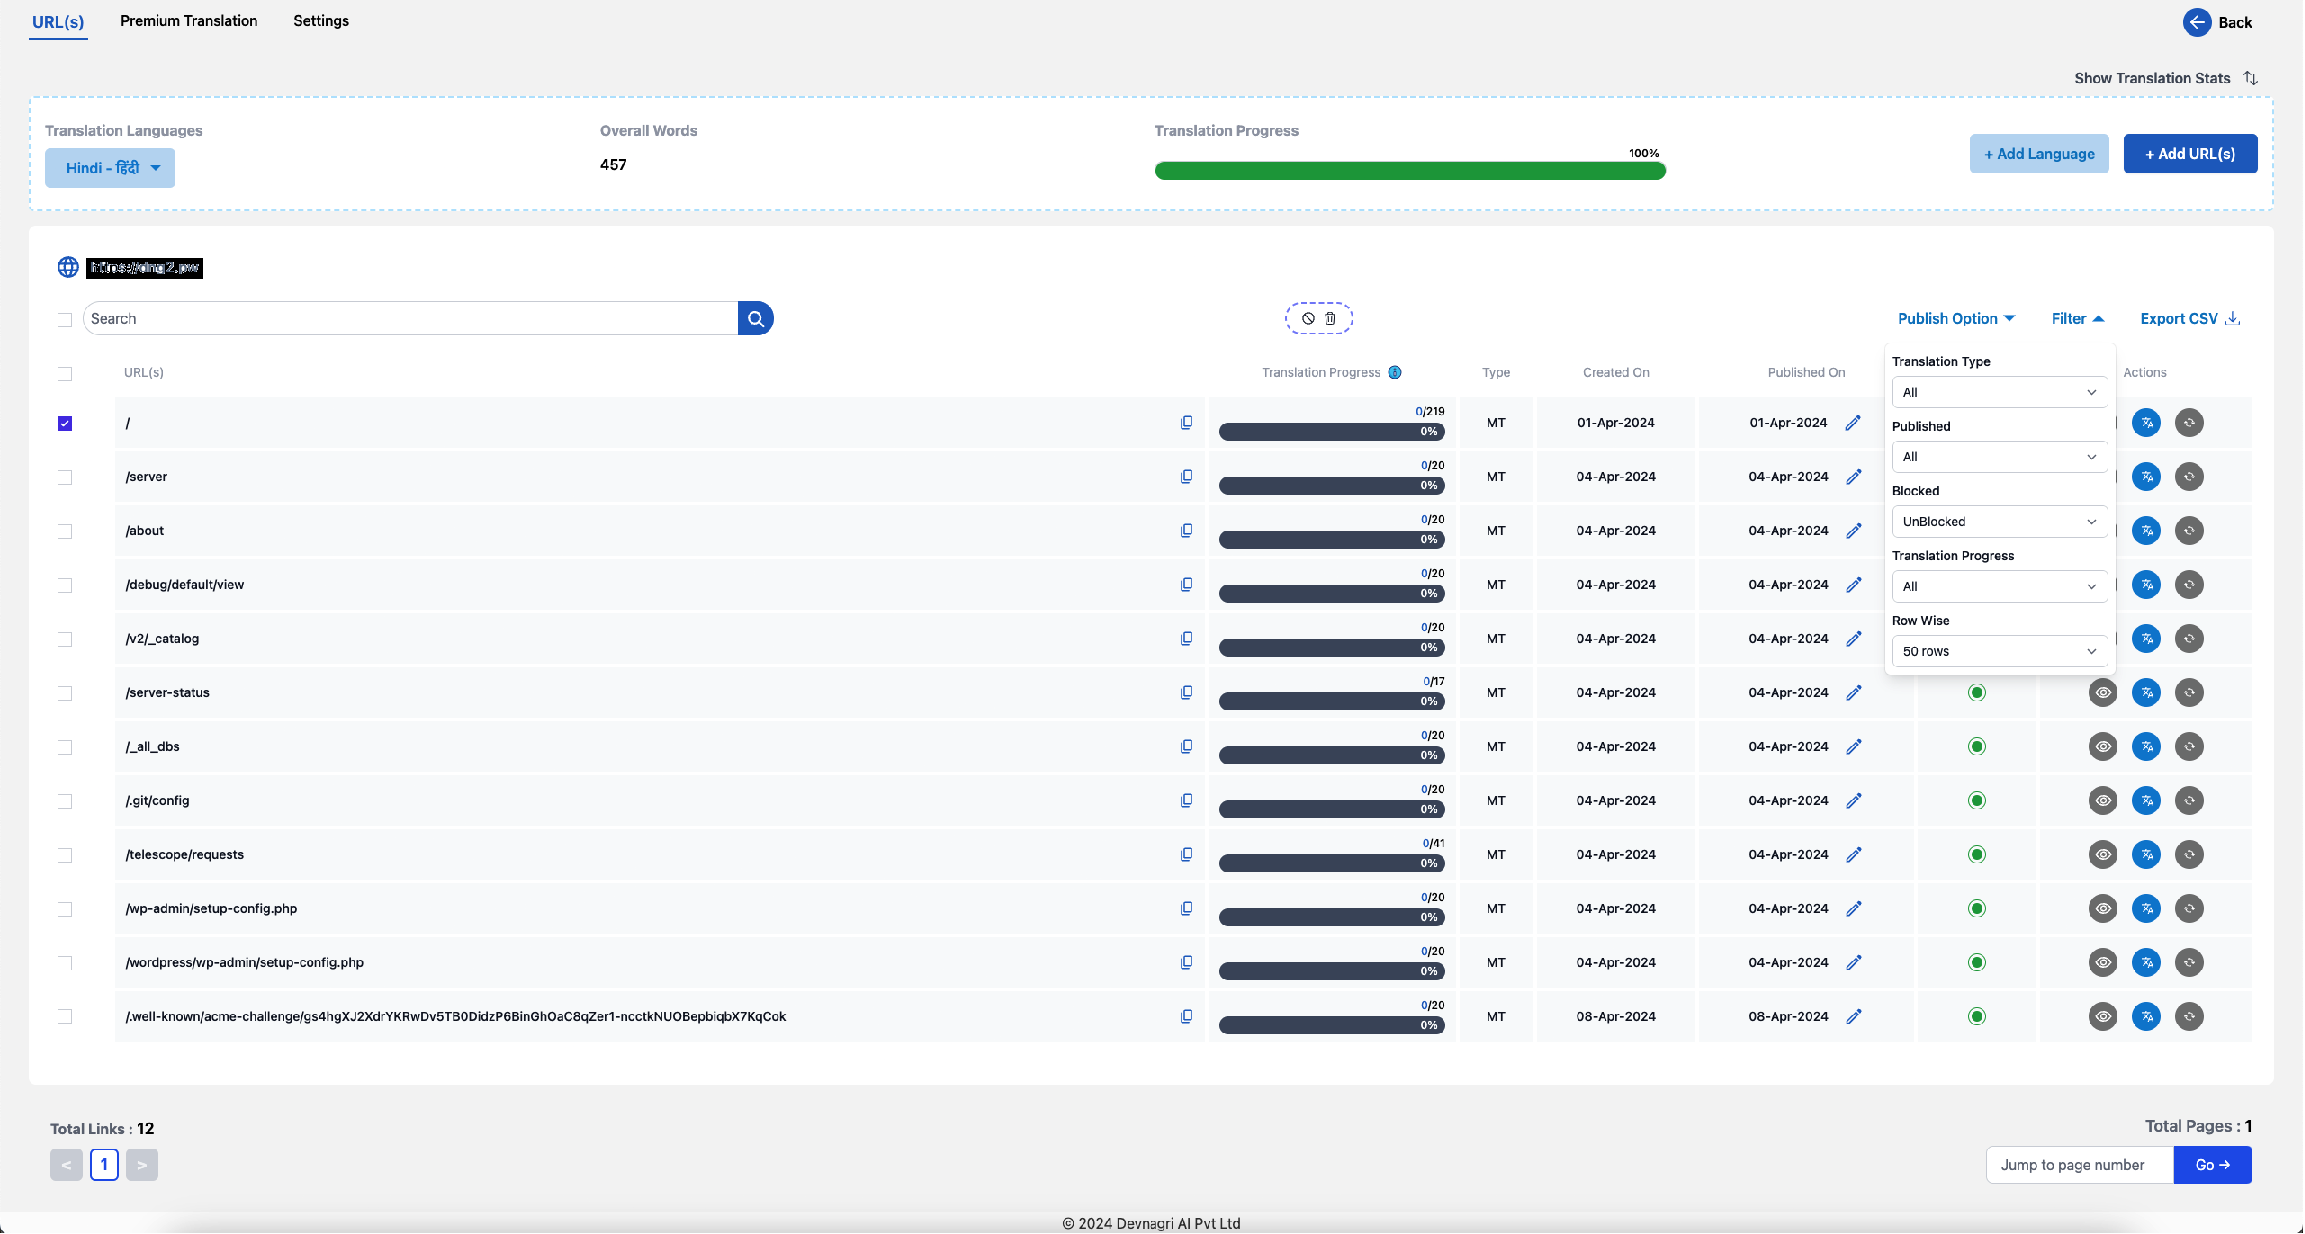
# Filter Dropdown
User can use the filter dropdown to filter on Active/Inactive/Blocked status, Published/Unpublished status, Translation type of the URLs.
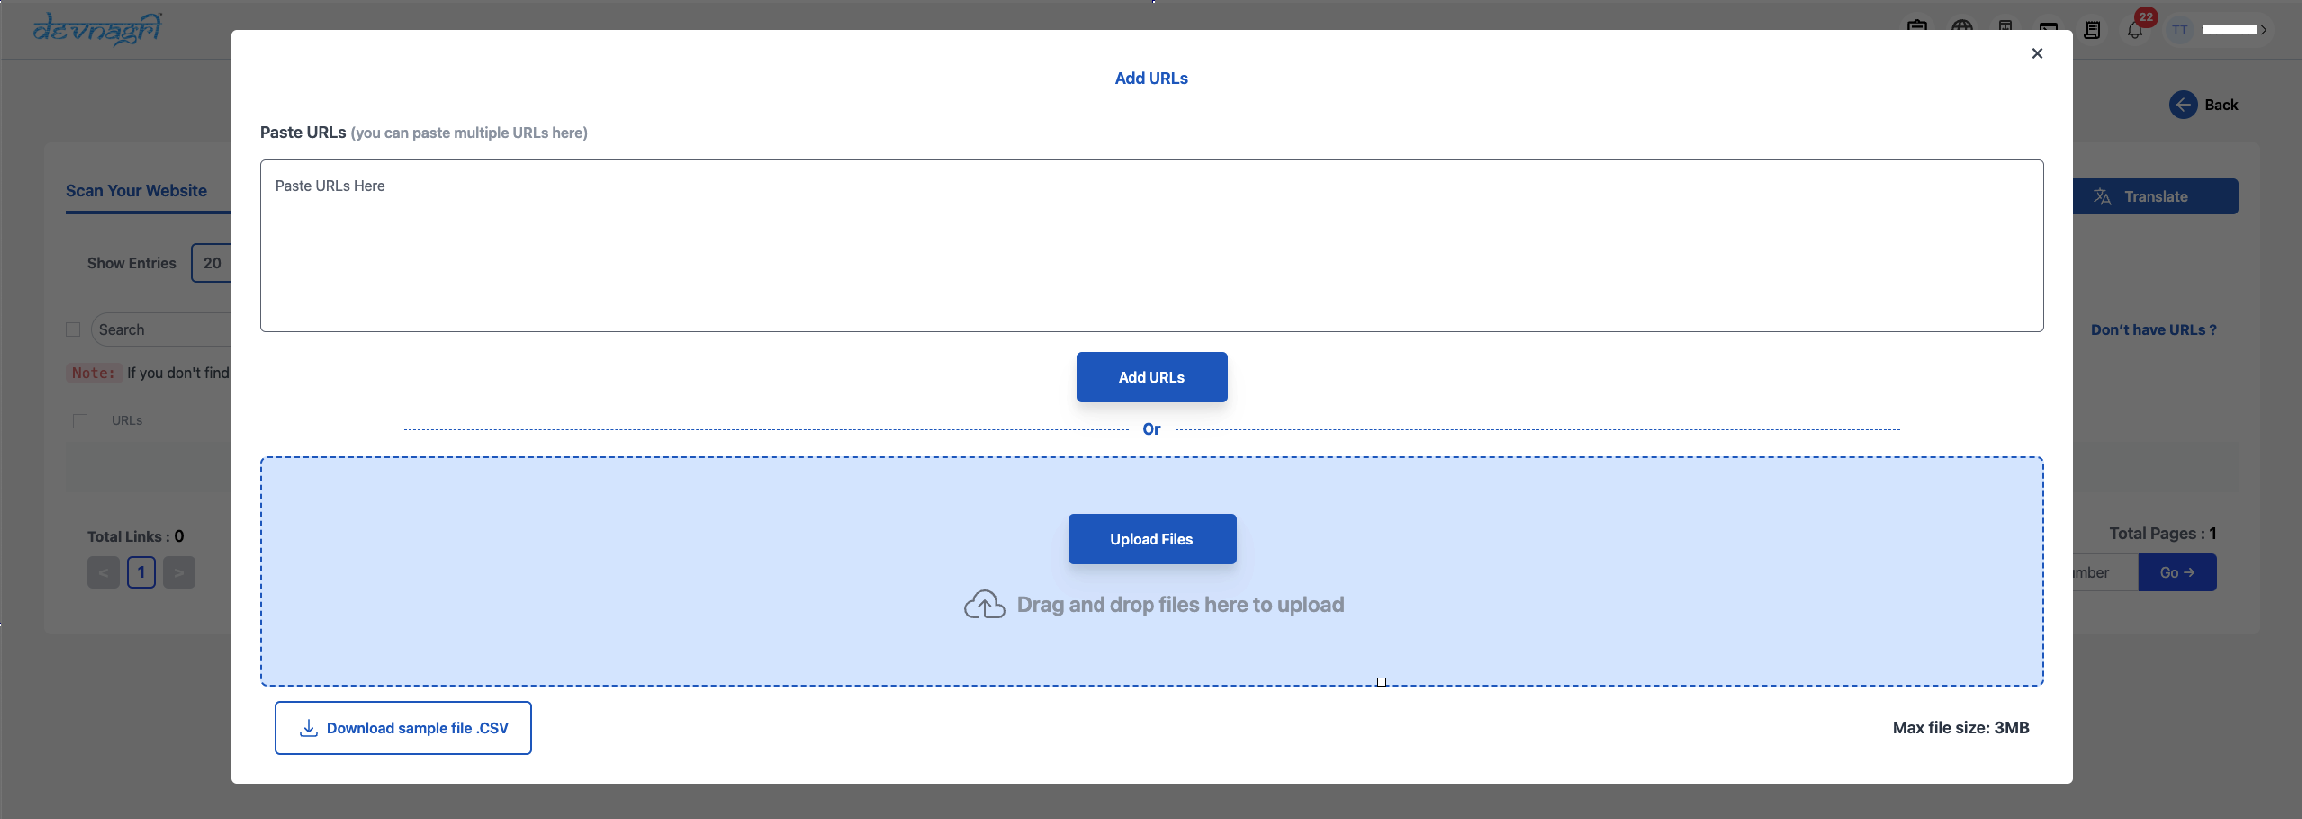
# Add URLs
If system did not crawl any url due to some technical issue or the user wants only some specifc URLs to be translated, the user can provide those URLs for translation.

# Scan Your Website button
This option can be used to scan all the possible URLs that are crawled by the Devnagri crawler.
# Translate button
Post selecting from the list of populated URLs, click on the translate button and URLs will be redirected to the DOTA dashboard.
# Don't have URLs
If the Devnagri crawler is unable to crawl some URLs, then use this to add the URLs to the dashboard manually.
# Manually Adding URL
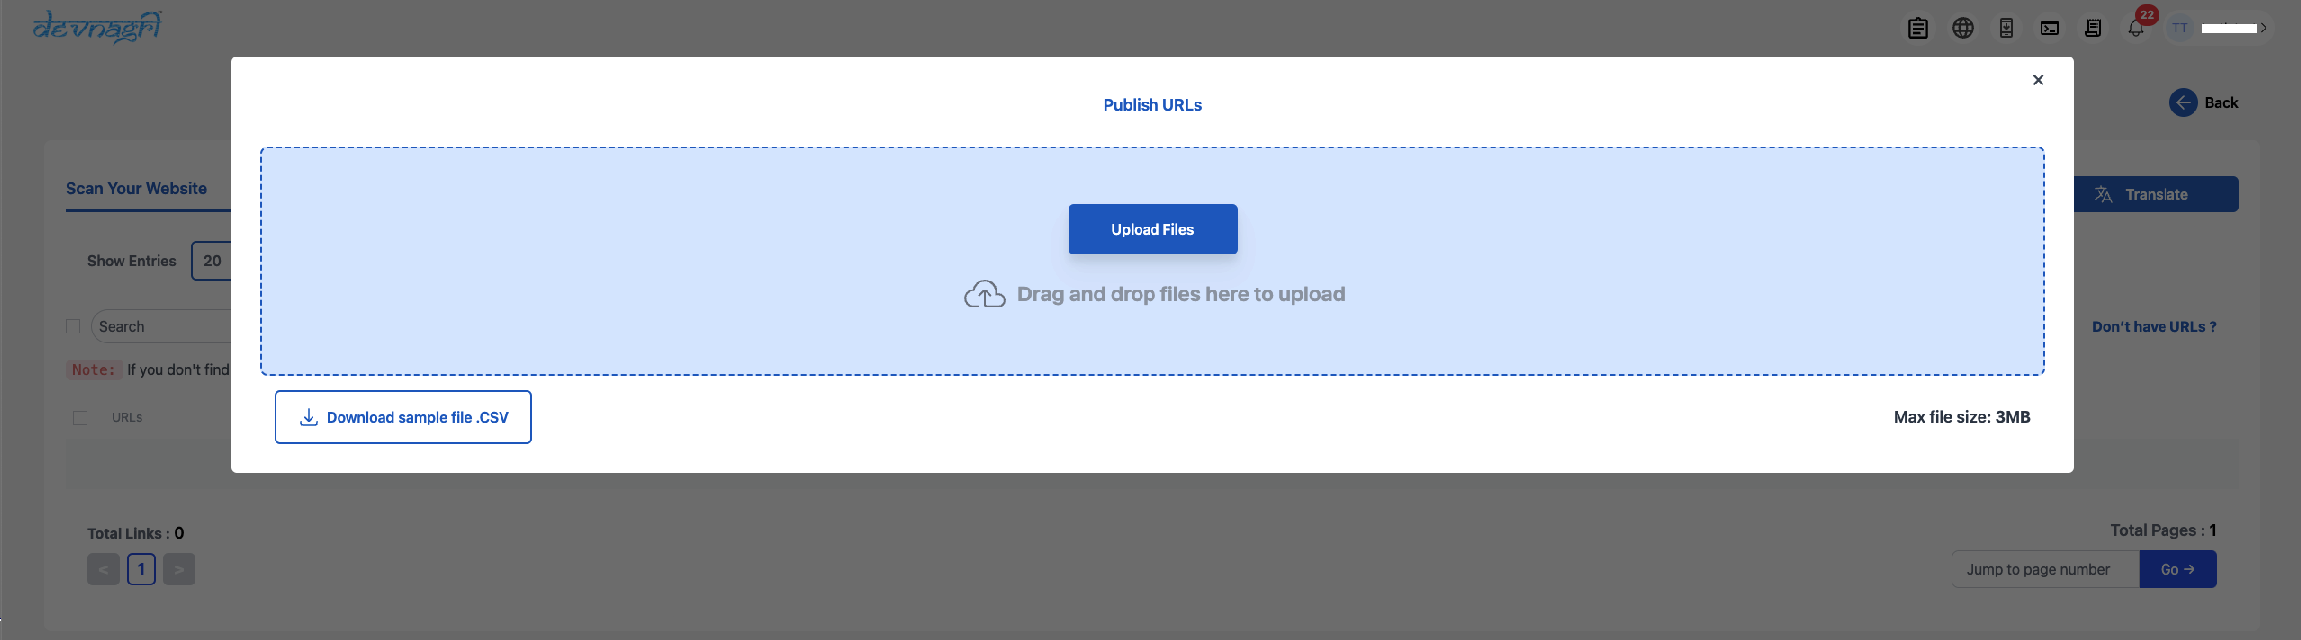
Users can add URLs using either the "Paste URLs" or "Upload Files" feature to add list of URLs for crawling/translation.
# Publish URLs
User can add all the URLs in the file and publish it directly.
# Publish
Type Live in the textbox present in the top right of the screen for enabling the localised website.
# Language Switcher
User can add the following script to display the language switcher on the source website.

# Custom CSS
You can use Custom CSS to customize the positioning of Language Switcher Dropdown.
Recommendation: Please use combination of (right and bottom) or (left and bottom) and keep the other fields empty for better dropdown positioning.

# Settings
Language dropdown on your website
Recommendation : if you are using custom language dropdown, please disable both the options.

# Subdomain Redirect
If you are using Devnagri language dropdown, you need to toggle "ON" the setting. Selecting a language will redirect you to the localized versions of the website. This option will work only after you have added the CNAME successfully.
Recommended only if you are not using your default language dropdown.
# Language Dropdown UI
Enabling this will help you populate an automatic language dropdown on your proxy website.
# Automatic Translations
If this is toggled to ON then any new URL that comes into the system automatically is marked ACTIVE (published) and localised. If this is toggled to OFF then any new URL that comes into the system automatically is marked INACTIVE (unpublished) and NOT localised. You would need to publish the URL manually in this case.
The user is taken to the parent site when he tries to access the new URLs.

# Static Content Website
Enabling this setting is beneficial for websites with static content as it accelerates the process of content localization and rendering.

# Show Professional Translations ONLY
Setting this to ON would ensure only manually approved/accepted translations would be displayed on the website else the content would be in parent site language only.

# SSL Certificate CNAME
The SSL certificate gets generated automatically once the CNAME entry is done for proxy server mentioned corresponding for each language.

# Subdomain
You can publish the subdomains for each language post making the CNAME entry with the Domain Name Service Provider using the highlighted toggle buttons.

# Premium Translation Tab
User can see all the Premium Translation orders on this page.

# Order for Premium Translation
Upon clicking the button, you will be redirected to a page where you can select URLs for which you want to create a Premium Translation order. Click on 'Next' after selecting the URLs and you will move to the 'Create Order' page.

# Create Order
This is where the user can create order by filling all the details (Project Name, Target Languages, Industry).


# PT Orders
The list of PT orders will be shown in orders page and Premium Translation section of DOTA dashboard.


# Translate Button
User can visit the Translation Page of the Premium Translation Order by using this button and check the status of the individual segments of the order.

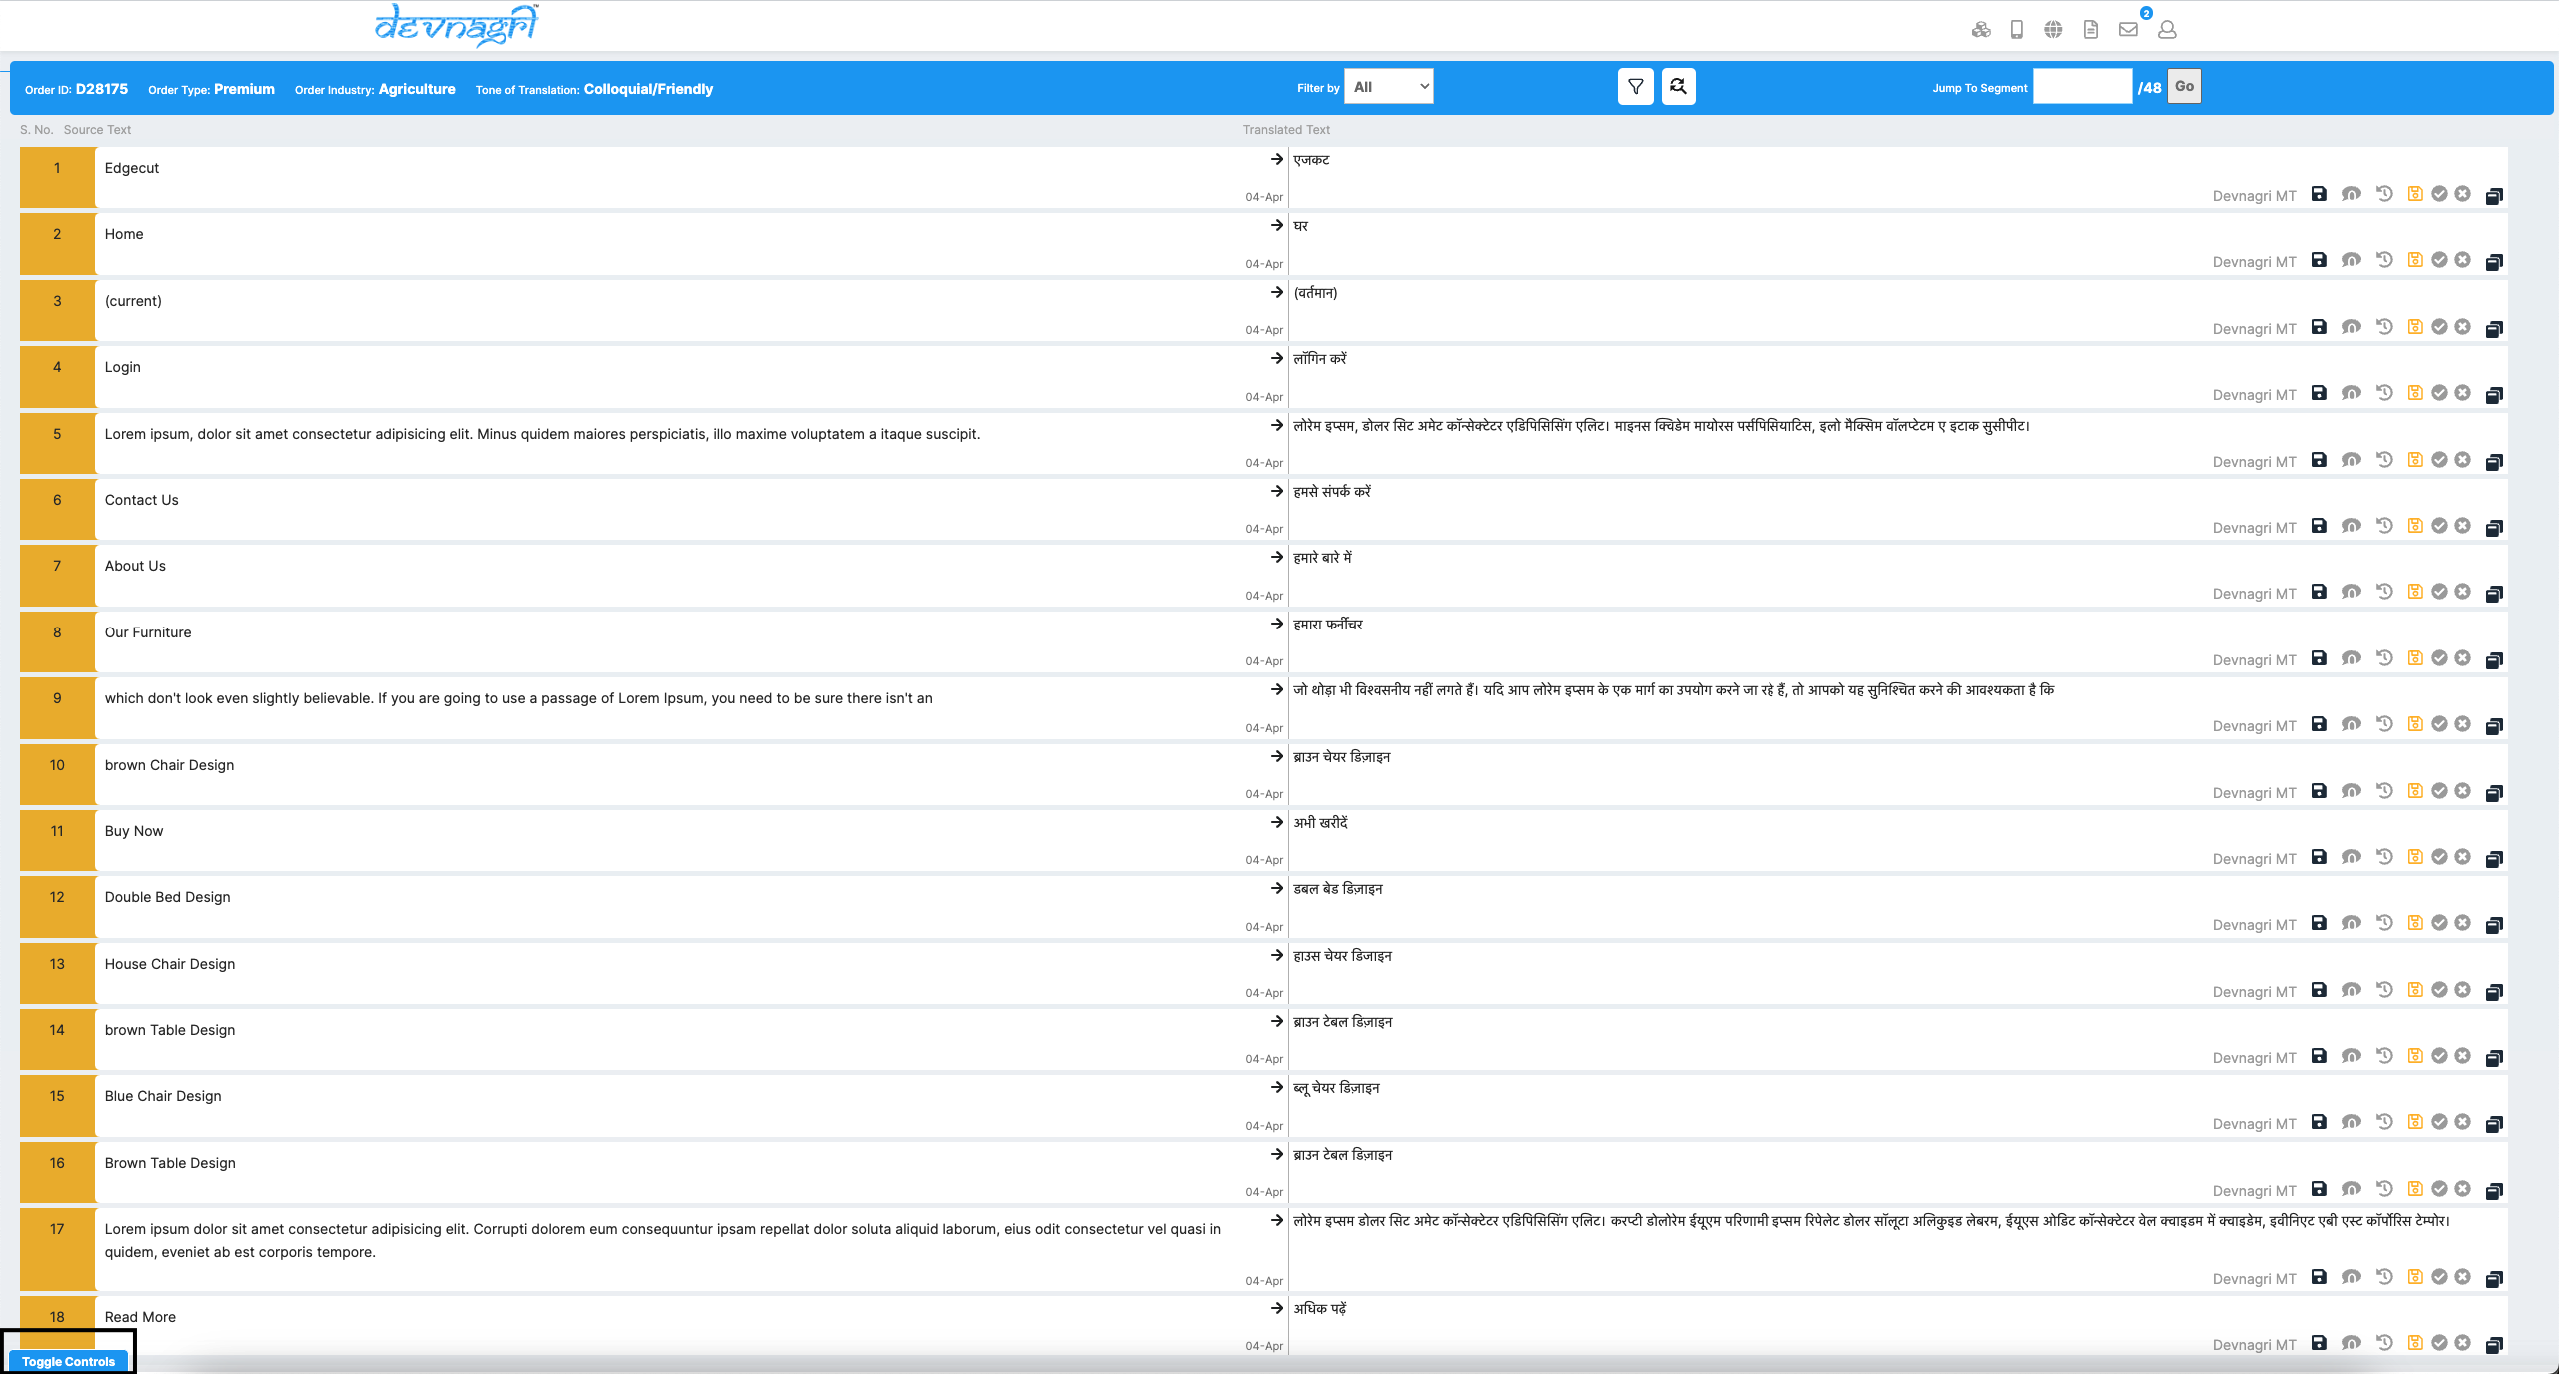
# Translate Page
The user can see the following information about the order:
Order type
Order Industry
Level of Politeness
Filters
Jump to segment
Language
URL being translated
Duplicate words
No. of words in the page
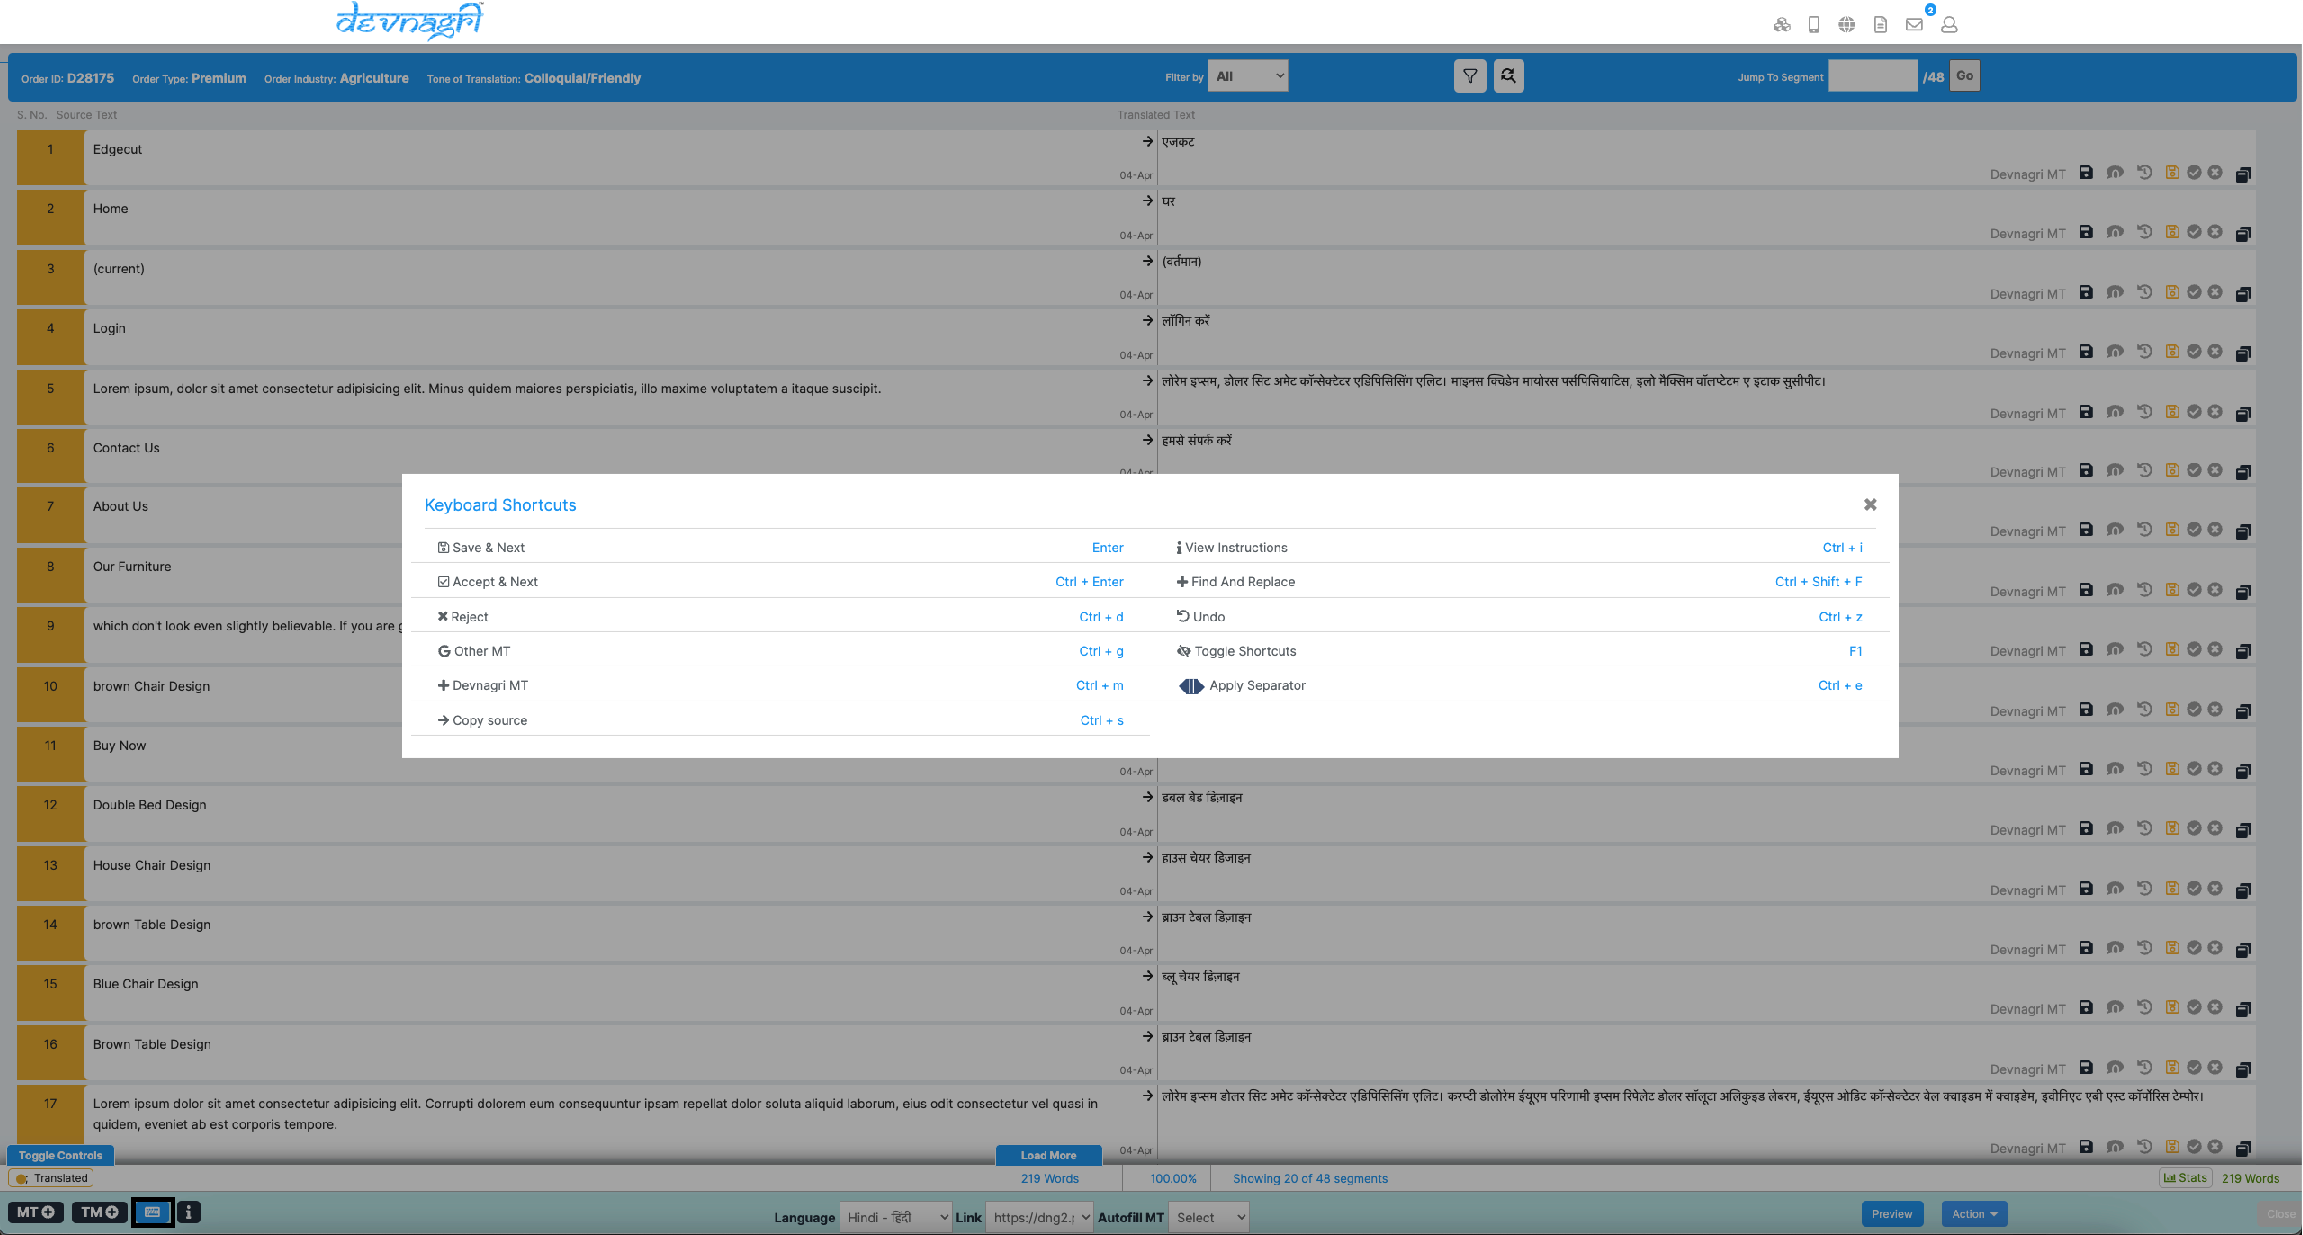
# Toggle Controls
Upon clicking on toggle button the toggle will hide the sticky menu present on the bottom of the page.

# Keyboard Shortcuts
Users can utilize the shortcuts available on this popup to streamline their workflow on the translation page..
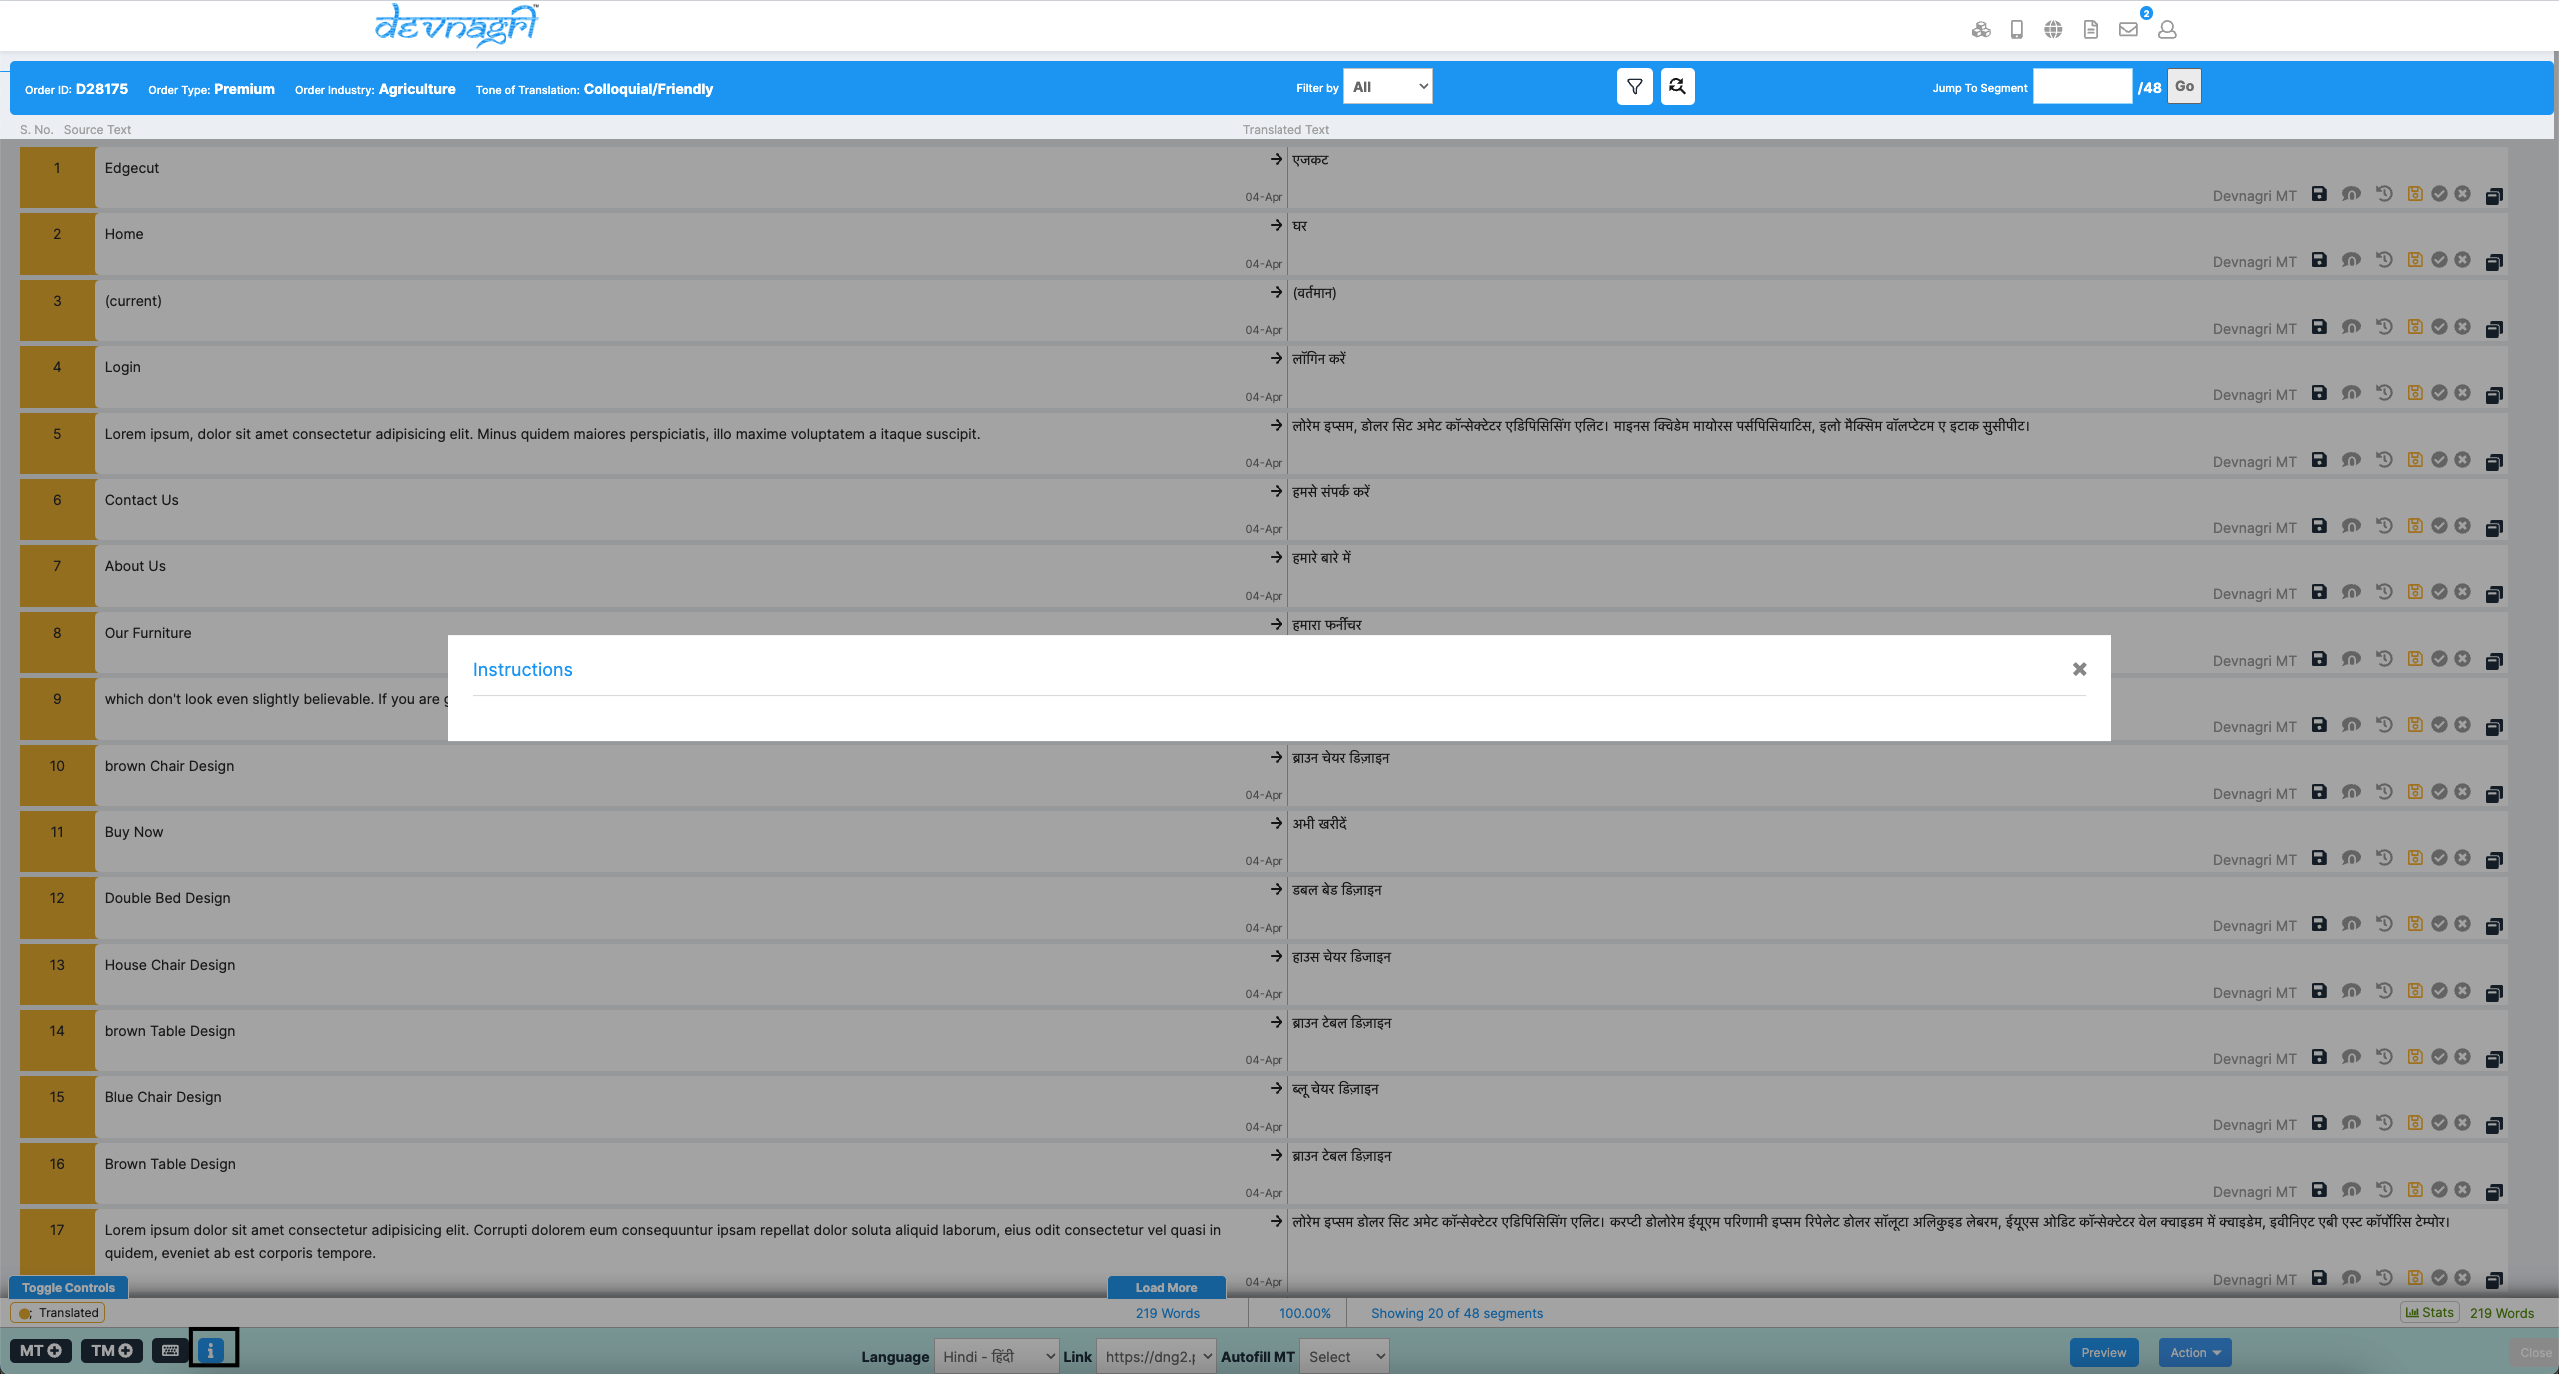
# Instructions
This popup displays the instructions provided during order creation.
# Description on Translate Page
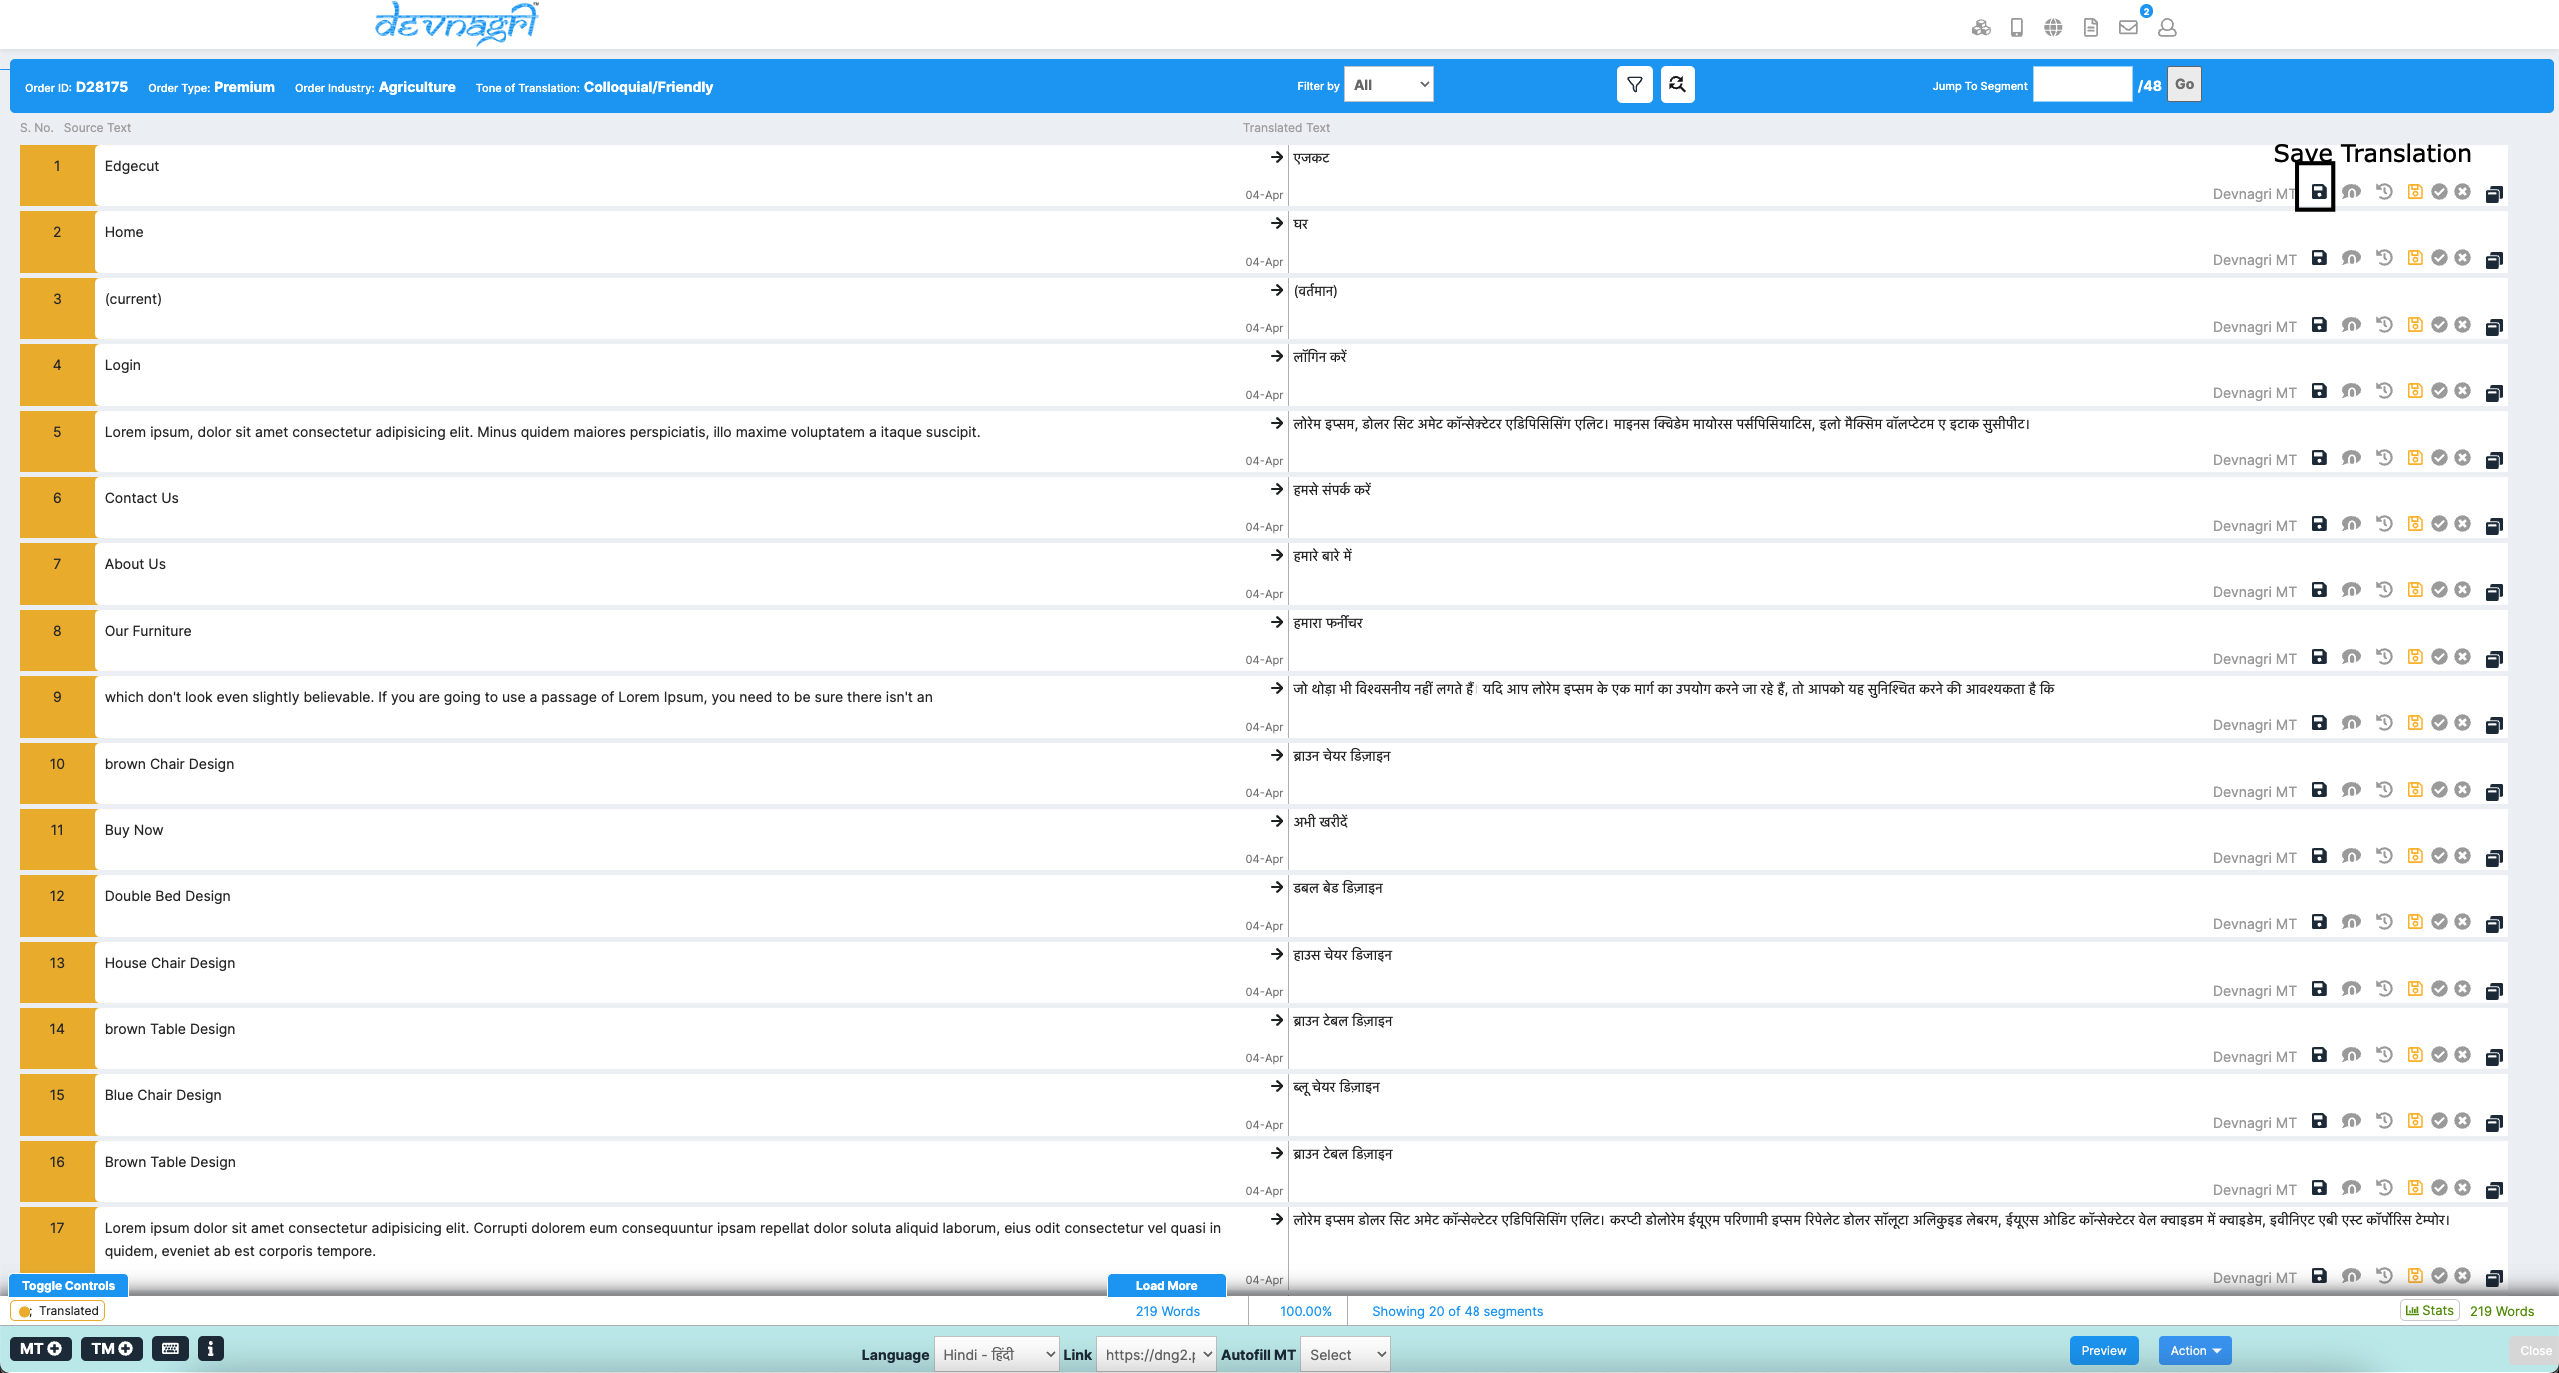
# Save Translation
The user or translator can save a specific segment after making changes by clicking the "Save Translation" button.
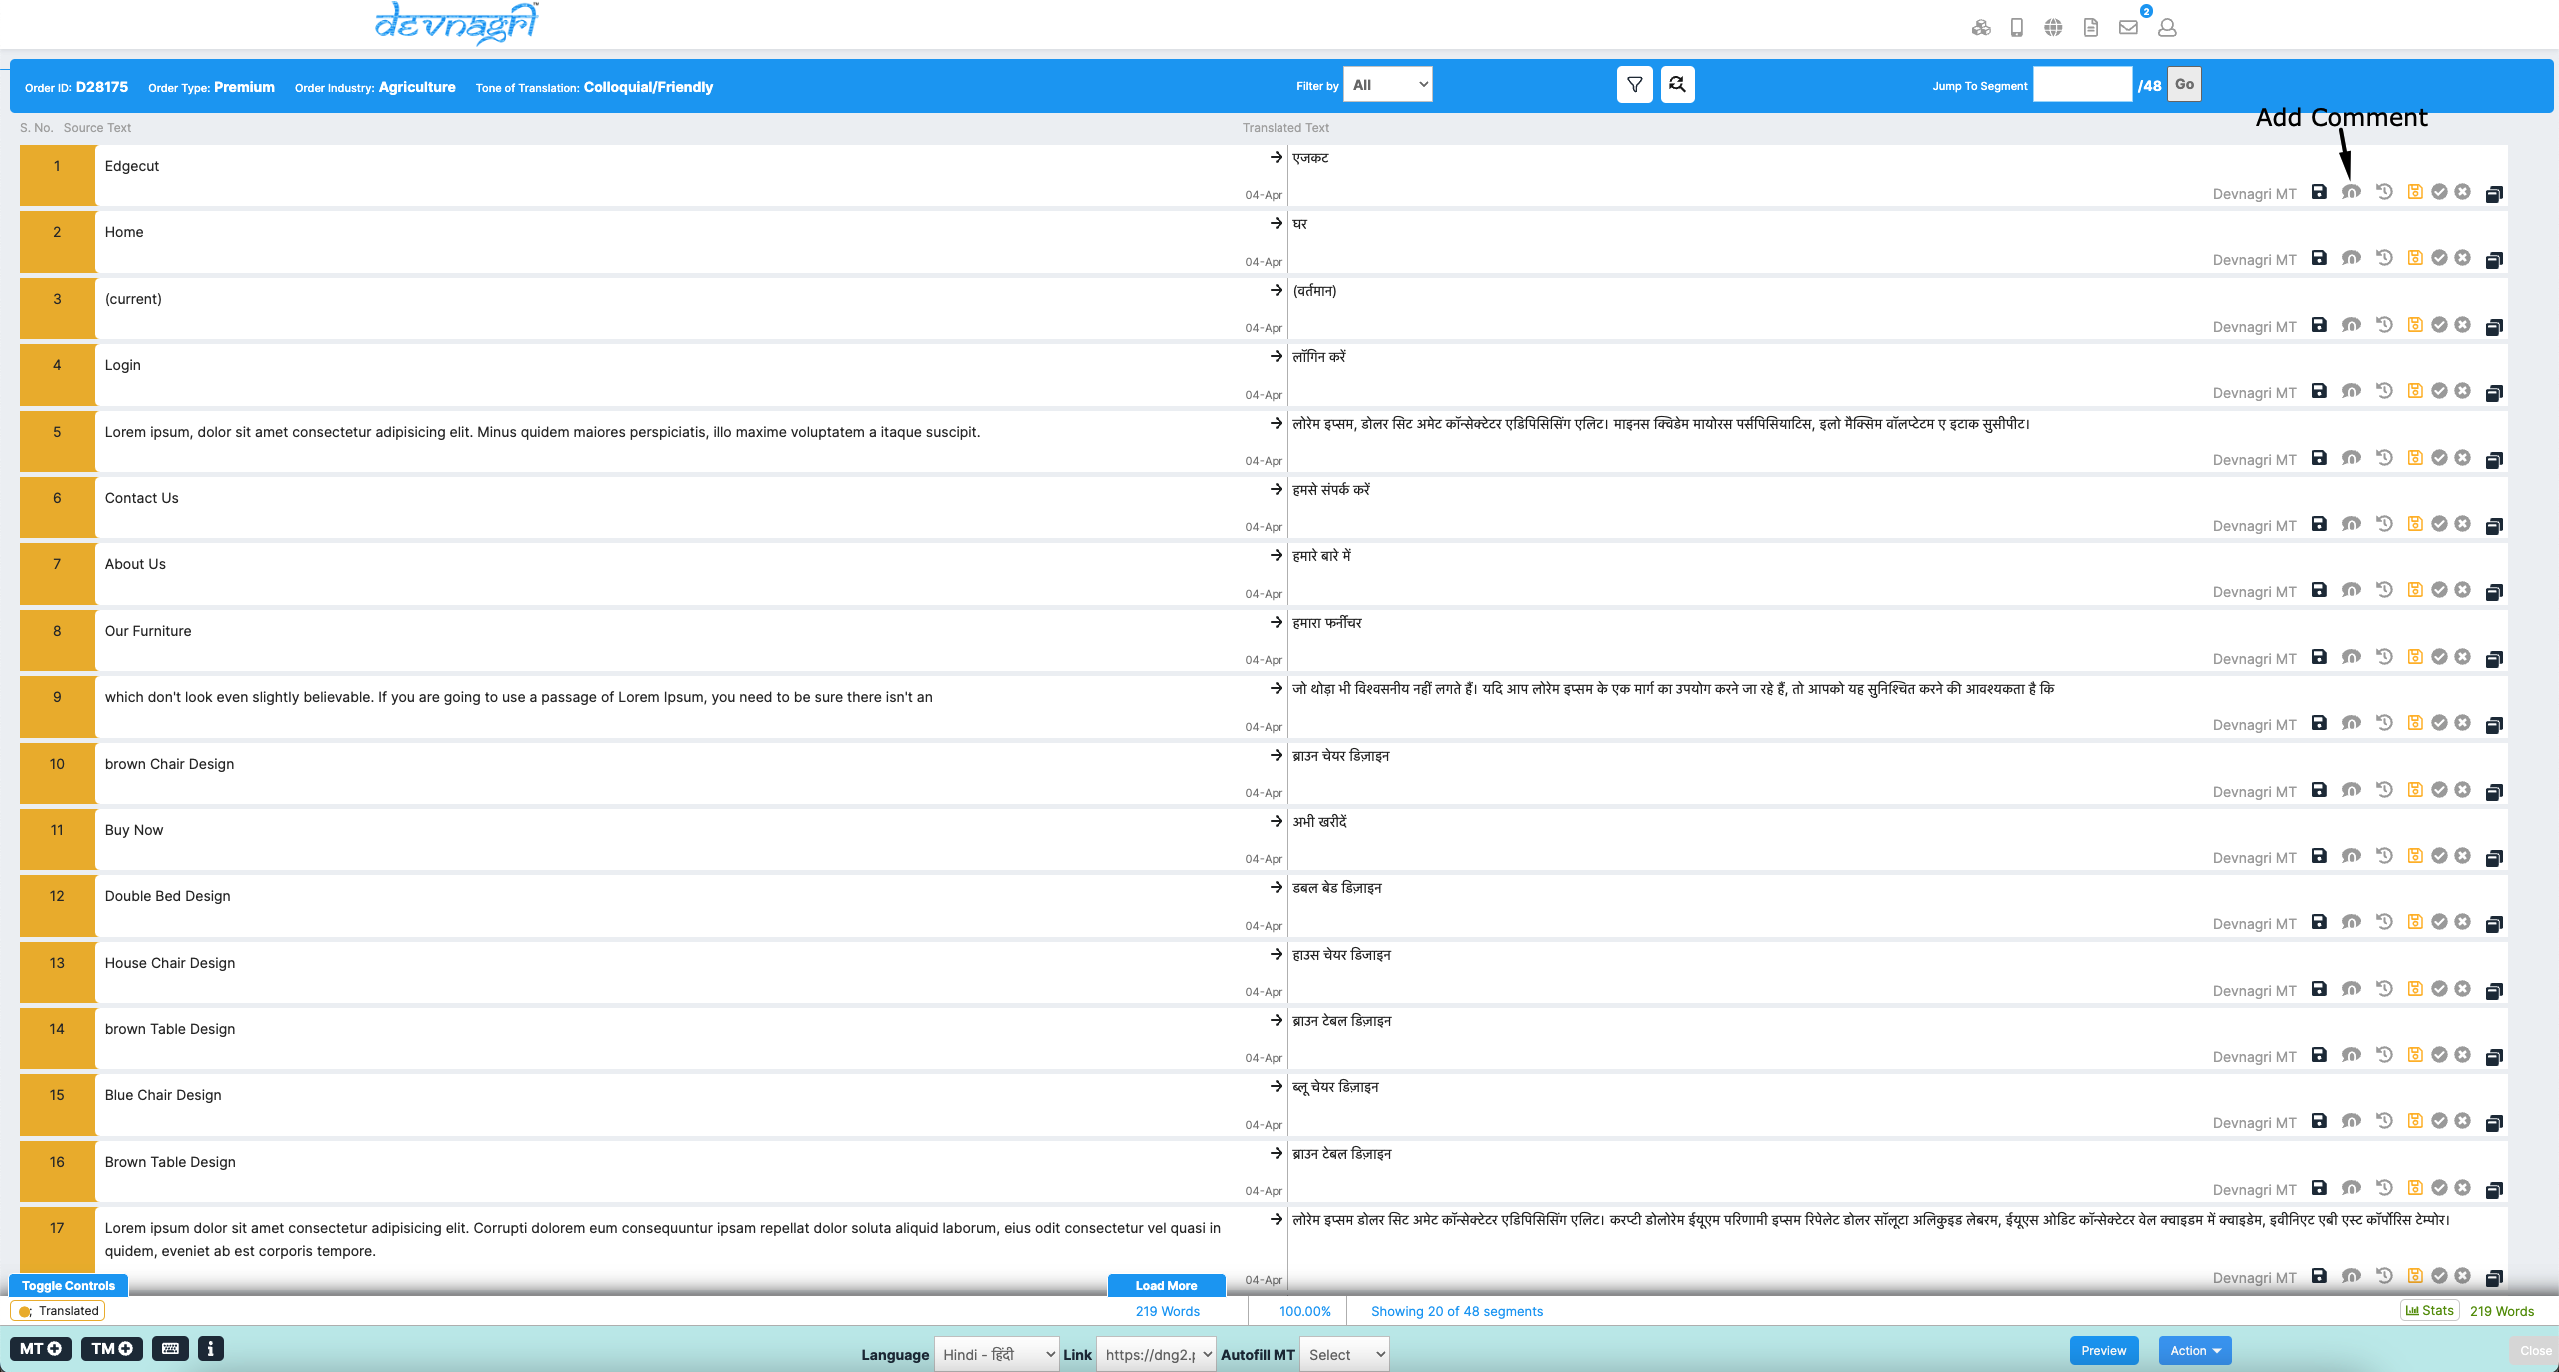
# Add Comment
Users have the option to add comments to the translation of any segment.
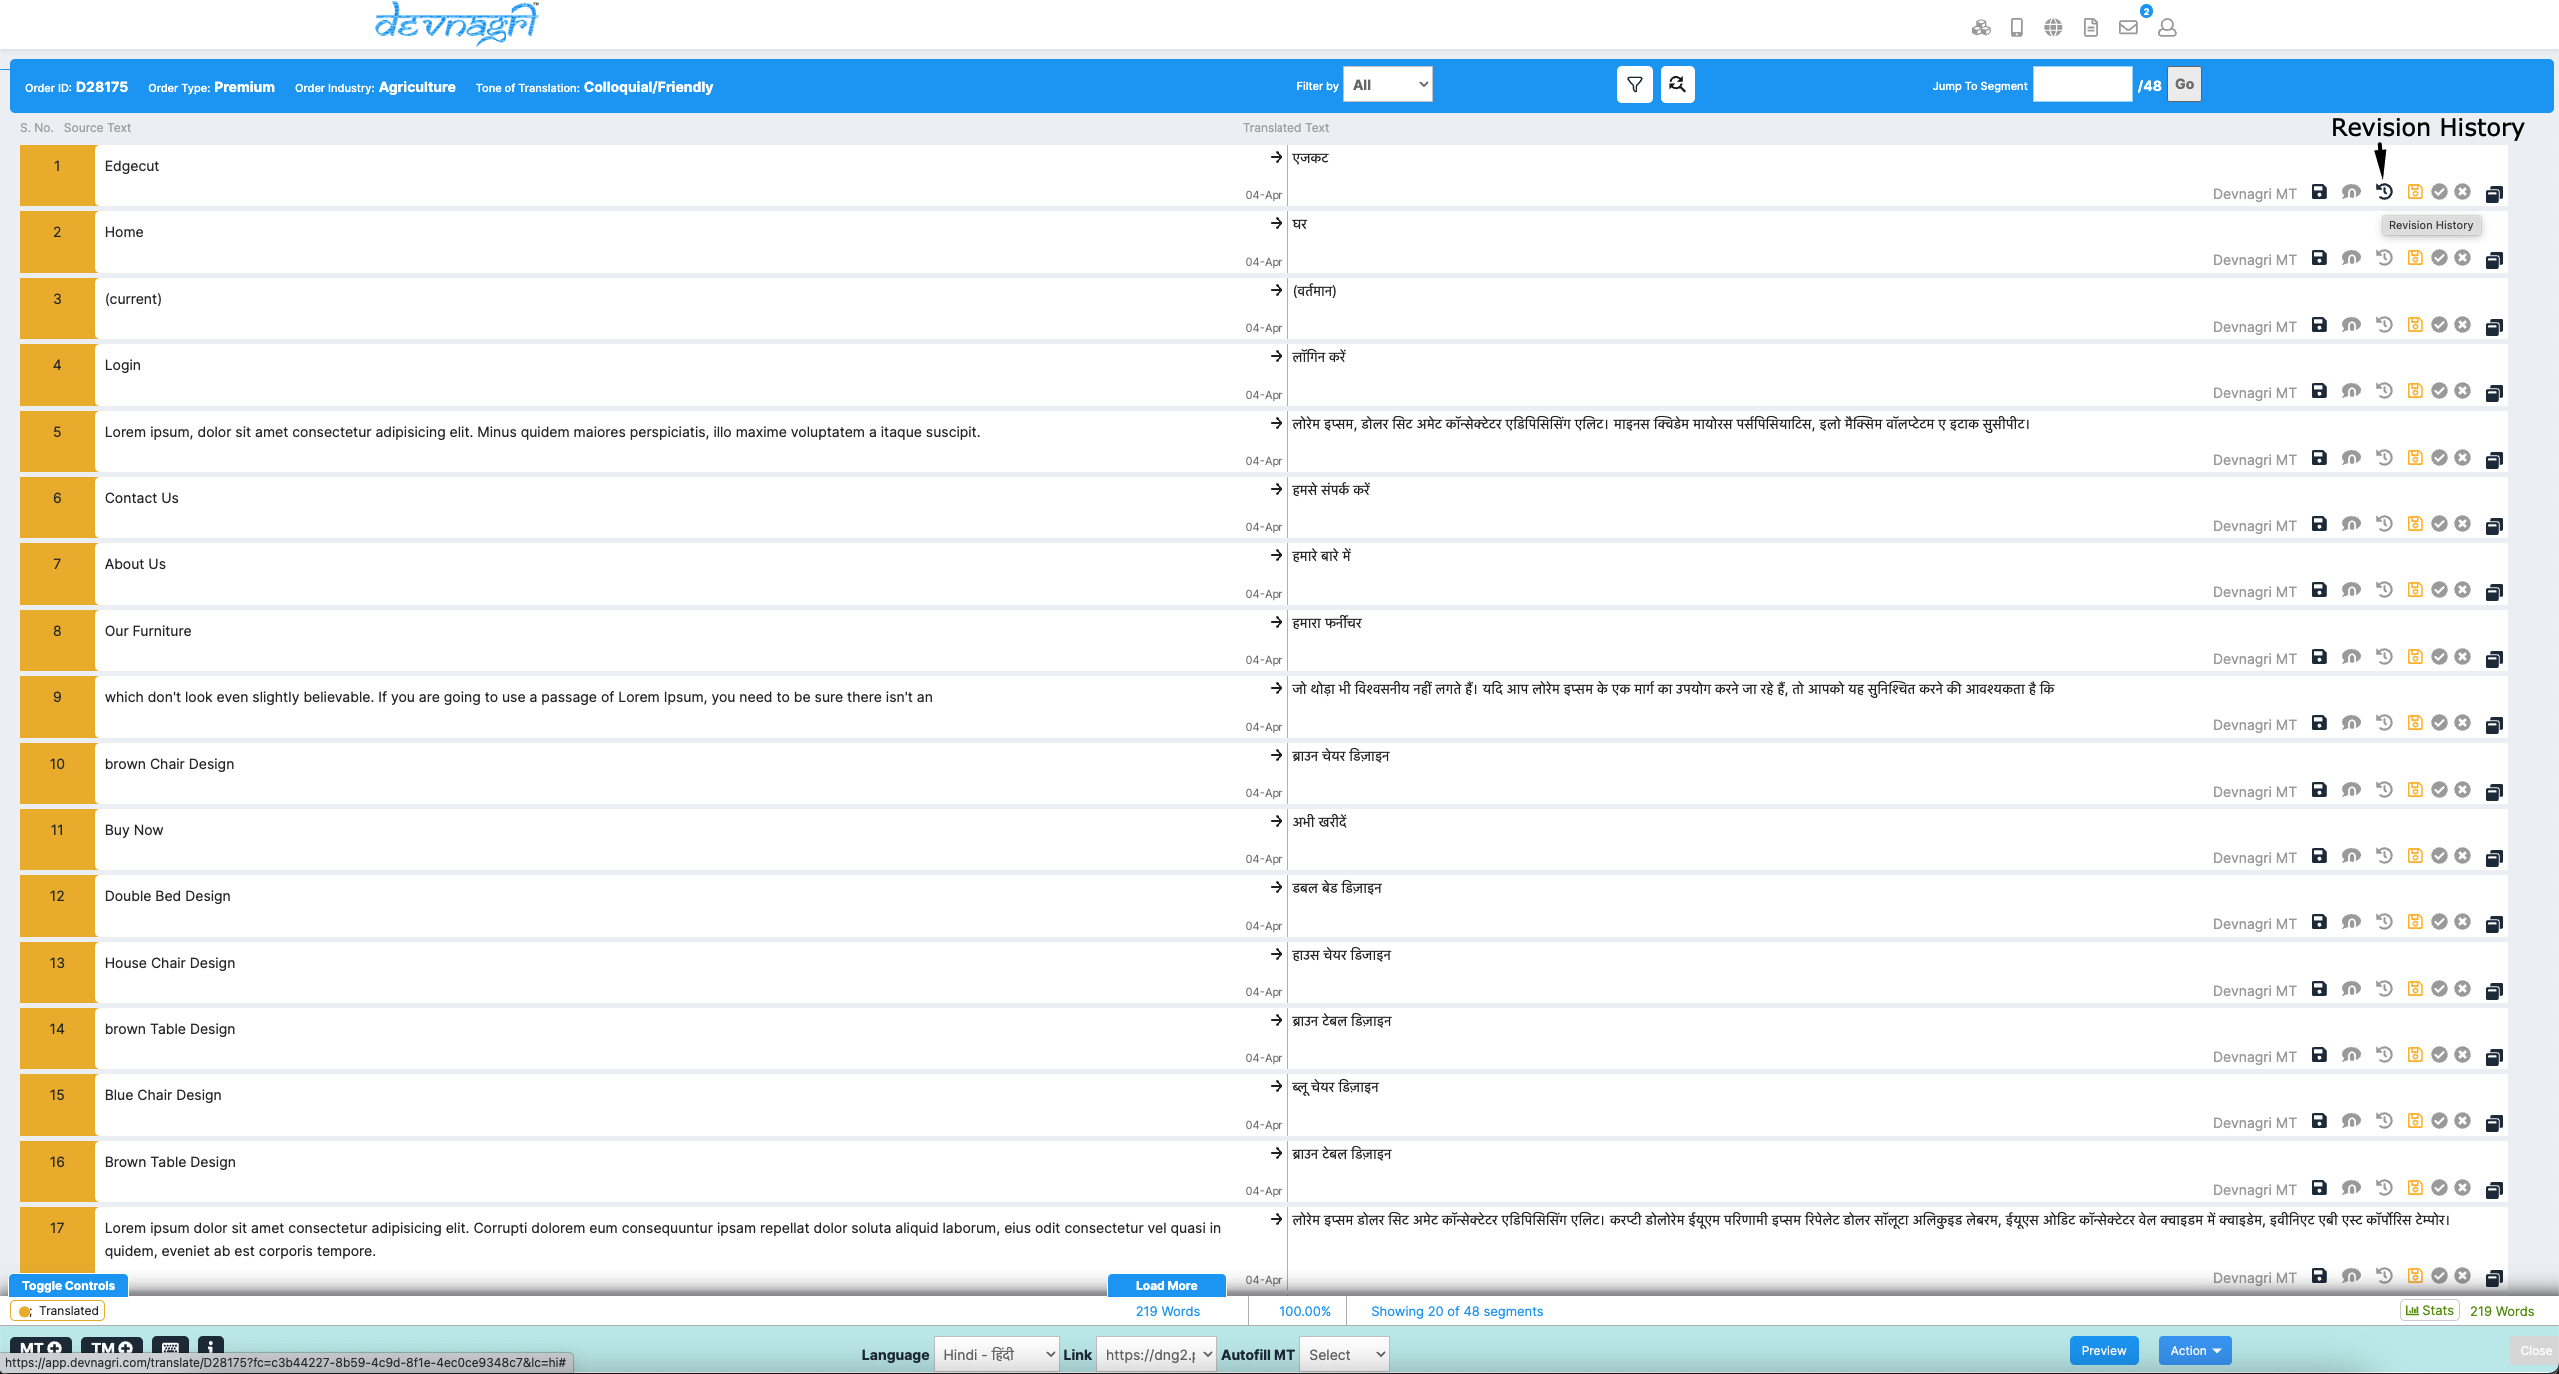
# Revision History
User can review the complete history of changes made to a particular segment.
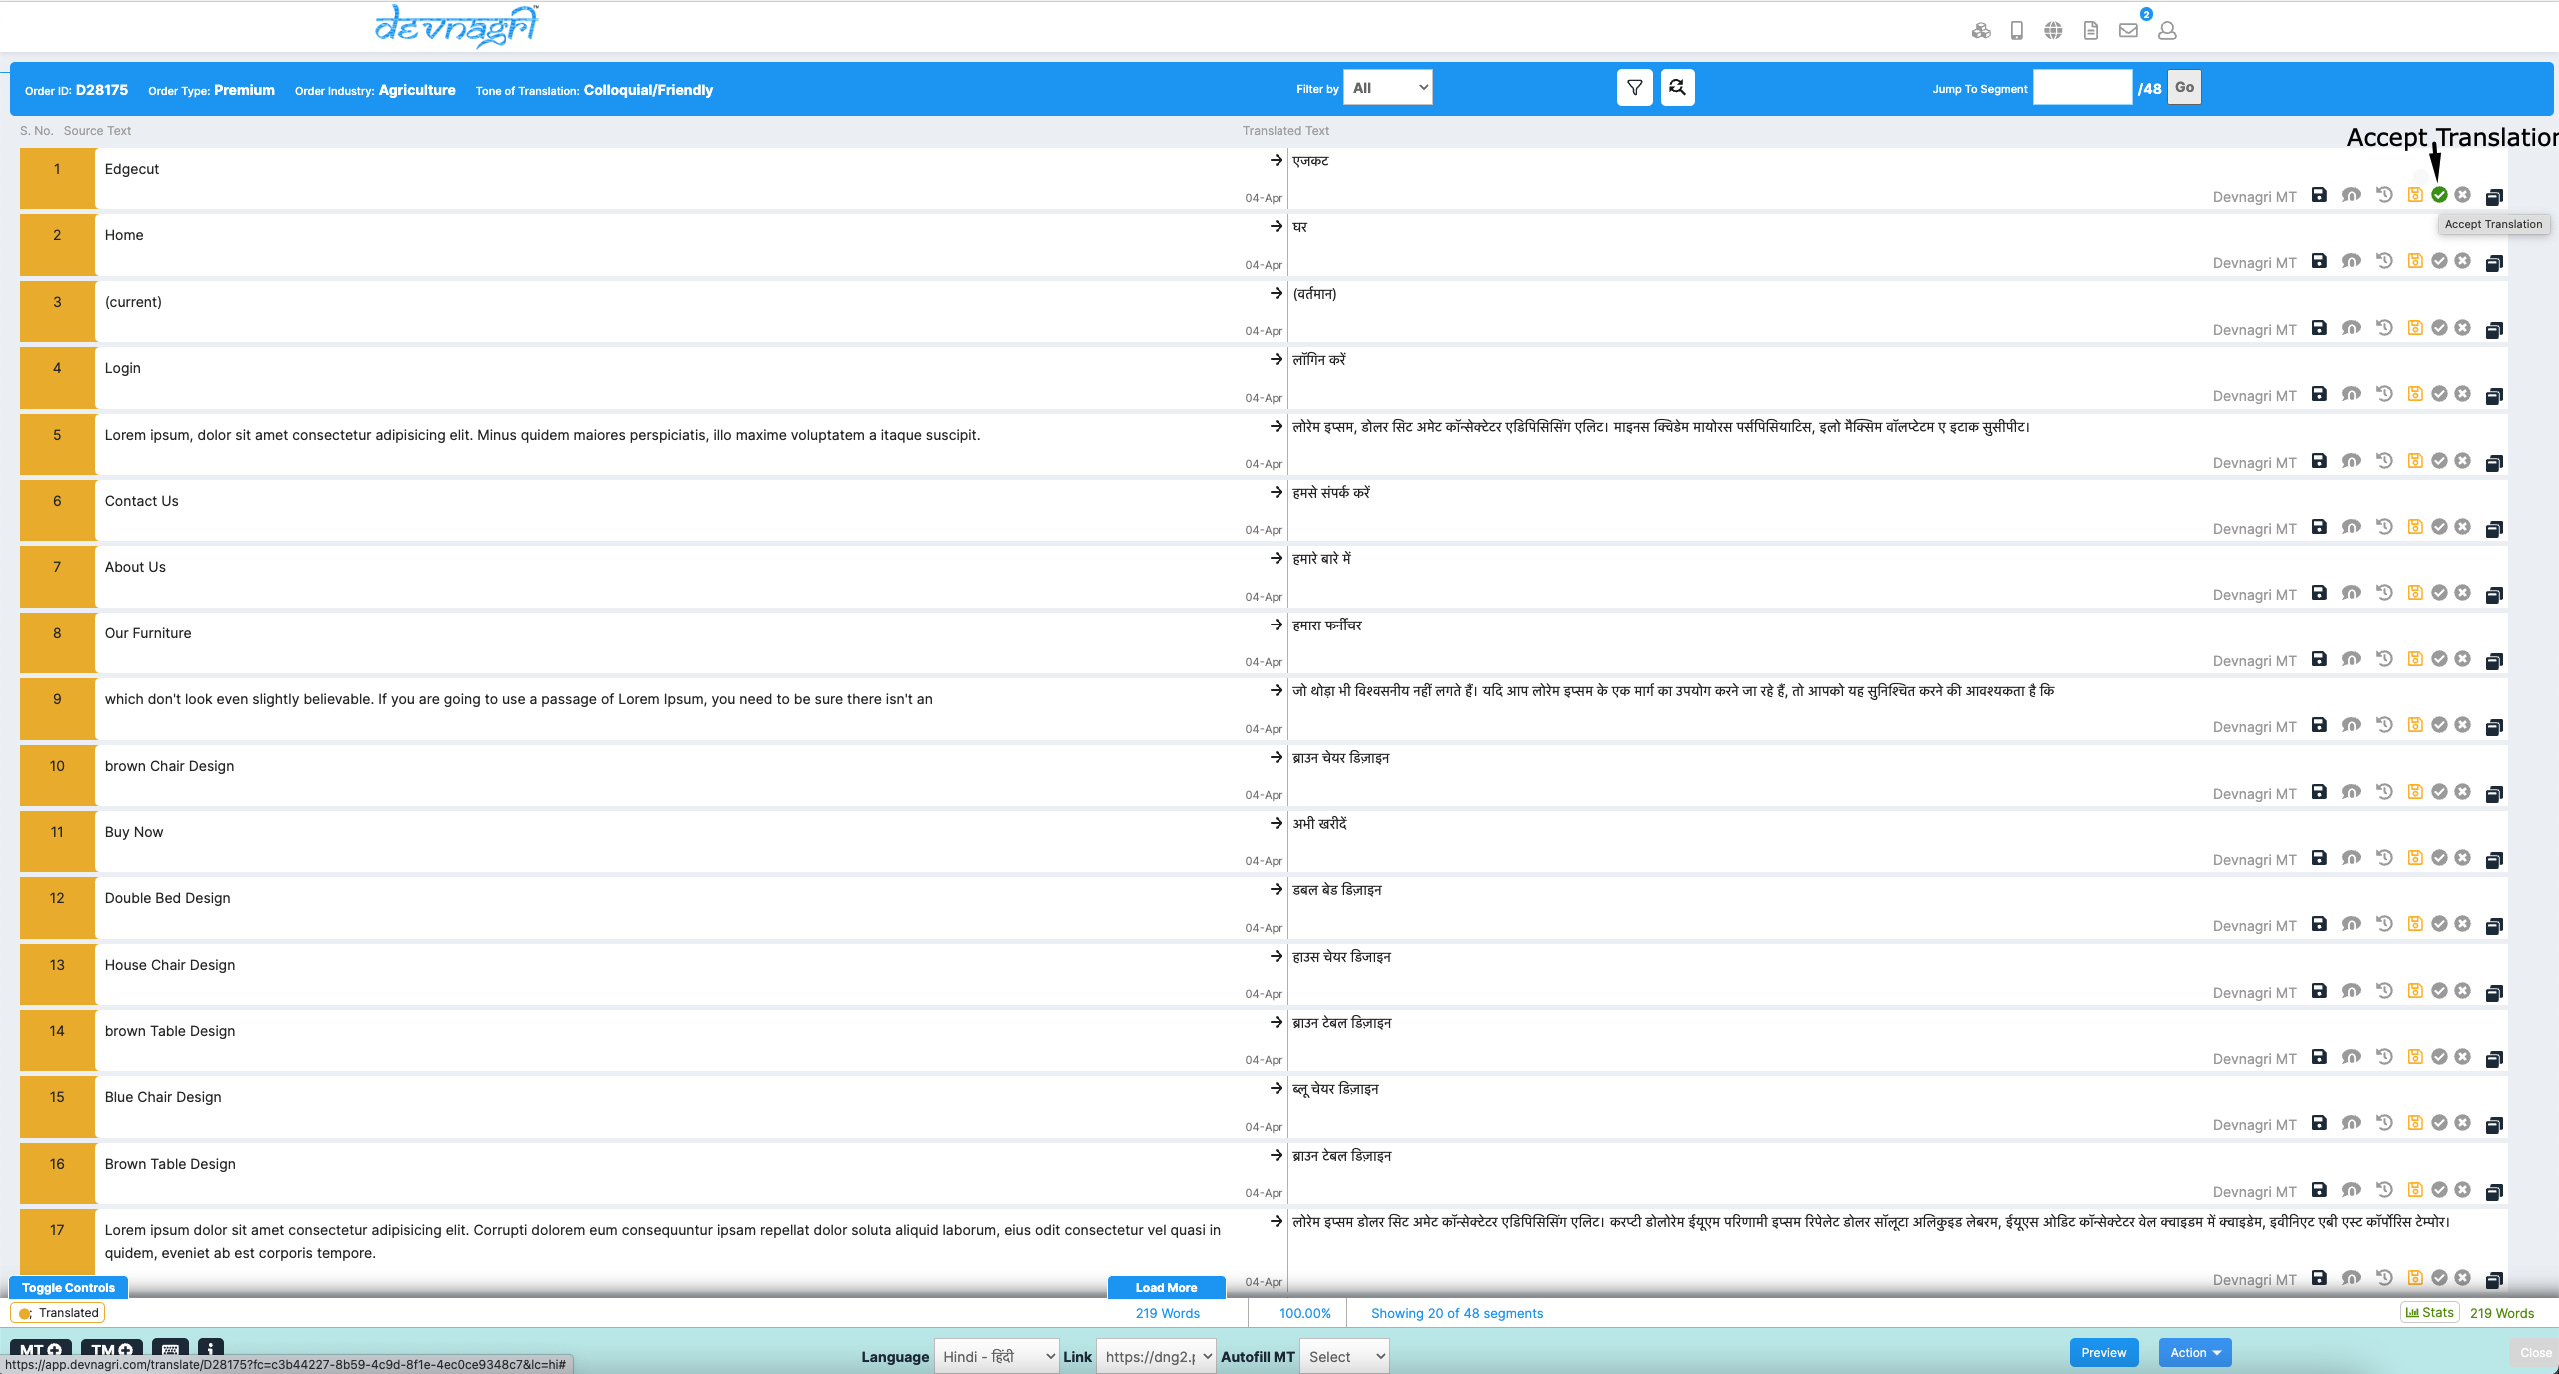
# Accept Translation
Reviewers can accept the translations done by translators by clicking on this button.
# Reject Translation
Reviewers can reject the translations done by translators by clicking on this button.

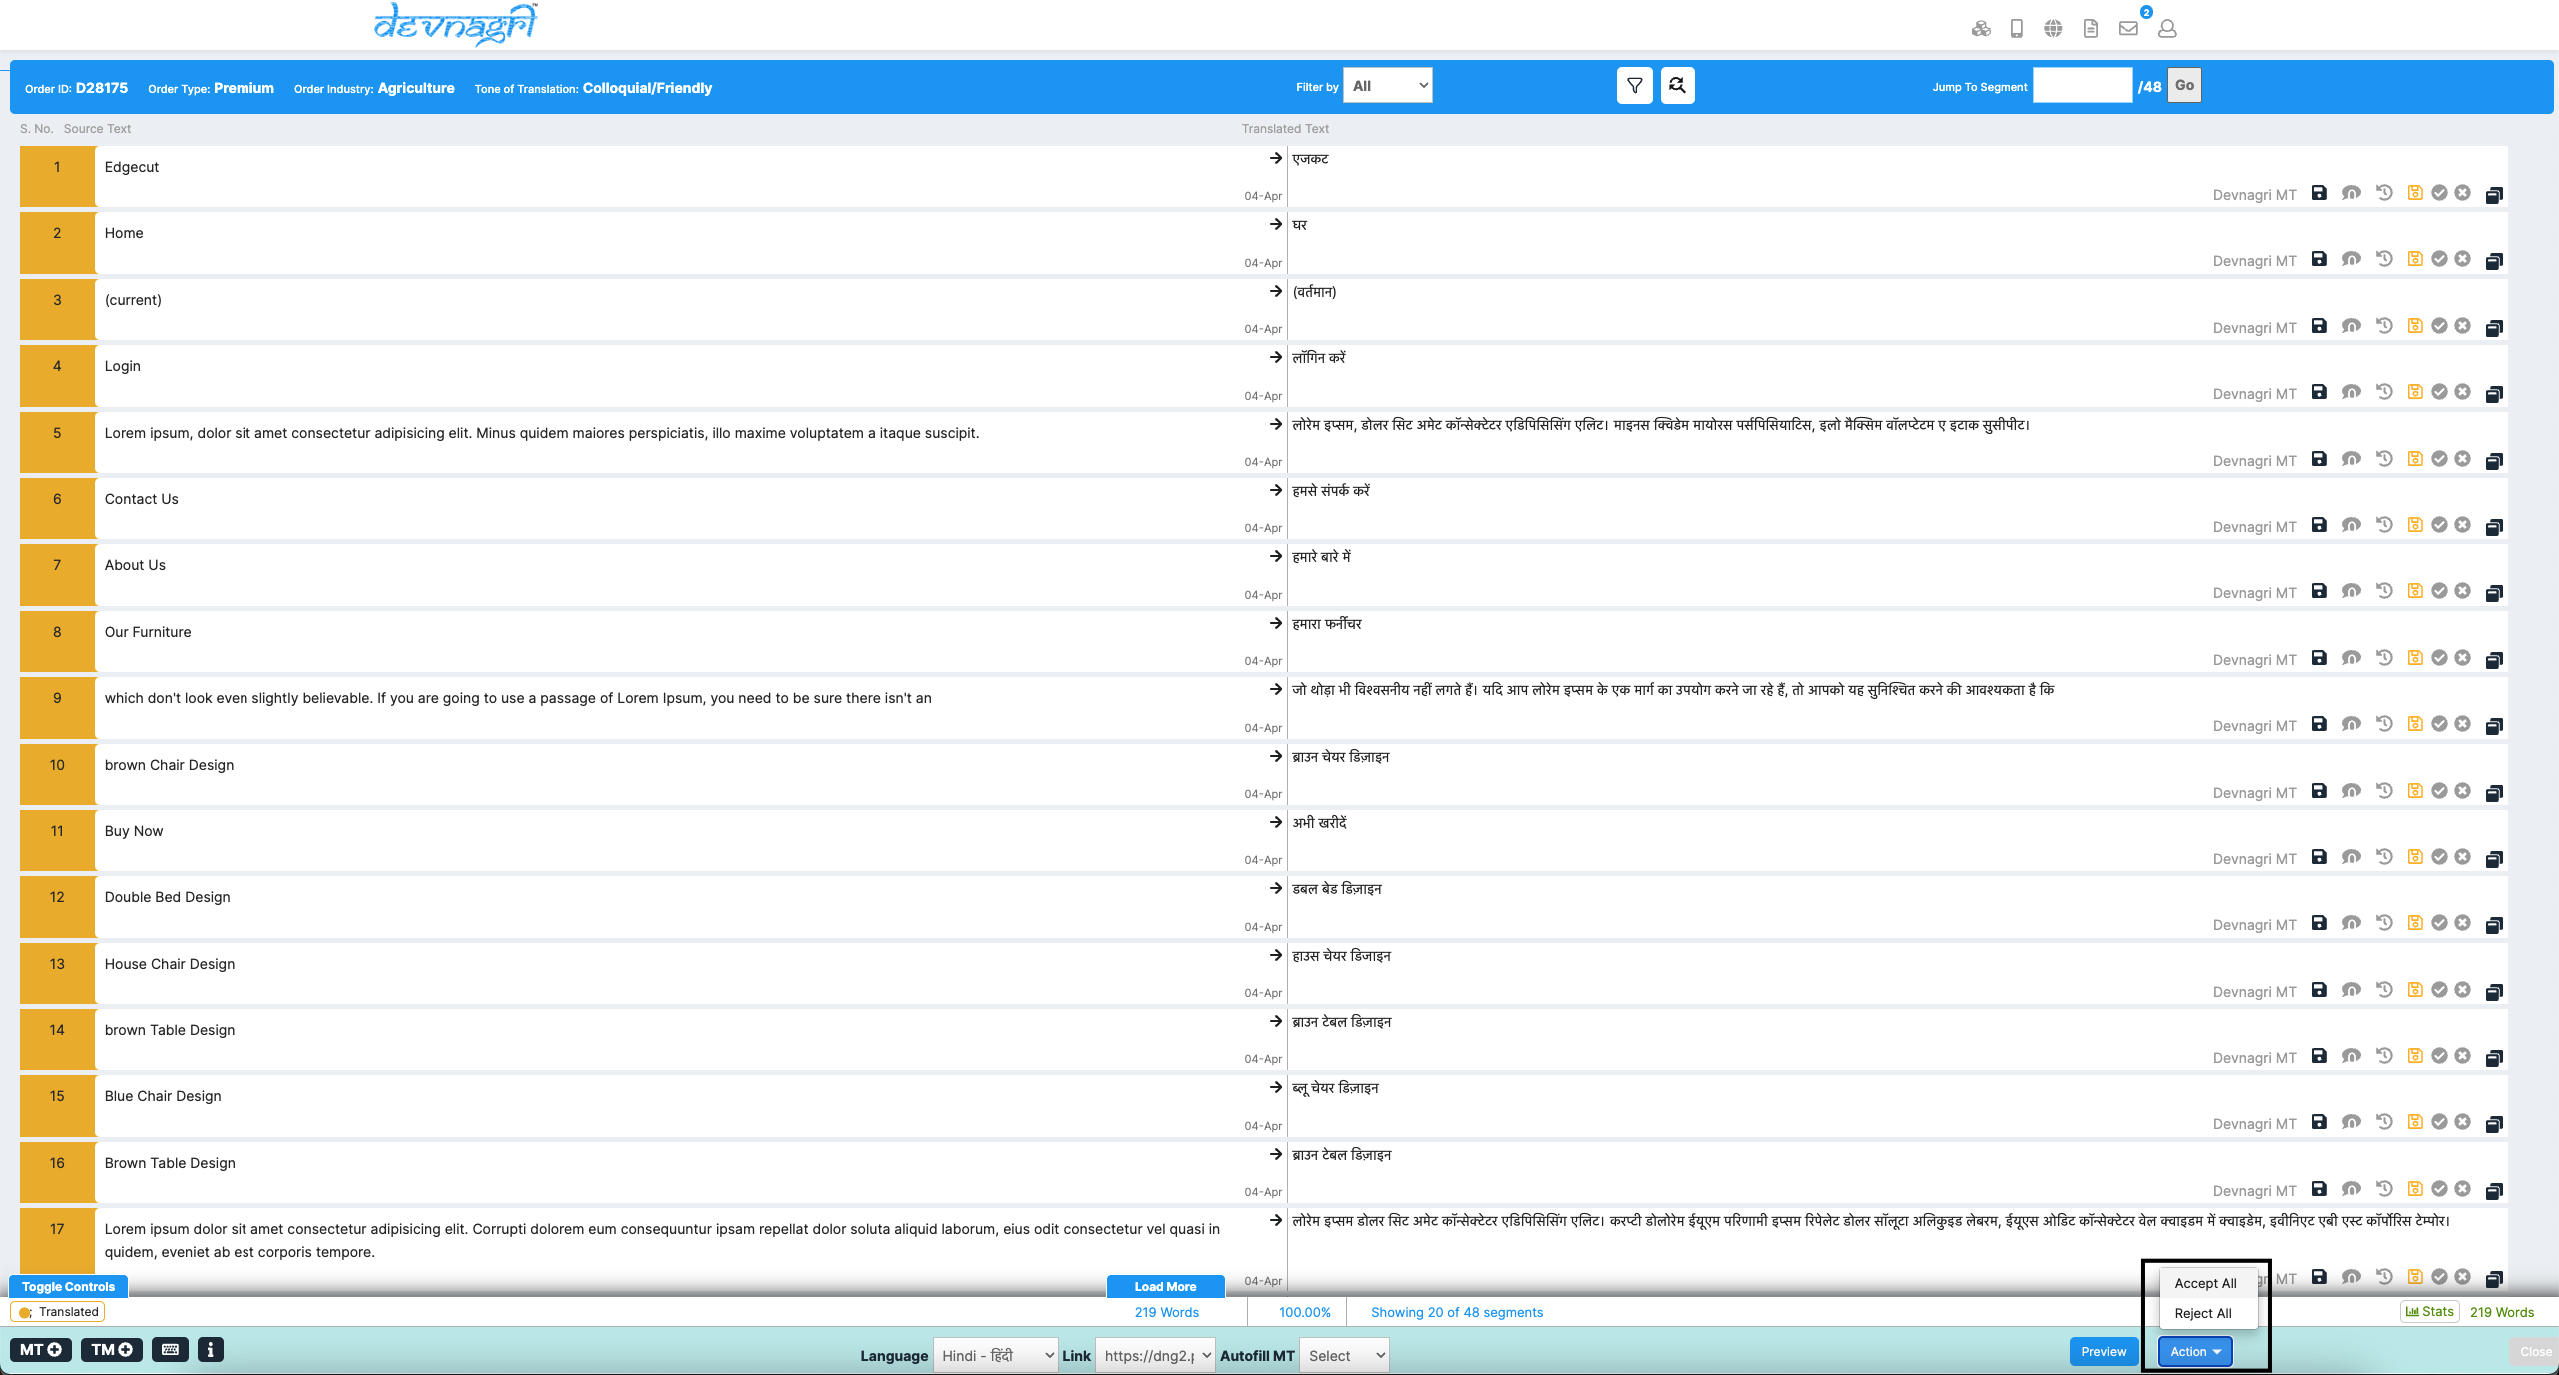
# Accept/Reject All
Reviewers can accept/reject all segments at once from here.
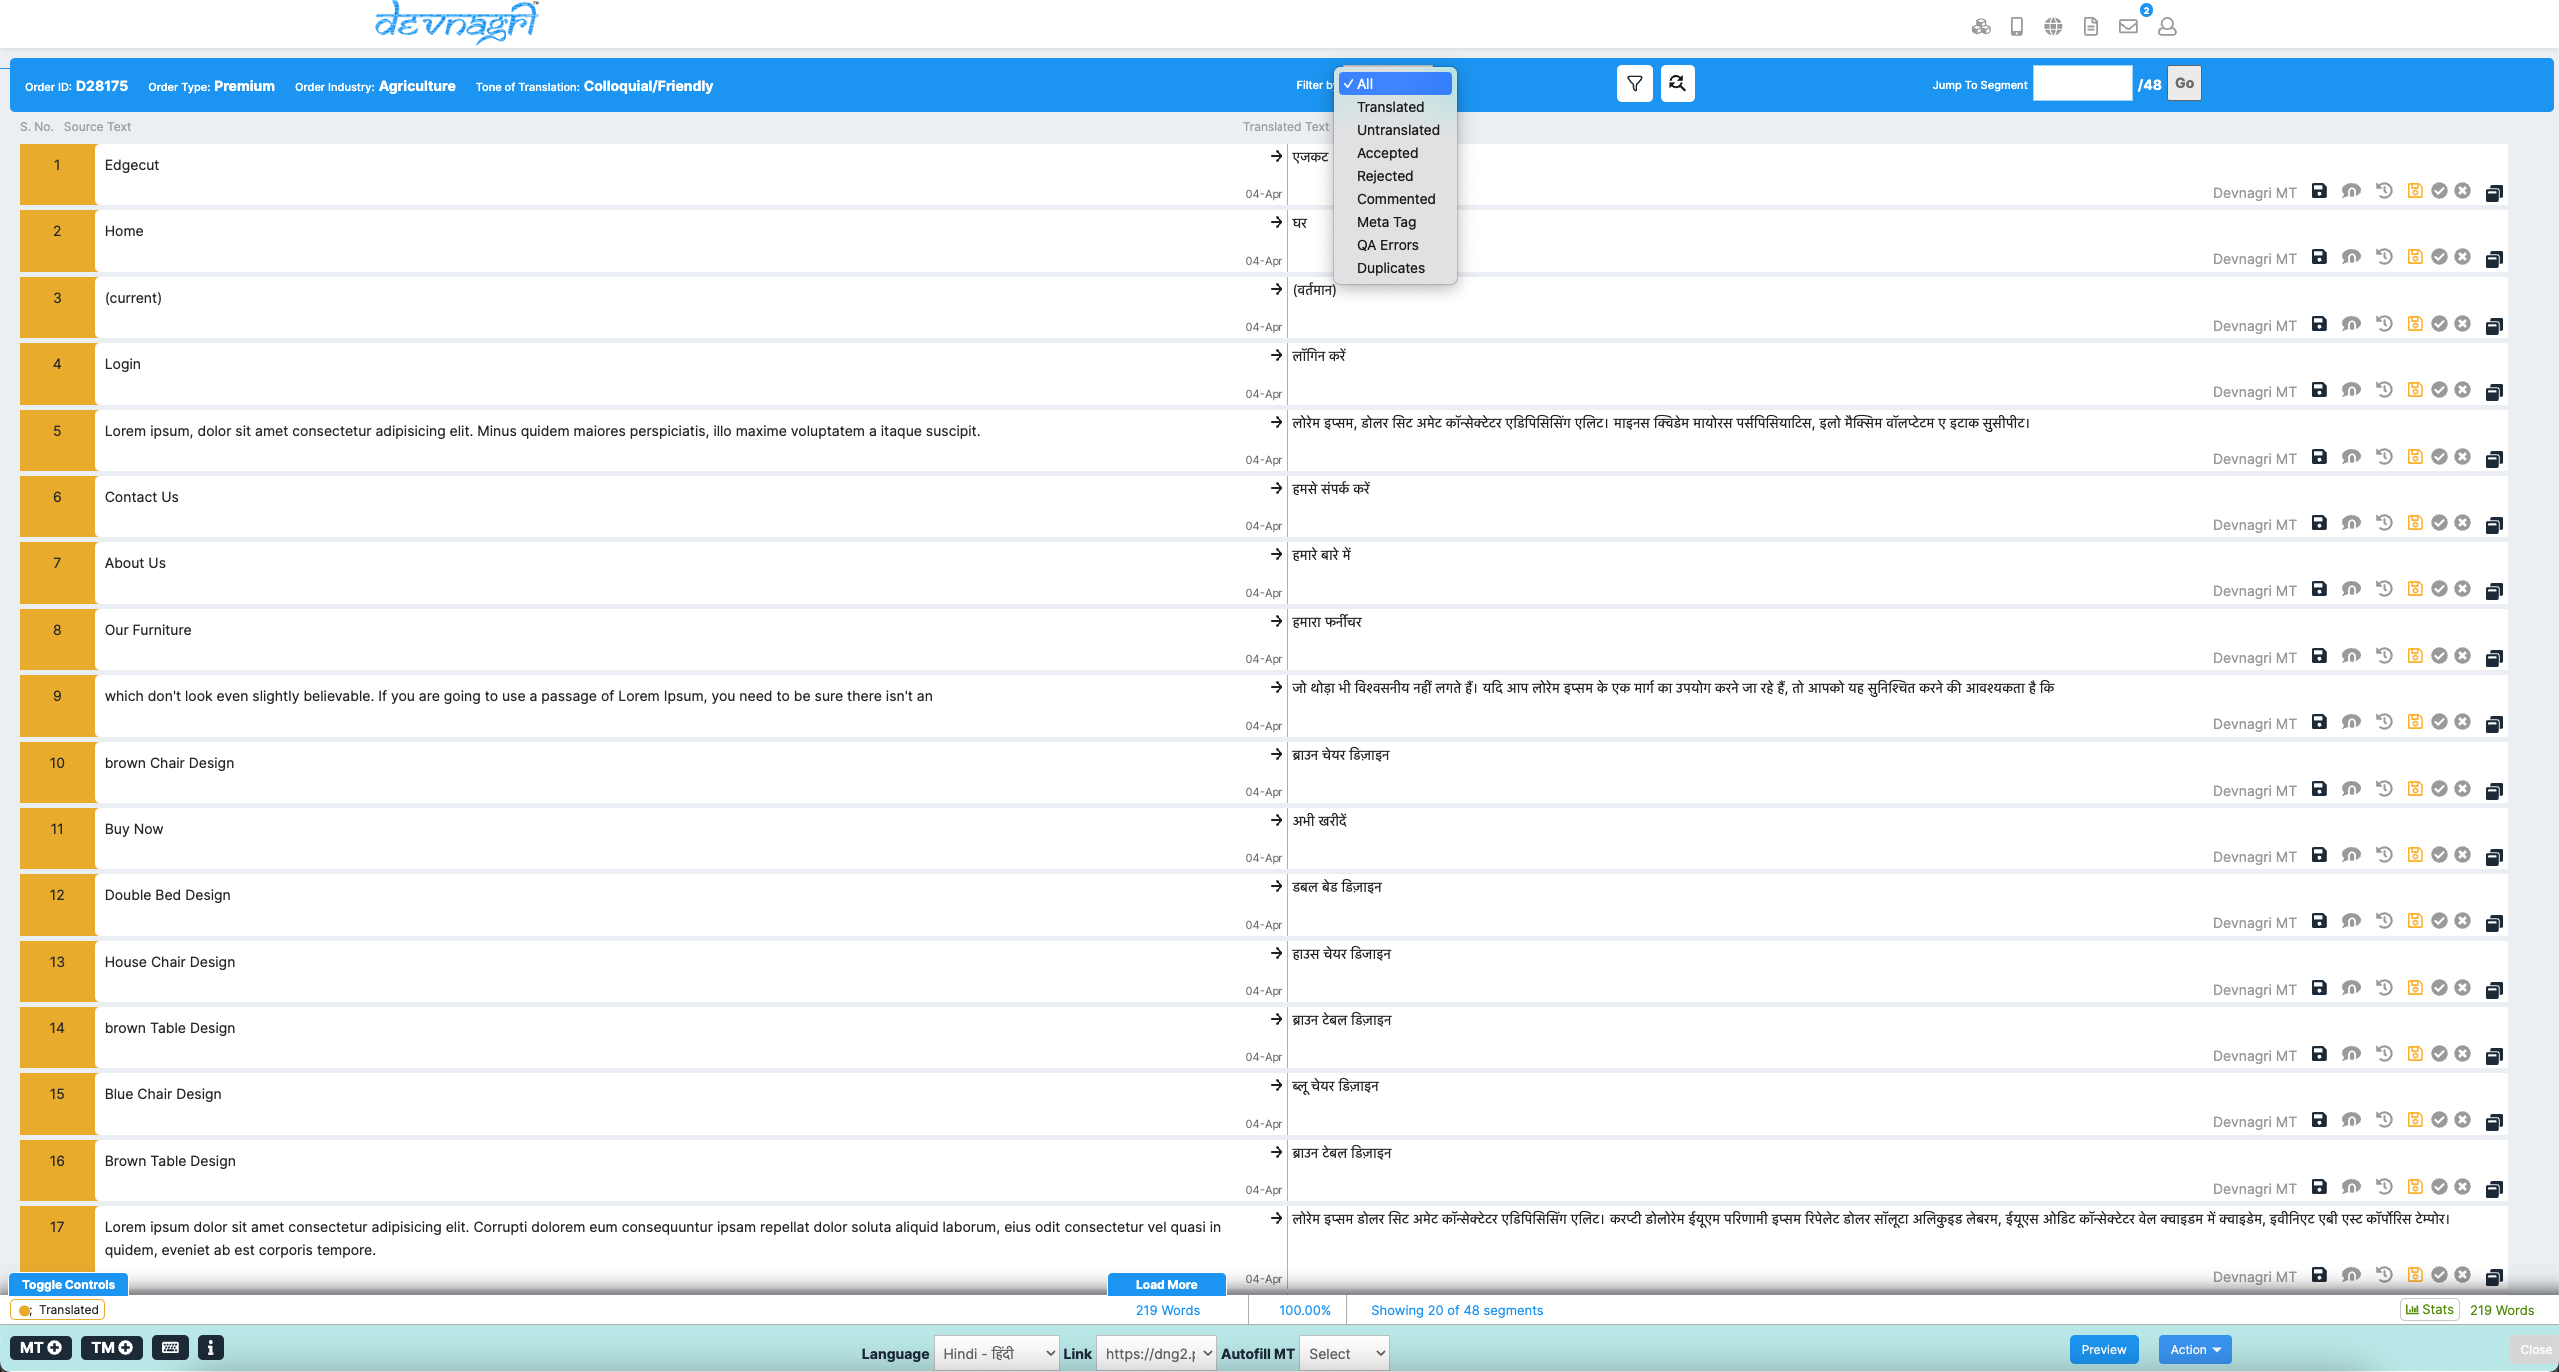
# Filter By
Filter from all the segments on basis of the status of the segments such as Translated, Untranslated, Accepted, Rejected, Commented, Duplicates etc.
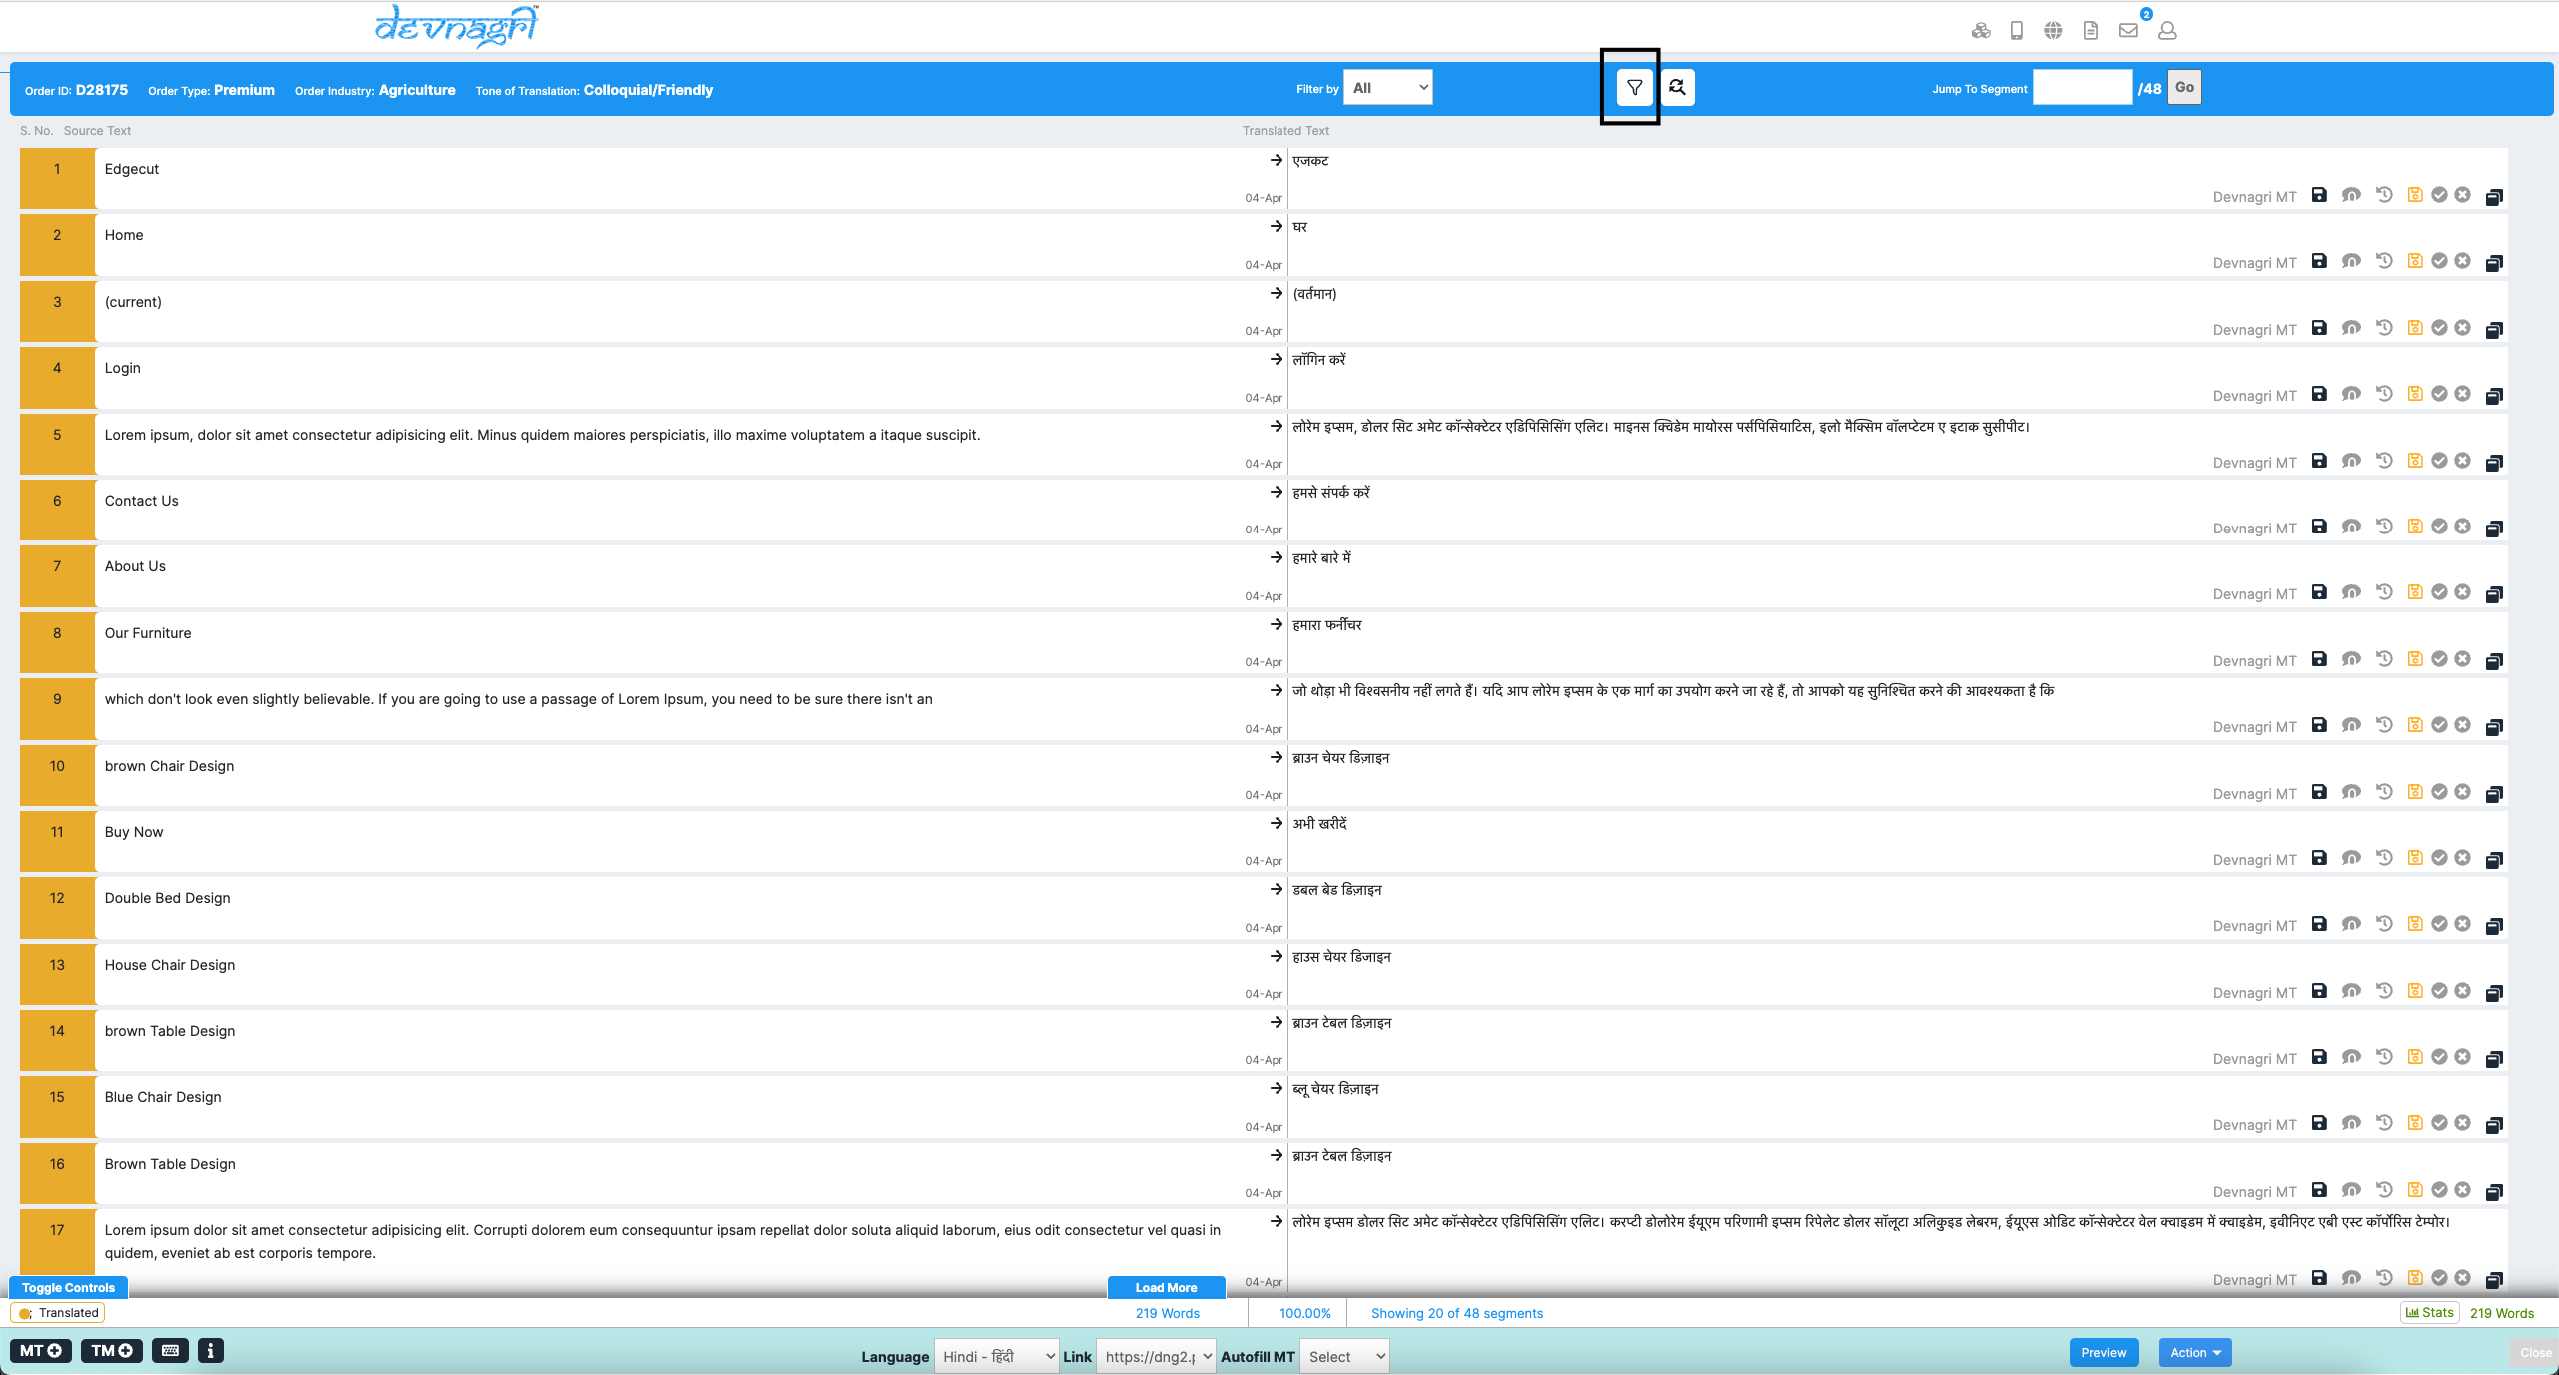
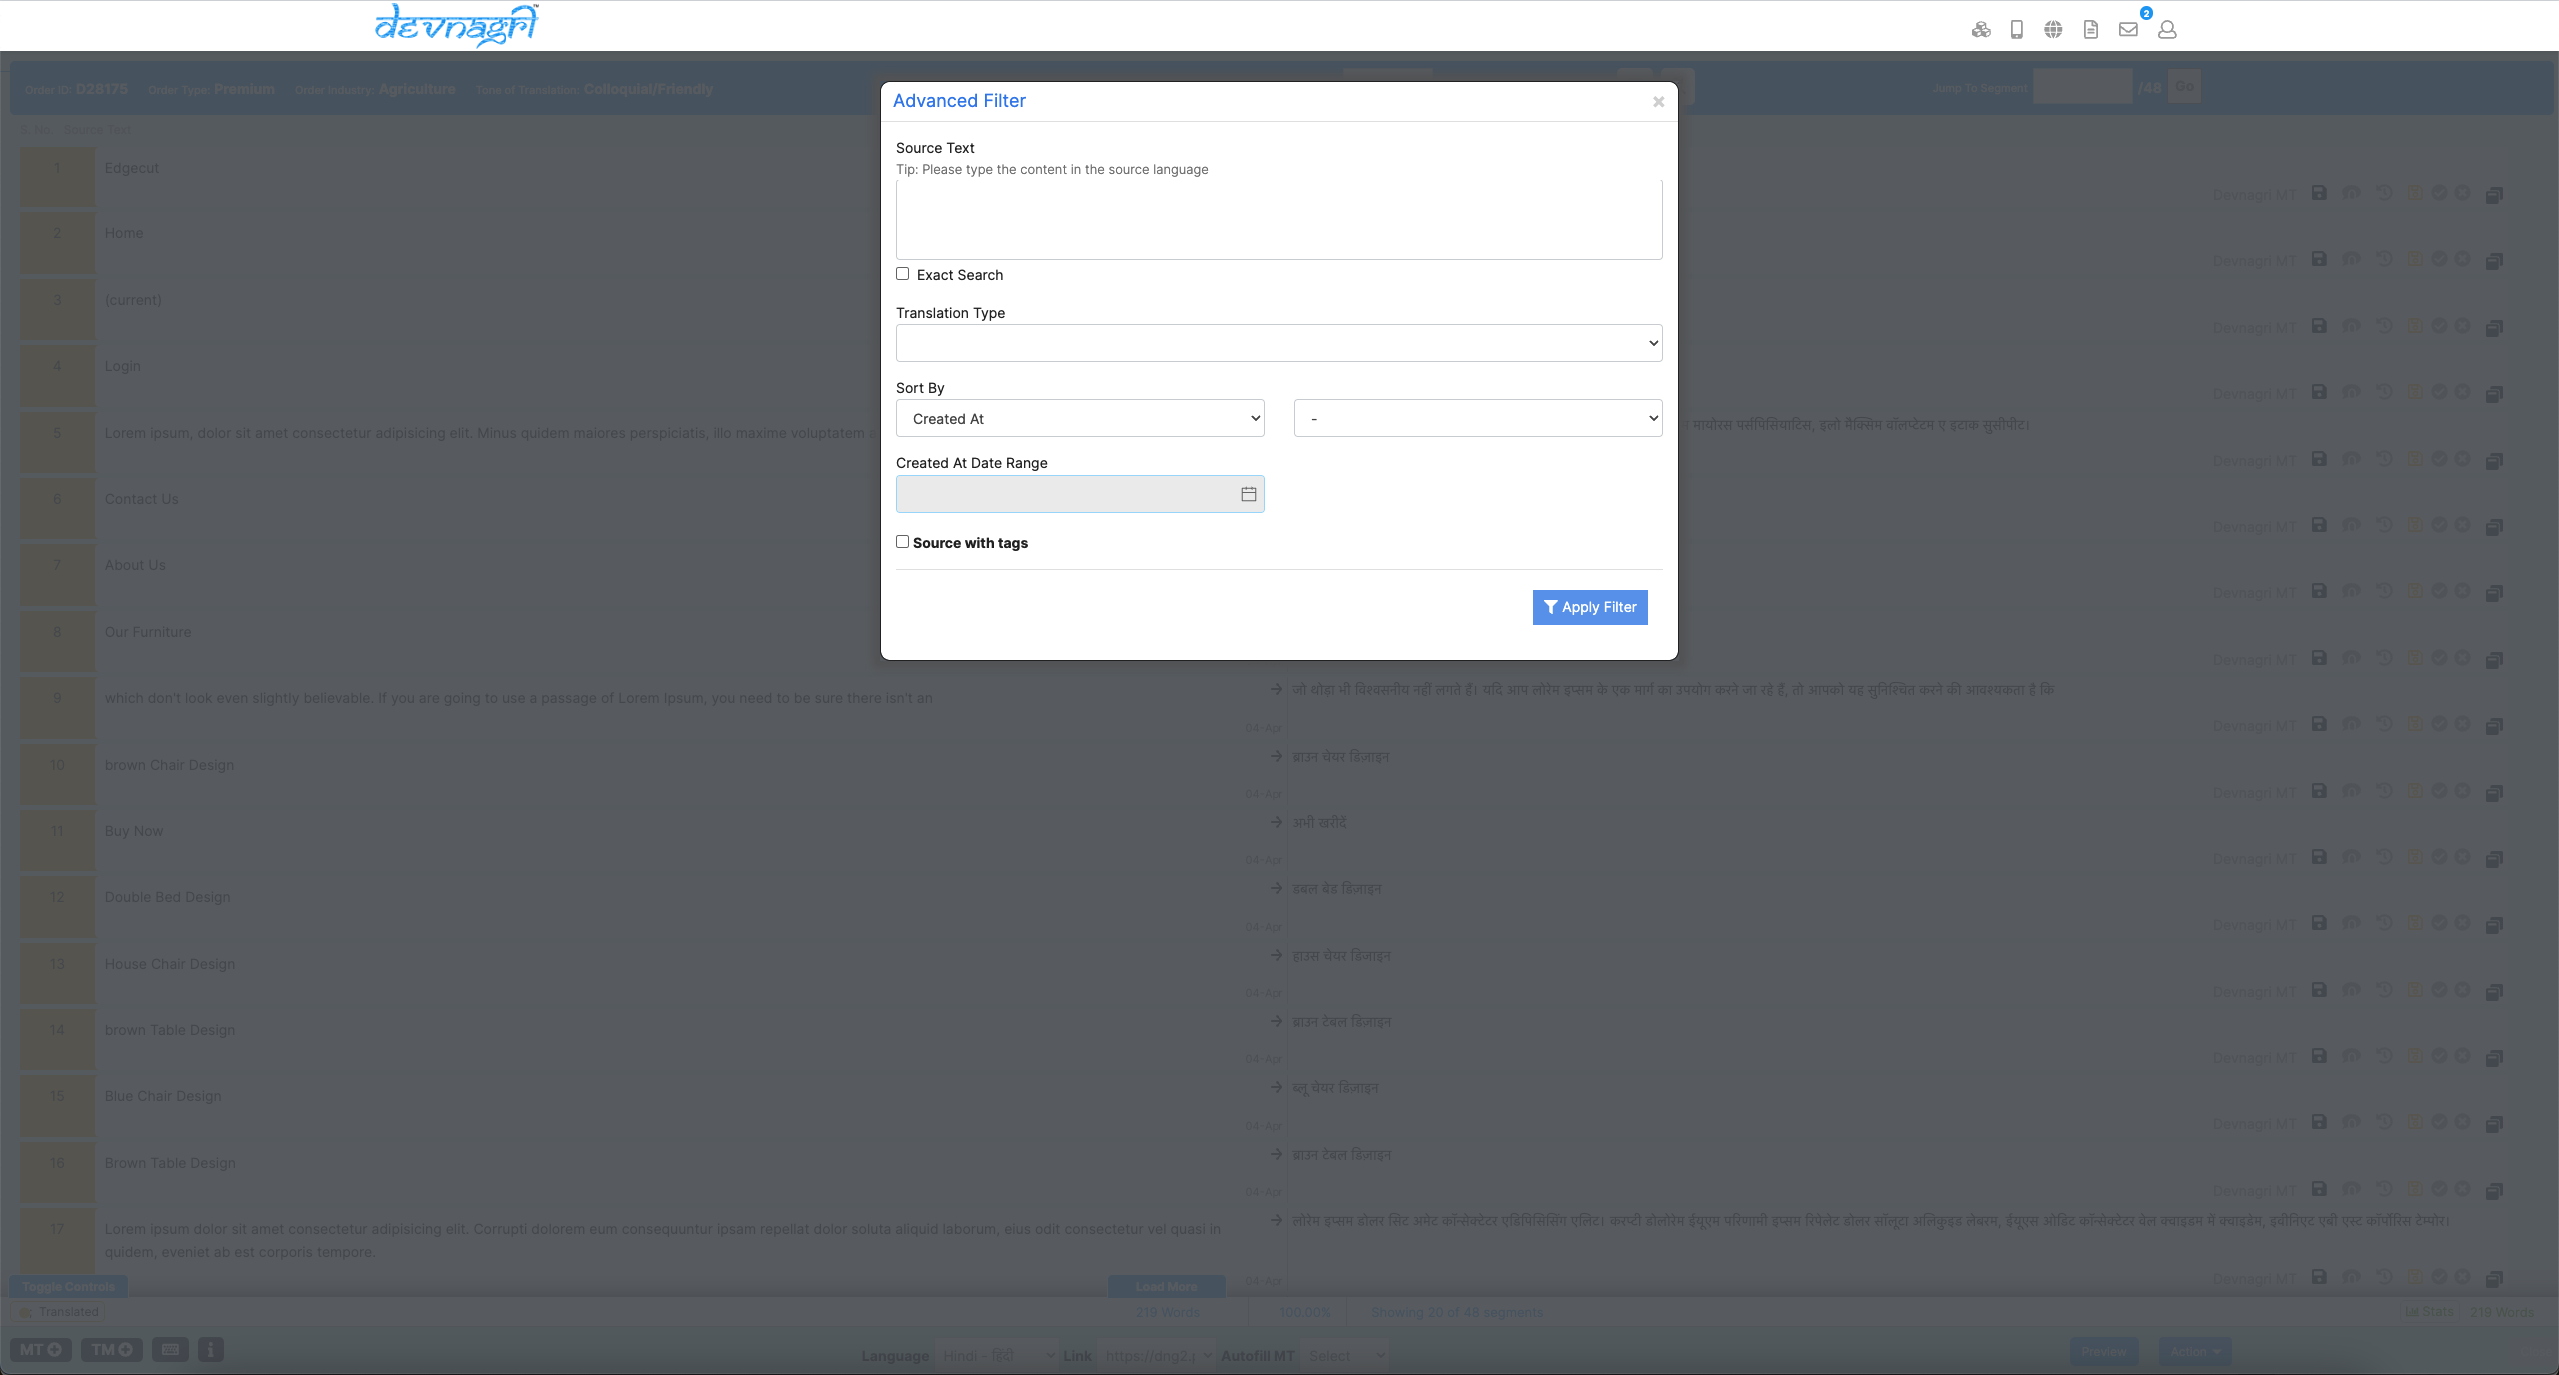
# Advance Filter
Filter the segments using options such as Source Text, Translation Type, Sort By, Created at and segments With tags in the source segments.
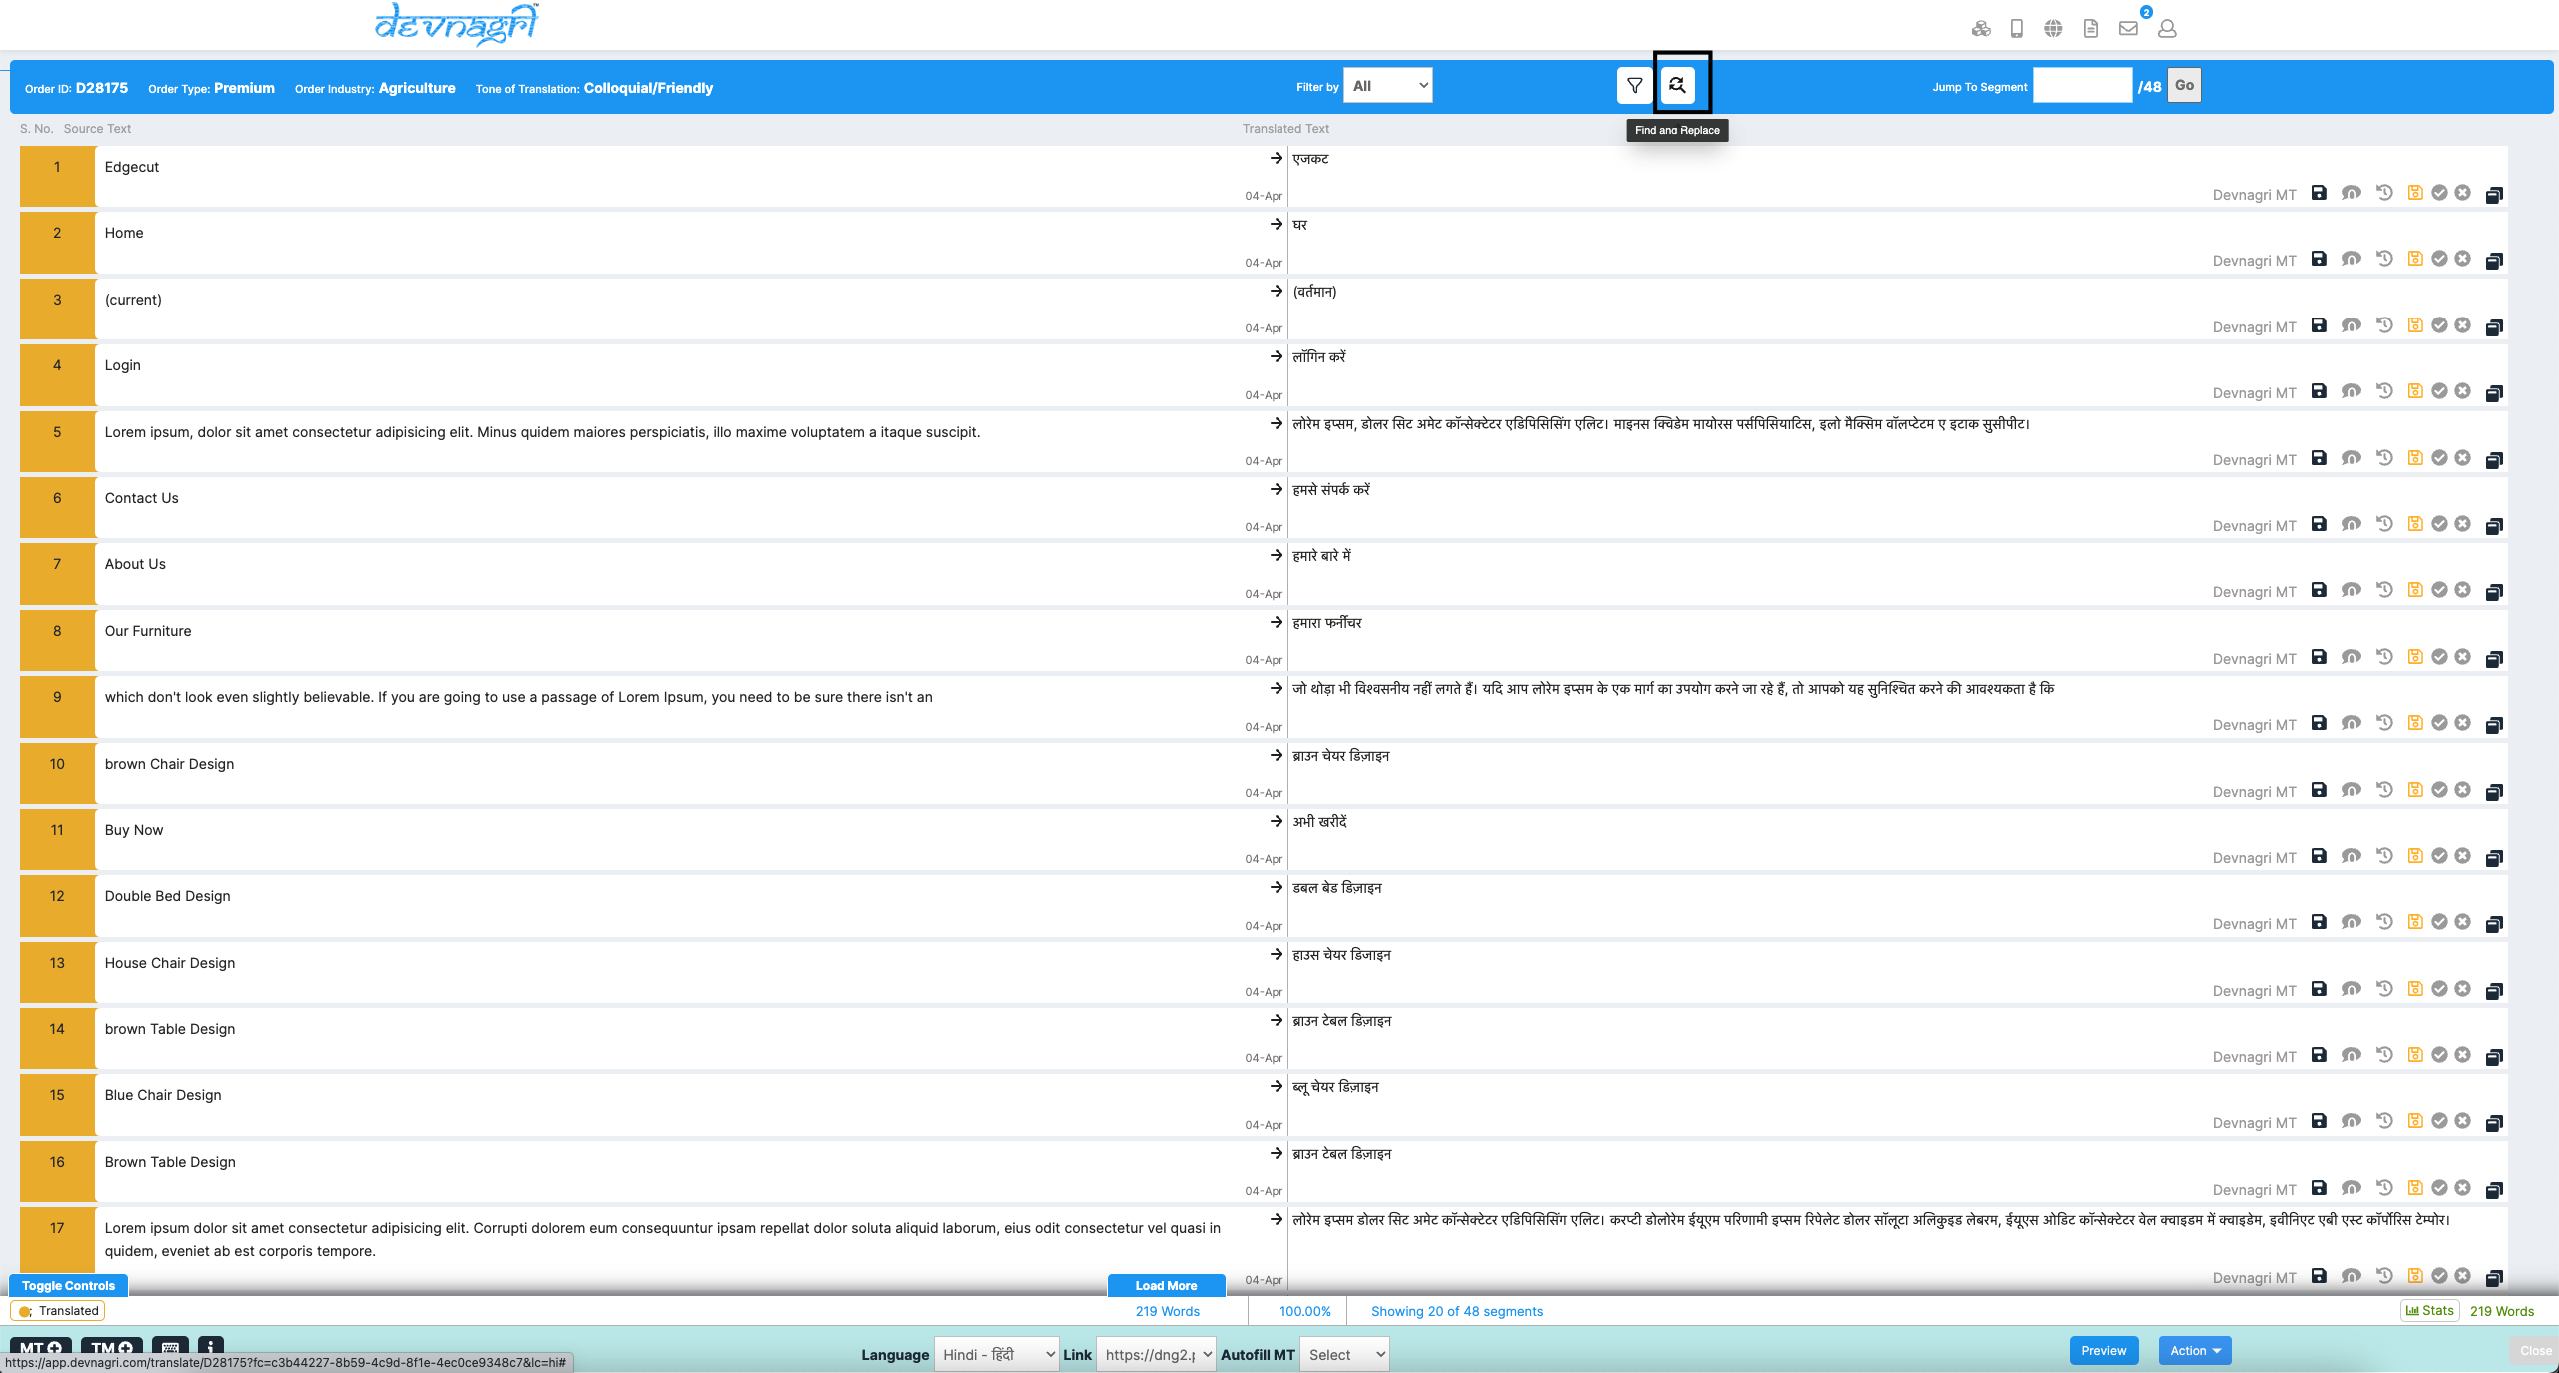
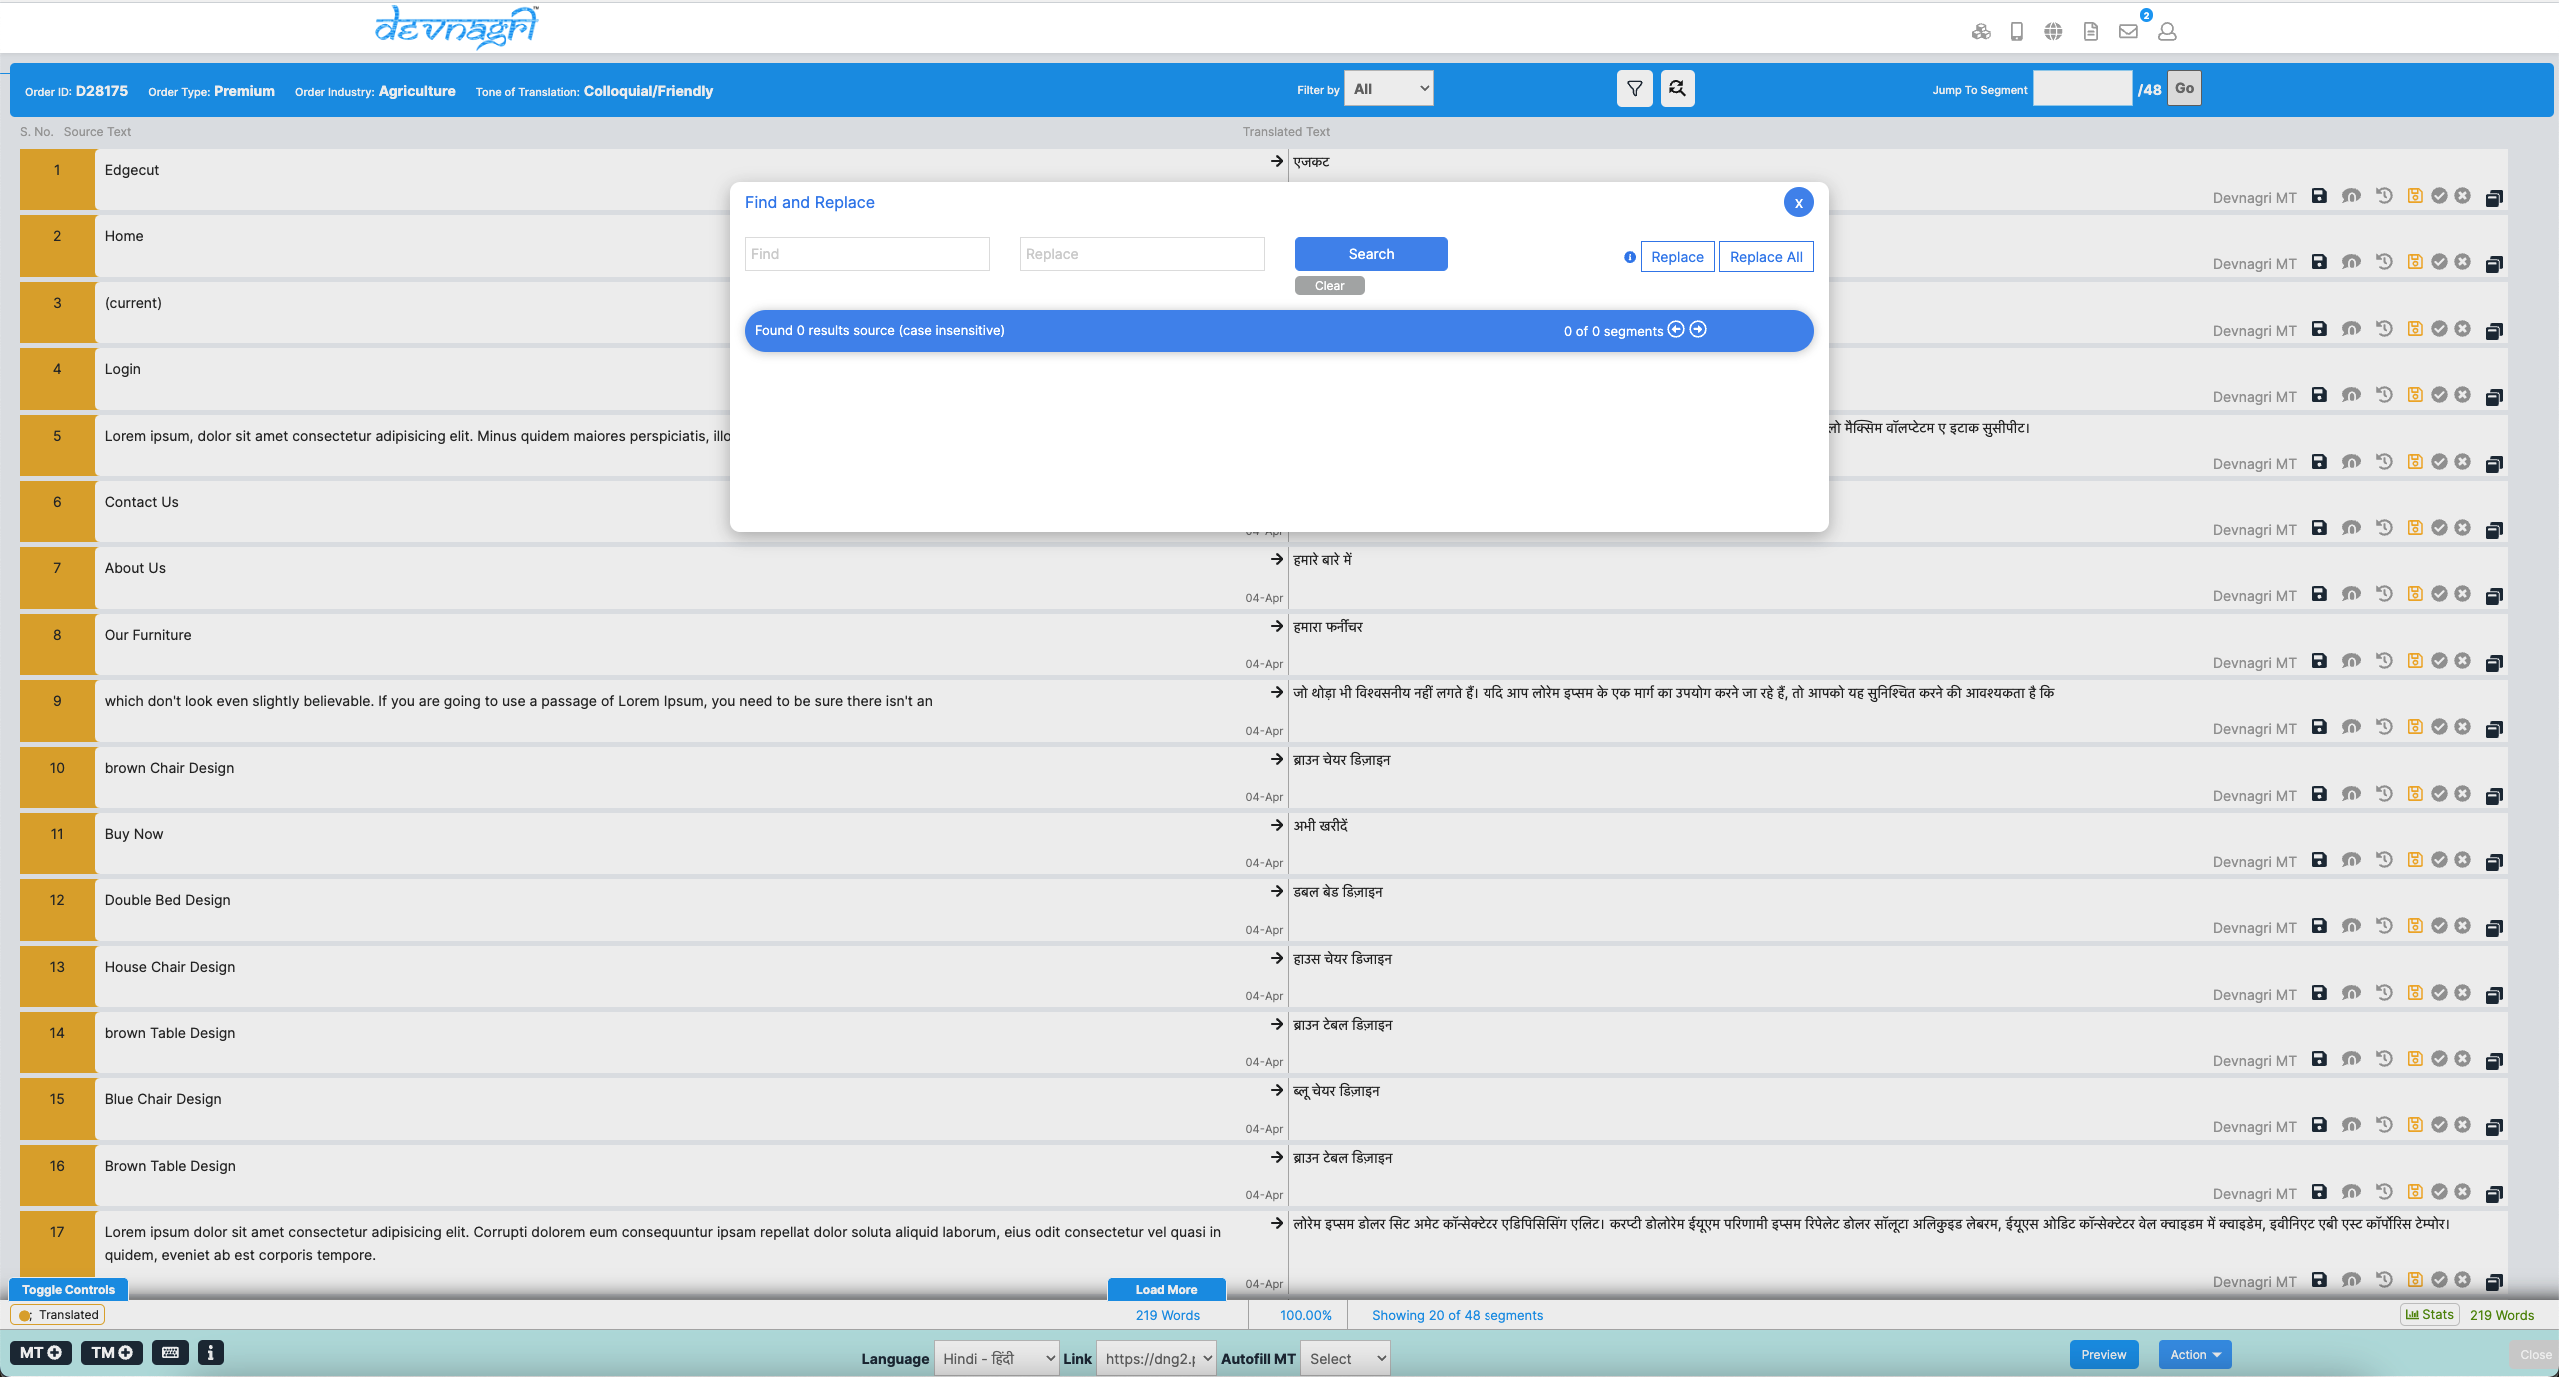
# Find And Replace
Find segment text and replace (in the translations) using this option. There is also an option to do a Replace All.
# Jump to Segment
Jump to any segment within the order.

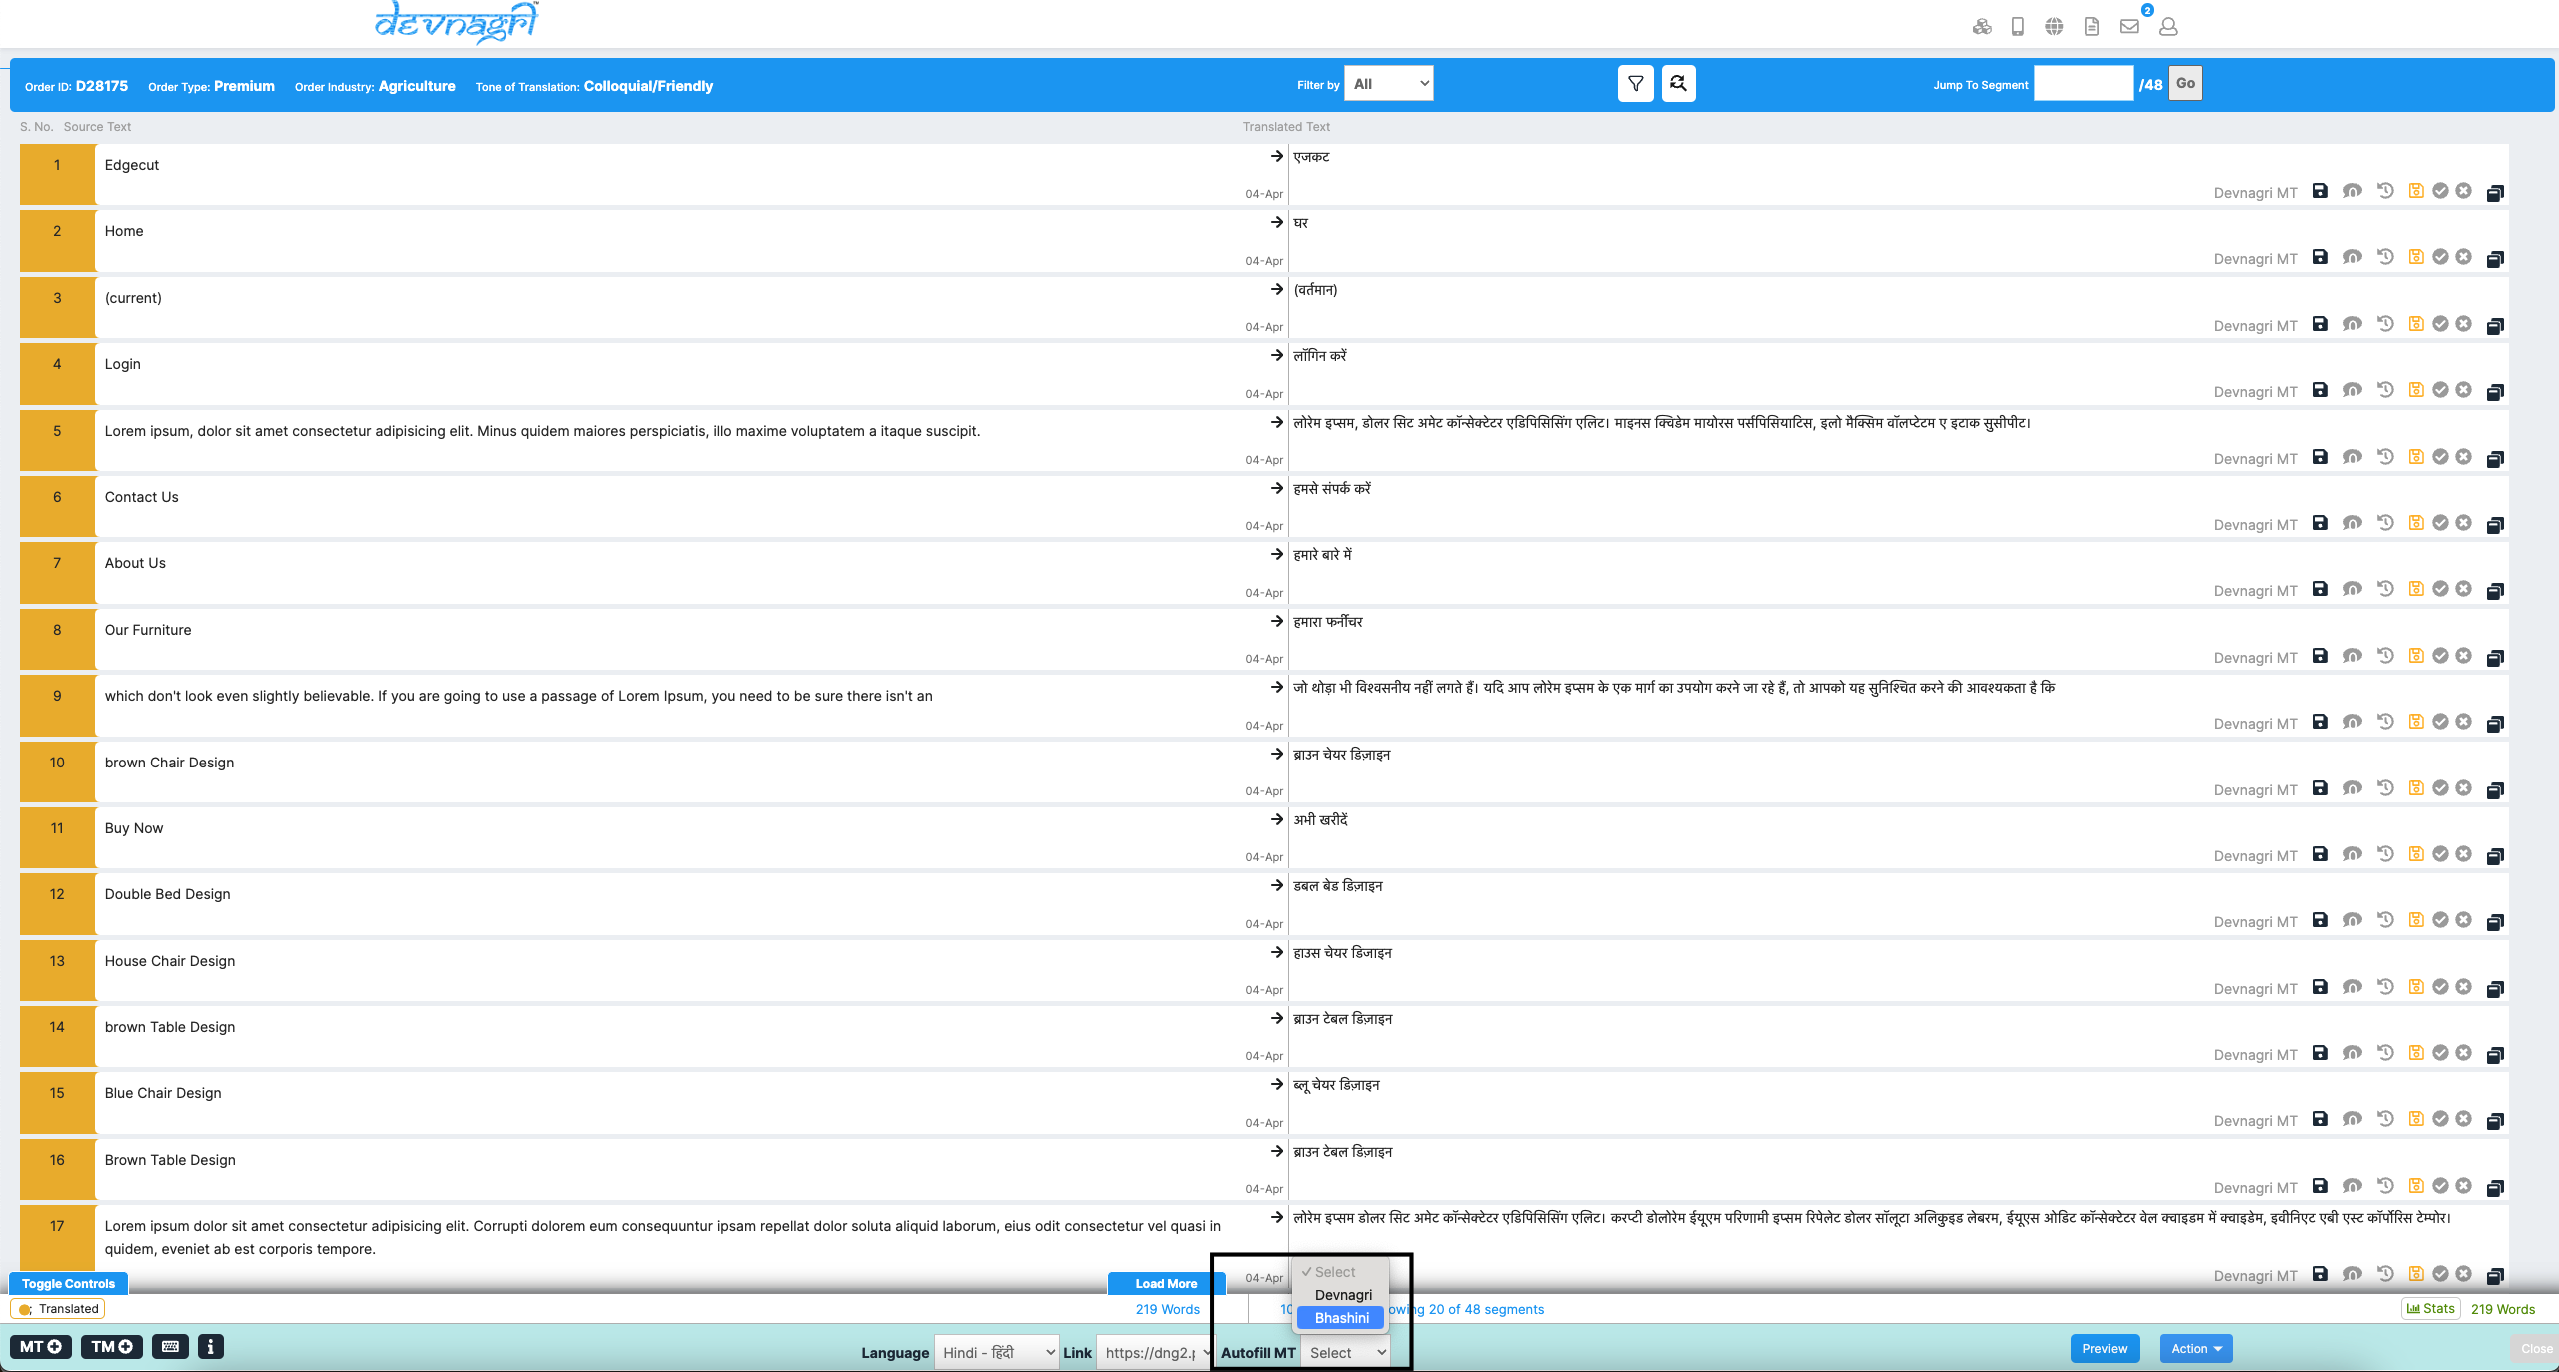
# Autofill MT
Automatically populate all untranslated segments with the chosen machine translation type.
# Preview
Preview the webpage in translated language once translation is completed.

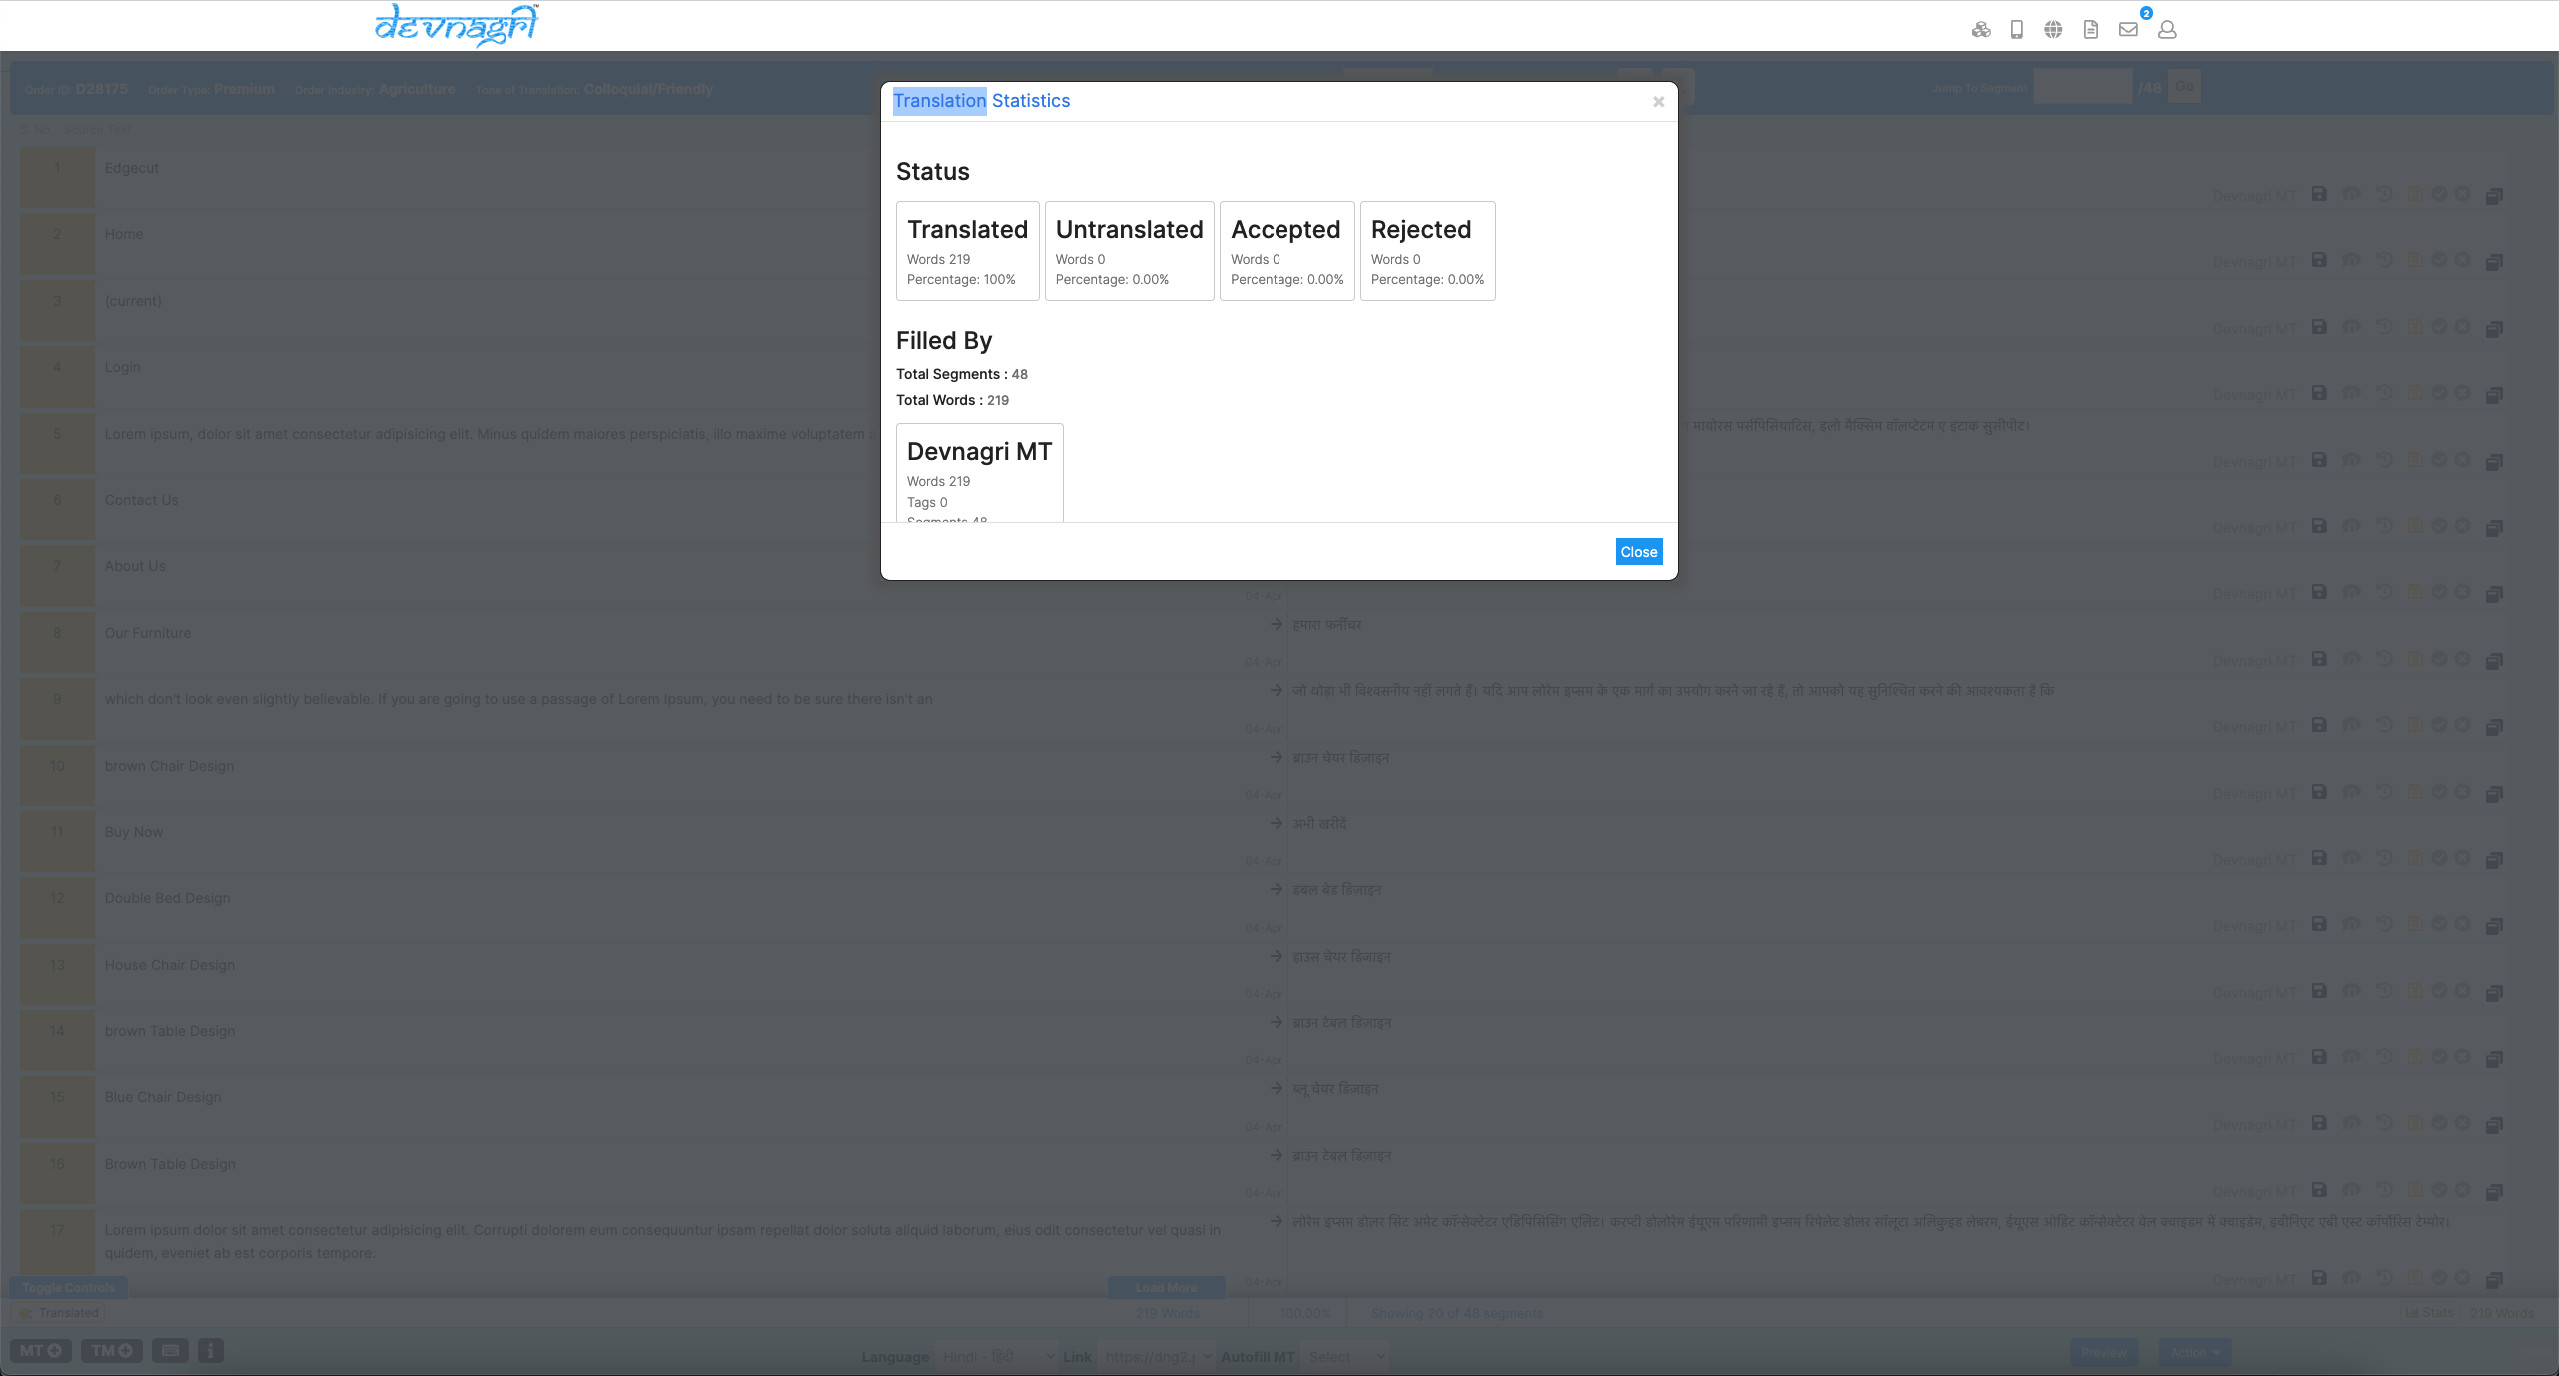
# Stats
Check Translation Statistics using this option.

# Settings
# Caching
# Custom Purge
# URLs Purge
Purge the cache of URLs. You can purge 5 URLs at a time. Remember to add one URL per line.

# Folder/Prefix Purge
Purge all the URLs of the specified folder.

# Domains
Purge all cached files of the specified domain.

# Purge Settings
Purge the settings data so that changes done for the localised website gets reflected.

# Bypass Cache
Please utilize this feature only if the website URL(s) remain the same before and after login.
User needs to specify the cookie name that will enable the system to identify whether the page cache should be bypassed.

# Query/Hash Params
If the site employs hash or query string parameters and you wish to determine whether each variant of URL(s) should be cached individually, please utilize the following section.

# Merge and Block
# Merge Folders
To merge msite or amp folders so that they do not show up repeatedly in the system. Please add comma seprated folder names. eg:- amp, msite etc.

# Blocked Keywords/URLs
For preventing blocked URLs to be stored in system. Please delete the malformed URLs once after adding them in the block list.

# Exclude Block
This option lets you block specific sections on the website from being translated. User needs to mention class or div that he/she do not want to translate.

# SEO Crawling
When set to "ON," this feature allows GoogleBOT and any other BOT to start crawling and indexing the localized website. Keep it OFF during the integration to ensure Google does not crawl any incorrect/incomplete localised page.

# Object Mapping
Any embedded object on the main site will be replaced by the localised ver by providing the URLs of the images.
- English URL - Object URL on the main site.
- Language - Localised language.
- Localised URL - Object URL for the localised site.
Note:- This feature can be used for localising images, documents, presentations, spread sheets etc.

# Iframes
Specify iframe IDs that you want to localise.
Limitation - Mentioned iframes should exist across the site.
Please add comma separated iframe ids, for eg:- iframeid1, iframeid2 etc.

# Hreflang Tags
Please add hreflang tags in your source code. These tags let Google know you have different language versions of the same page and thus allow indexing of these pages. You can find these hreflang tags in the head tag of your website source code. This ensures you don't need to edit your sitemap.

# Purge Cache
# 1. Clear Cache of a Single URL
POST 'https://dns.devnagri.com/page-cache/clear-url'
{
    "english_url" : "https://fourtek.com/"
}
# Request Parameters
The request requires input in the json data
| Key | Sample value | Description |
|---|---|---|
| url | "https://fourtek.com/" | URL for purging |
# 2. Clear Cache of Complete Domain
POST 'https://dns.devnagri.com/page-cache/clear-domain'
{
    "domain" : "https://fourtek.com"
}
# Request Parameters
The request requires input in the json data
| Key | Sample value | Description |
|---|---|---|
| domain | "https://fourtek.com" | URL of domain for purging |